
User-Defined Workflows in Next.js with Sanity and Inngest
Joel Hooks· 10/6/2023 (Updated: 1/7/2026) · 10 min read
Inngest makes it simple to define workflows in your Next.js applications, but by default changing/customizing the workflows can require code changes, pull requests, and deploys. In many situations this is fine, and updating and maintaining the workflow processes is the job of the developer on your teams.
Sometimes hard coded workflows aren’t what you want.
Other teams and stakeholders want to be able to customize, create, and manage particular workflows without the need to constantly engage with development and engineering teams.
This is where excellent tools like Zapier and Make enter the ecosystem, but these “no-code” tools are external and can be challenging to integrate in your domain and development environment. In many situations, introducing an external service is not desirable or even possible.
The question becomes:
_“How do I provide my users the ability to create and maintain no-code workflows in an entirely controlled environment?” _
There are multiple aspects to consider if you want to provide your users with a consistent experience authoring and editing their own workflow.
- User Interface (UI): This is non-trivial and requires a lot of thinking from the most basic list to a full on drag-and-drop diagram style UI.
- Dynamic Durable Workflow Execution: This is also a significant challenge, particularly if you want to build from scratch. Queues, persisted state, retries, concurrency, observability, and execution. It’s… a lot.
If you’re just getting started, a simple solution that you can iterate on over time is the smartest move. You want to build something quickly, ship it, gather feedback, and make improvements over time. This is true in most software development, of course, but developing this sort of bespoke solution can be an endless black hole and what you likely want to avoid is spending 6-12 months crafting the perfect solution, only to find out it wasn’t what your stakeholders actually need.
Instead, we are going to skip past the hardest parts, and use two tools to rapidly develop and deploy something that users can start using tomorrow (instead of a year from now).
Here’s the code on Github if you want to dig into that directly.
For this example we will use Sanity for our database and end-user UI, Inngest to handle all the sticky queuing and durability issues with execution, and Next.js to handle serving and running our serverless functions for each step of the workflow.
The Basic Setup
To get started you’ll need a few things in place.
- Your free Sanity account
- A Next.js application
- Inngest and Sanity integrated into your Next.js application
Here’s a quick 10 minute video to get your Next.js app setup with Inngest.
Once that is setup, you can run npm create sanity@latest inside your Next.js app to bootstrap Sanity. If you’d like to skip ahead, here is the code for the completed example on Github. Note that you’ll want to change the Sanity project ID to match your own project! This will run, but to access Sanity Studio and create or edit workflows, you’ll need your own account.
A Simple Data Model Workflows
Design a workflow system, or any non-trivial software system, one starting point is to consider the underlying structure of the data that we want to create that will drive decisions about UI and execution of the functionality we are creating.
Take a look at this full-featured workflow data model example from Budibase:
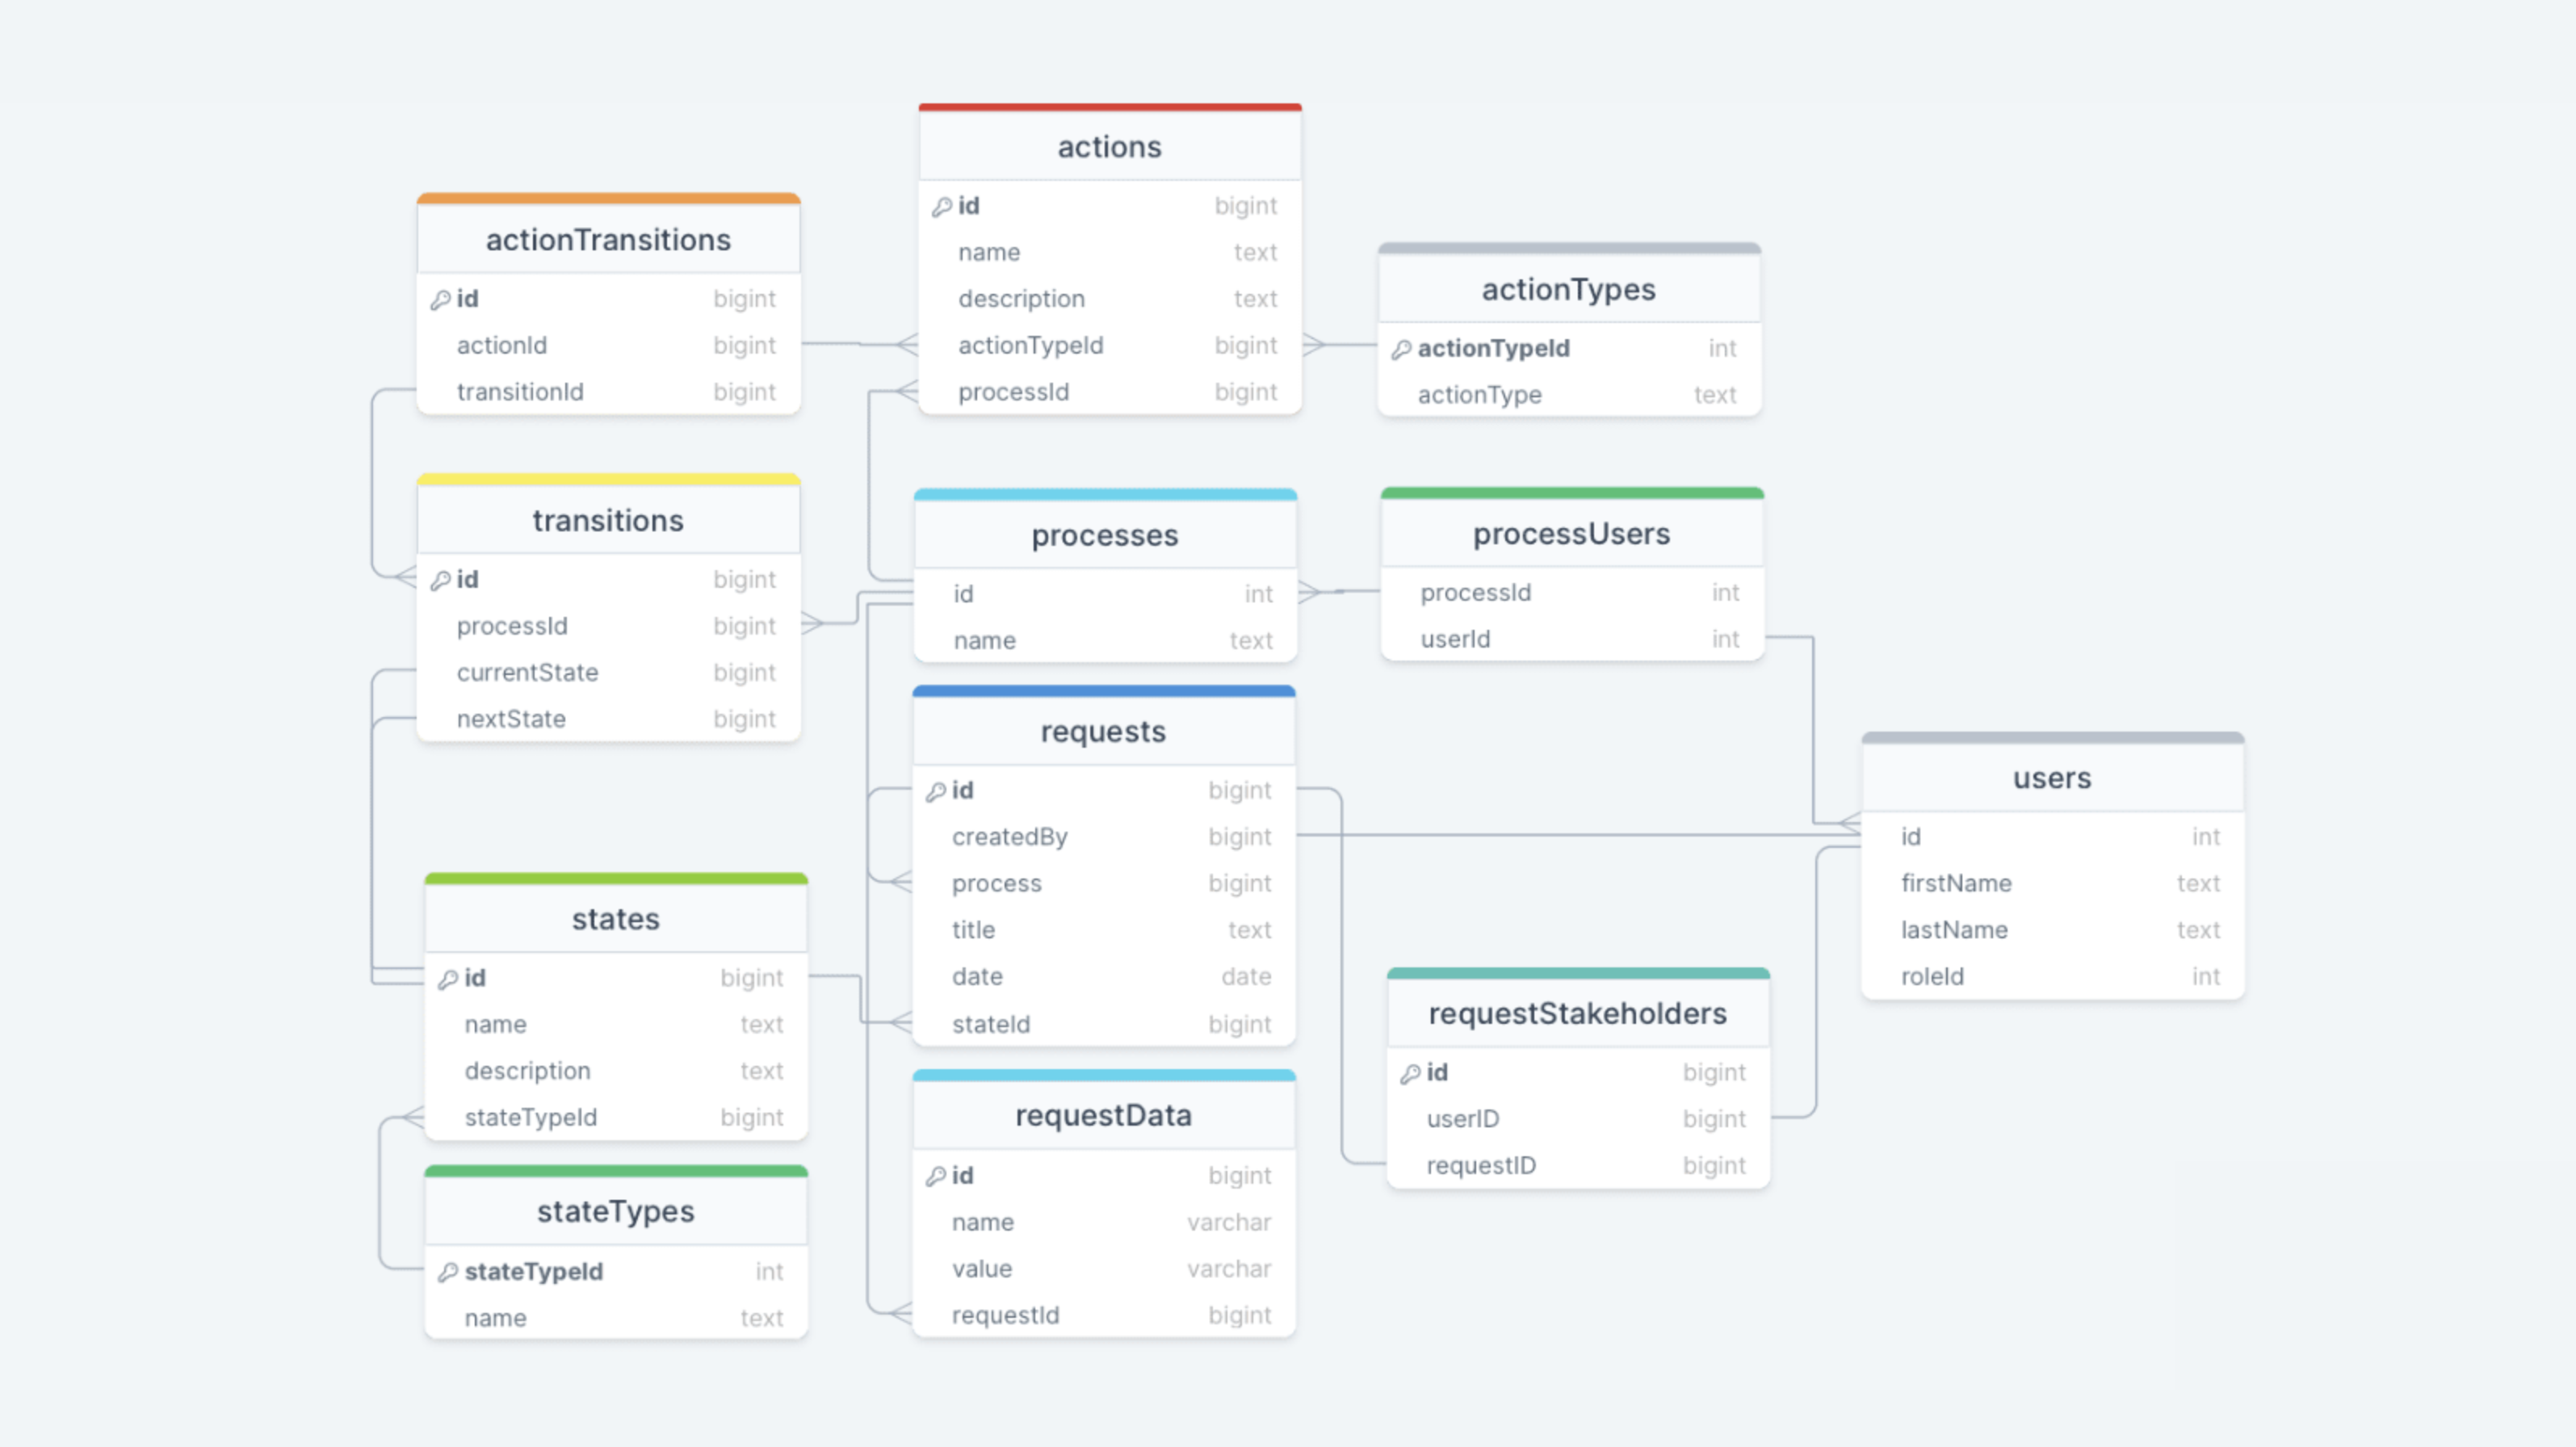
In a robust production system, this is a very solid shape for the data model. It should give you an idea of how you might start to think about modeling a user-defined workflow system. They explain it step by step and if you are building a proper workflow system, I’d definitely recommend studying the article in depth.
For the example here, you can simplify this quite a bit to include these two elements:
- Workflows: the workflow process is the heart of the data model. It’s the structure at the center. This makes sense because we are designing a system for “user-defined workflows”.
- Actions: the individual actions that the workflow executes in a specific order.
Keeping it simple means that our example won’t be as flexible, but should give a good idea about how to iterate to the more robust data model above.
Implementing the data model in Sanity
Sanity describes itself as a Composable Content Cloud, which in simplified terms means it’s a Content Management System (CMS), and even simpler terms it’s a database.
Sanity is interesting for implementing a user-defined workflow system because it gives us an easily managed schema and a very nice UI that stakeholders can use to build and maintain the workflows that they need.
Here’s the workflow schema:
import {defineField, defineType} from 'sanity'

export default defineType({
    name: 'workflow',
    type: 'document',
    title: 'Workflow',
    fields: [
        defineField({
            name: 'title',
            title: 'Title',
            type: 'string',
            validation: (Rule) => Rule.required(),
        }),
        defineField({
            name: 'trigger',
            title: 'Trigger',
            type: 'string',
            validation: (Rule) => Rule.required(),
        }),
        defineField({
            name: 'accountId',
            title: 'Account ID',
            type: 'string',
            validation: (Rule) => Rule.required(),
        }),
        defineField({
            name: 'actions',
            title: 'Actions',
            type: 'array',
            of: [{type: 'delay'}, {type:'filter'}, {type: 'sendEmail'}, {type: 'slack'}]
        })
    ]
})
It’s very simple providing a title, trigger, account ID, and a predefined set of actions that can be added to an array.
When deployed, this is what the workflow looks like in Sanity:
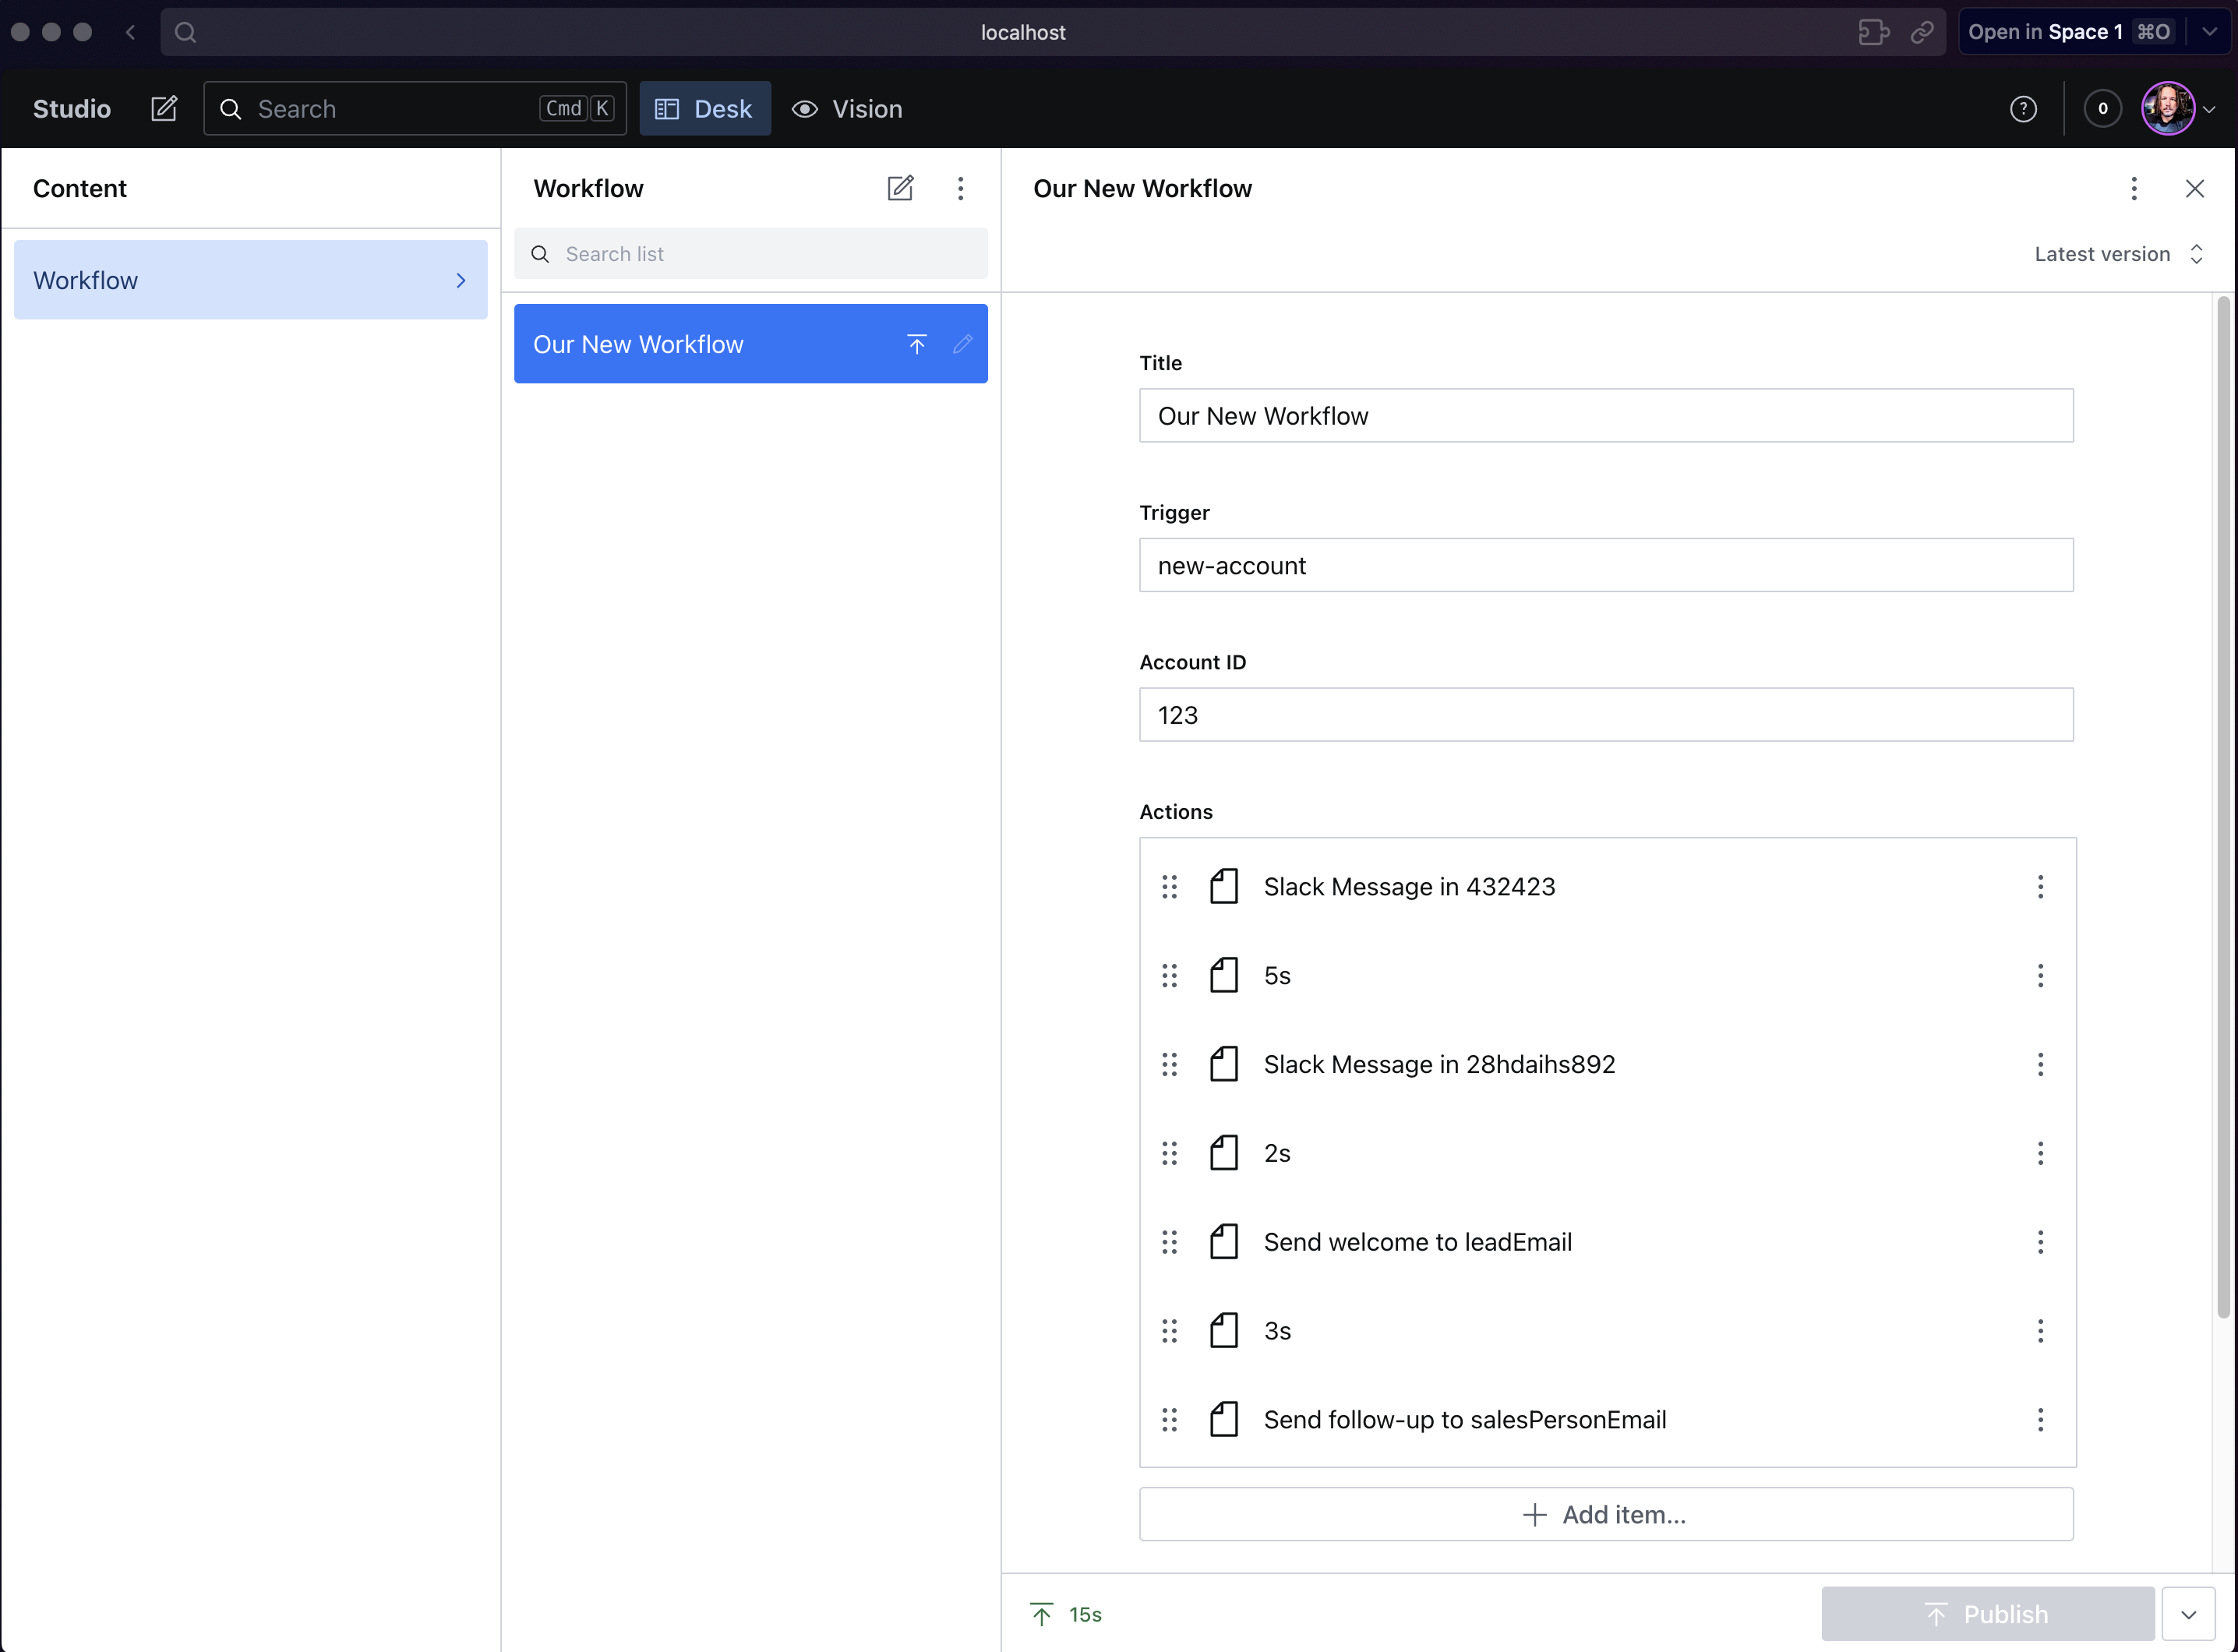
Clean and easy to manage. Each action can be reordered with drag-and-drop, edited, and deleted visually. The account ID field is optional, so a default workflow could be defined, and the trigger allows you to define different workflows for various processes that might be available for your users.
The schemas for individual actions are similar:
import {defineField, defineType} from 'sanity'

export default defineType({
    name: 'delay',
    type: 'object',
    title: 'Delay',
    fields: [
        defineField({
            name: 'duration',
            title: 'Delay Length',
            type: 'number',
            validation: (Rule) => Rule.required(),
        }),
        defineField({
            name: 'unit',
            title: 'Delay Unit',
            type: 'string',
            initialValue: 's',
            options: {
                list: [
                    {title: 'Second(s)', value: 's'},
                    {title: 'Minute(s)', value: 'm'},
                    {title: 'Day(s)', value: 'd'}
                ],
            },
        }),
    ],
    preview: {
        select: {
            duration: 'duration',
            unit: 'unit',
        },
        prepare(selection) {
            const {duration, unit} = selection
            return {
                title: `${duration}${unit}`
            }
        },
    },
})
In this example only delay, filter, send-mail, and slack have been defined, but the variety of actions is boundless in practice and can be tuned to suit the needs of your business domain.
Executing the Workflow in Serverless Functions with Next.js
Sanity is your database and let’s you setup, create, and edit workflows and actions in a quick and simple way, but Sanity cannot execute the functions or do the actual work required to perform these actions for your users.
While Inngest will work great across many different systems, from Cloudflare and Lambdas to your own traditional long-running express servers, for this example we are taking the straightforward approach using Next.js which makes writing and deploying serverless functions relatively simple.
Assuming that you’ve got Inngest setup, you can jump right in to the function that will execute the workflow and dig into the details:
export const newAccount = inngest.createFunction(
  {id: 'new-account', name: 'New Account Created'},
  {event: 'marketing/new-account'},
  async ({event, step}) => {
    const {accountId = 'default'} = event.data

    const workflow = await step.run('load workflow from sanity', async () => {
      return sanityClient.fetch(
        `*[_type == "workflow" && trigger == "new-account" && accountId == "${accountId}"][0]{title, _id, _type, trigger, accountId, "actions": actions[]}`,
      )
    })

    let shouldContinue = Boolean(workflow)

    while (shouldContinue && workflow.actions.length > 0) {
      const action = workflow.actions.shift()
      switch (action._type) {
        case 'delay':
          await step.sleep(`${action.duration}${action.unit}`)
          break
        case 'sendEmail':
          const sendToAddress = event.data[action.to]
          await step.run('send email', async () => {
            return sendEmail({
              to: sendToAddress,
              template: action.template,
              accountId,
            })
          })
          break
        case 'filter':
          shouldContinue = await step.run('filter', async () => {
            return (
              action.field &&
              event.data[action.field as string] === action.value
            )
          })
          break
        case 'slack':
          await step.run('send slack message', async () => {
            return postInSlack({
              channelId: action.channel,
              accountId,
              notificationType: event.data.status,
            })
          })
          break
        default:
          shouldContinue = false
      }
    }

    return {status: 'complete', workflow: workflow.title, accountId}
  },
)
This function is setup to run one workflow process and is directly associated to the new-account trigger in the example workflow above in Sanity Studio screenshot.
The first thing we do is load the workflow data from Sanity:
const workflow = await step.run('load workflow from sanity', async () => {
  return sanityClient.fetch(
    `*[_type == "workflow" && trigger == "new-account" && accountId == "${accountId}"][0]{title, _id, _type, trigger, accountId, "actions": actions[]}`,
  )
})
This gives us the metadata from the workflow as well as the array of actions that we want to perform.
The heart of the workflow is the conditional logic housed in this switch statement:
const action = workflow.actions.shift()
switch (action._type) {
case 'delay':
  await step.sleep(`${action.duration}${action.unit}`)
  break
case 'sendEmail':
  const sendToAddress = event.data[action.to]
  await step.run('send email', async () => {
    return sendEmail({
      to: sendToAddress,
      template: action.template,
      accountId,
    })
  })
  break
case 'filter':
  shouldContinue = await step.run('filter', async () => {
    return (
      action.field &&
      event.data[action.field as string] === action.value
    )
  })
  break
case 'slack':
  await step.run('send slack message', async () => {
    return postInSlack({
      channelId: action.channel,
      accountId,
      notificationType: event.data.status,
    })
  })
  break
default:
  shouldContinue = false
}
This logic cycles through all of the actions within the workflow’s actions array, plucking them off one by one, matching them to the appropriate type, and executing the desired functionality.
If a step fails, Inngest will try it again.
When a step is complete, your Inngest dashboard will show you the results.
The entire workflow can take seconds or it can take weeks. Ingest will make sure that it keeps running and executing the steps as defined by your users until it is completed.
Run it yourself!
If you haven’t yet, clone the Github repository and run:
npm i
npm run dev
You can use yarn or pnpm also, the choice is yours!
Then you can visit http://localhost:3000 to see the app and http://localhost:8288/stream to see your Inngest dev server. From there you can click the button and observe as the workflow executes.
Now, change the Sanity project id in the .env file, and run sanity dev so that you can access your own Sanity Studio and play around with creating and editing workflows.
What's next from there? Hopefully this gives you some ideas! If you build something I'd love to see it so feel free to reach out on X.
AI-assisted local development with MCP (October 2025)
Since this article was published, the Inngest dev server has added support for MCP (Model Context Protocol), making it even easier to test and debug your user-defined workflows. You can now connect Claude Code, Cursor, and other AI assistants directly to your local Inngest functions to help with development and testing:
{
  "mcpServers": {
    "inngest-dev": {
      "command": "curl",
      "args": [
        "-X", "POST",
        "http://127.0.0.1:8288/mcp",
        "-H", "Content-Type: application/json",
        "-d", "@-"
      ]
    }
  }
}
AI assistants can now:
- Send test events and monitor executions
- Debug failed runs with full trace access
- Test entire workflows end-to-end automatically
- Search Inngest documentation offline
This is particularly useful when building and testing user-defined workflows, as AI assistants can help you iterate on workflow logic and debug issues without leaving your editor.