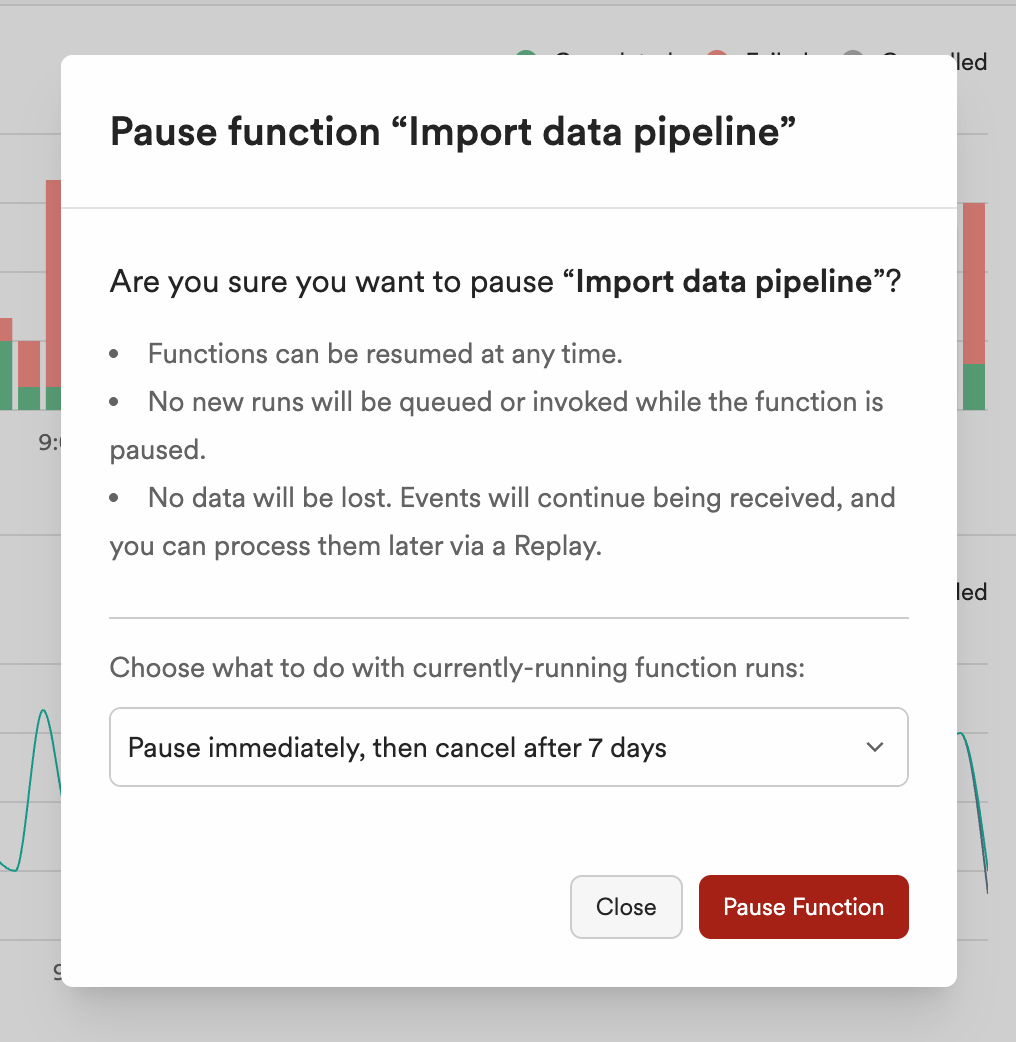
## Resuming a function
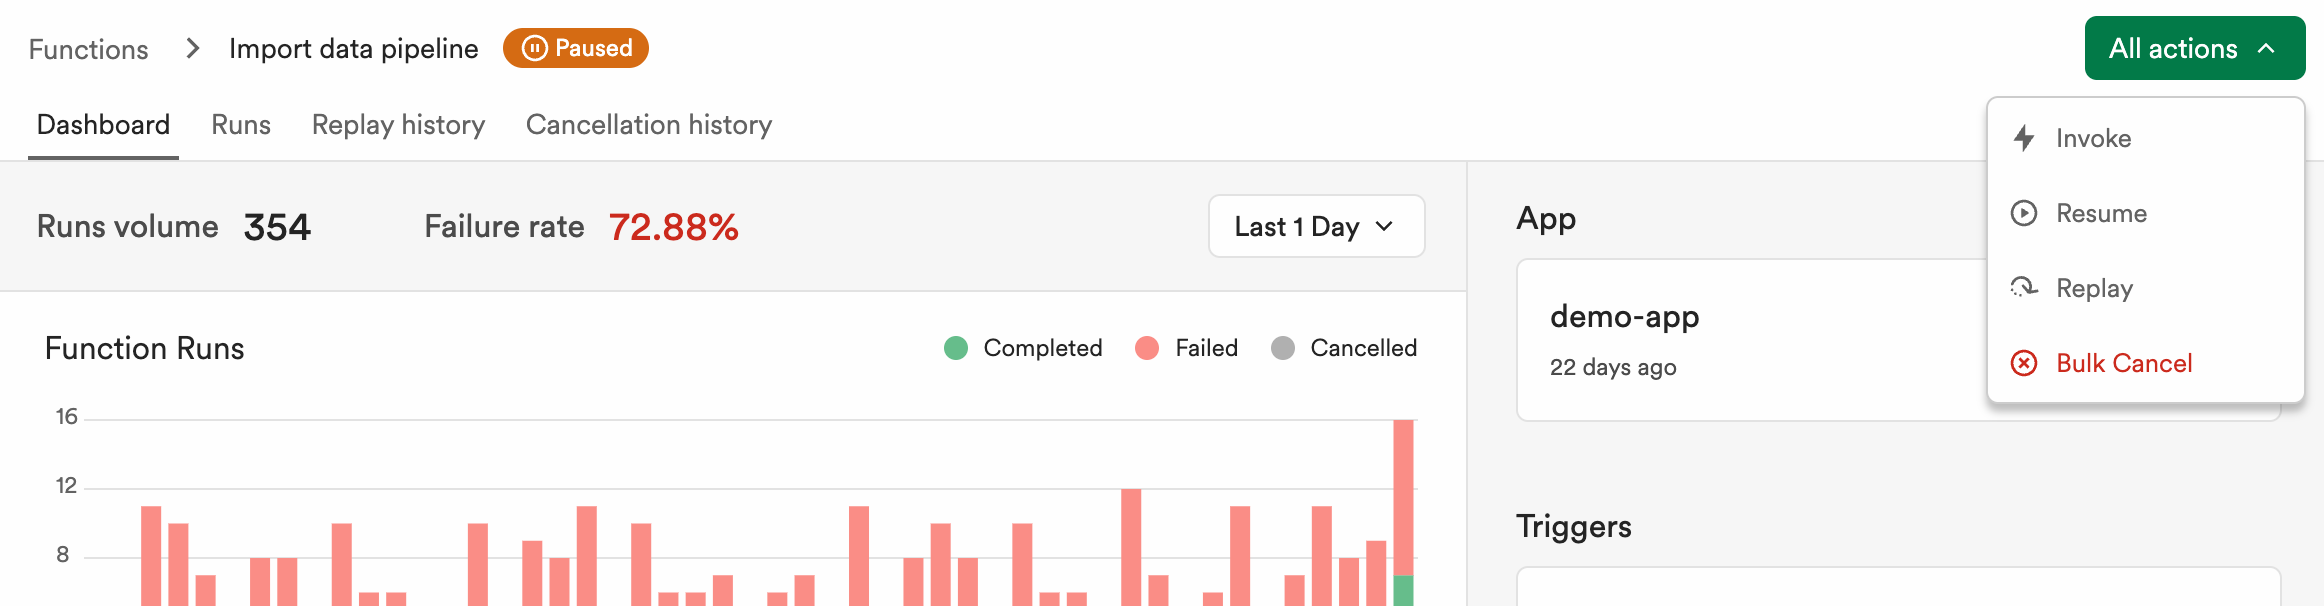
To resume a paused function, navigate to the function's page in Inngest Cloud and select the "Resume" option in the "All actions" menu from a function's dashboard.
The function will immediately begin processing events received after you resume it.
## Replaying skipped events
After resuming a paused function, you may wish to replay the runs for that function that would otherwise have run while it was paused. To do so:
1. Navigate to the function's dashboard
2. Select the "Replay" option in the "All actions" menu.
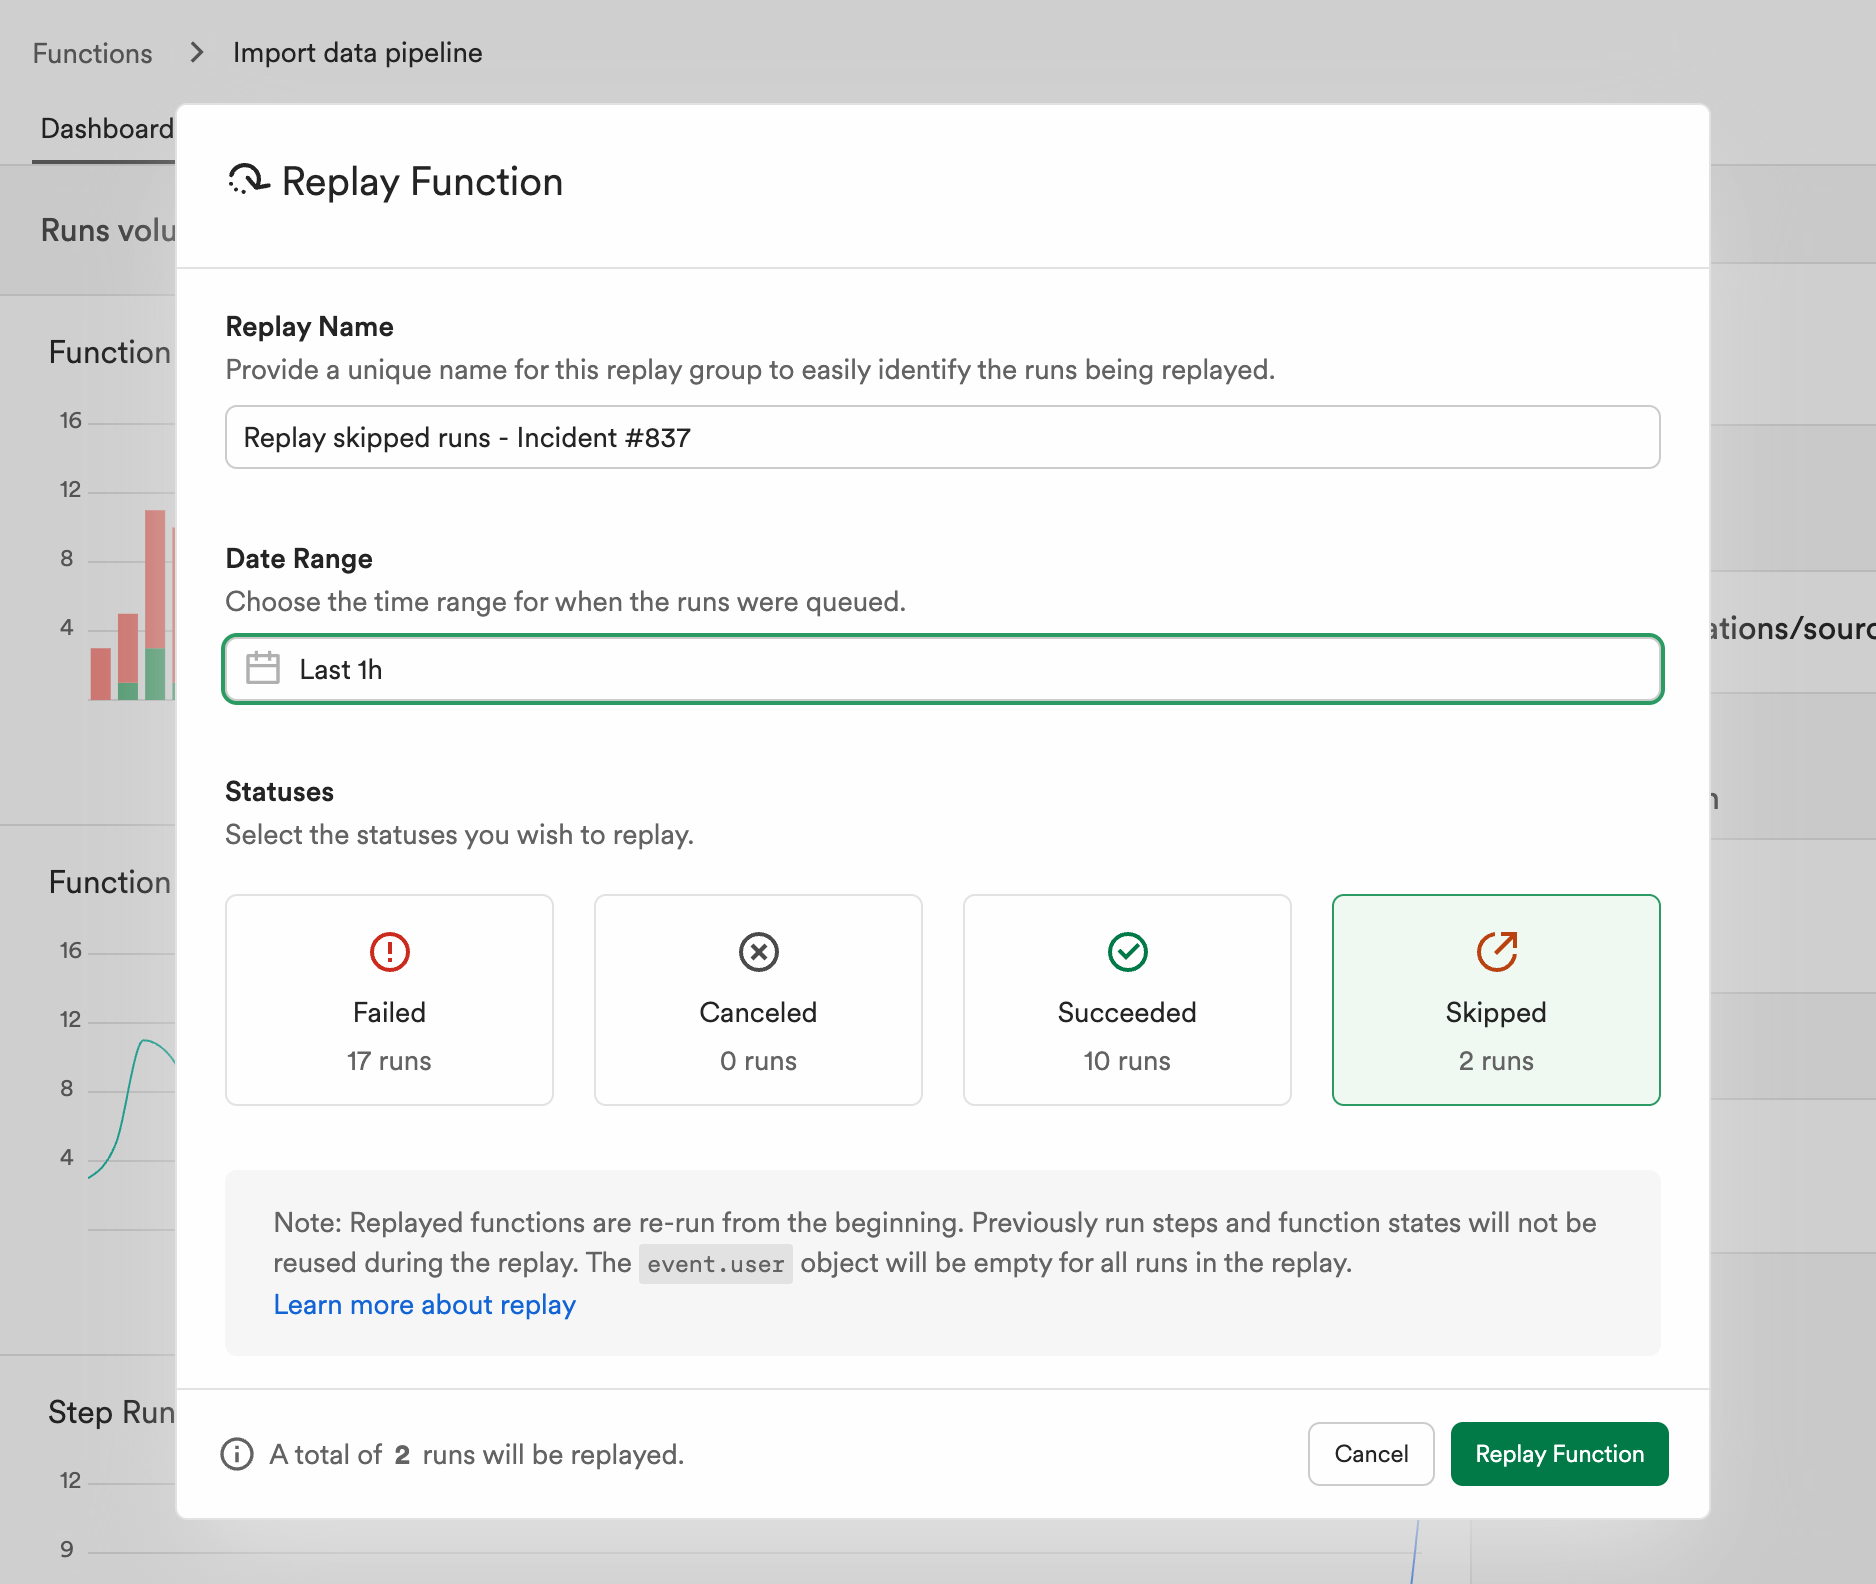
3. Select an appropriate date window and enable the "Skipped" status.
4. If you wish to replay runs that were canceled when you paused the function, select the "Canceled" status as well.
You'll see a preview of the number of runs to be replayed:
Remember that your plan's history limit still applies to events received while a function is paused. This means that if, for example, you're using Inngest's free plan, you will only be able to replay events from the last 3 days, regardless of how long your function was paused.
See our [Replay guide](/docs/platform/replay) for more information.
# Priority
Source: https://www.inngest.com/docs/guides/priority
Description: Dynamically adjust the execution order of functions based on any data. Ideal for pushing critical work to the front of the queue.'
# Priority
Priority allows you to dynamically execute some runs ahead or behind others based on any data. This allows you to prioritize some jobs ahead of others without the need for a separate queue. Some use cases for priority include:
* Giving higher priority based on a user's subscription level, for example, free vs. paid users.
* Ensuring that critical work is executed before other work in the queue.
* Prioritizing certain jobs during onboarding to give the user a better first-run experience.
## How to configure priority
',
to: [to],
subject,
react: content
});
if (error) {
throw error;
}
return data;
};
```
Now you're able to send emails! Let's put this new function to use.
The below example assumes that your application receives a `app/signup.completed` event when a new user signs up:
```tsx
inngest.createFunction(
{ id: 'send-welcome-email' },
{ event: 'app/signup.completed' },
async ({ event }) => {
event.data;
await sendEmail(user.email, "Welcome to Acme", (
Welcome to ACME, {user.firstName}
));
}
)
```
Now that we've mastered the basics of sending email with Resend from an Inngest function, you can build even more complex functionality.
## Sending a delayed follow-up email
Every Inngest function handler comes with an additional [`step` object](/docs/reference/functions/step-sleep-until) which provides tools to create more fine-grained functions. Using `step.run` allows you to encapsulate specific code that will be automatically retried ensuring that issues with one part of your function don't force the entire function to re-run. Additionally, [other tools like `step.sleep`](/docs/reference/functions/step-sleep) are available to extend your app's functionality.
The code below sends a welcome email, then uses `step.sleep` to wait for three days before sending another email offering a free trial:
```tsx
inngest.createFunction(
{ id: 'onboarding-emails' },
{ event: 'app/signup.completed' },
async ({ event, step }) => { // ← step is available in the handler's arguments
event.data
user
await step.run('welcome-email', async () => {
await sendEmail(email, "Welcome to ACME", (
Welcome to ACME, {firstName}
));
})
// wait 3 days before second email
await step.sleep('wait-3-days', '3 days')
await step.run('trial-offer-email', async () => {
await sendEmail(email, "Free ACME Pro trial", (
Hello {firstName}, try our Pro features for 30 days for free
));
})
}
)
```
This is handy, but we can do better. Since Resend sends you webhook events when emails are delivered, opened and clicked, you can build dynamic email campaigns tailored to each user's needs.
## Creating a dynamic drip campaign
Let's say you want to create the following campaign:
- Send every user a welcome email when they join.
- If a `resend/email.clicked` event is received (meaning the user has engaged with your email), wait a day and then follow-up with pro user tips meant for highly engaged users.
- Otherwise, wait for up to 3 days and then send them the default trial offer, but only if the user hasn't already upgraded their plan in the meantime.
```tsx
inngest.createFunction(
{ id: "signup-drip-campaign" },
{ event: "app/signup.completed" },
async ({ event, step }) => {
event.data;
user
"Welcome to ACME";
await step.run("welcome-email", async () => {
return await sendEmail(
email,
welcome,
Welcome to ACME, {user.firstName}
);
});
// Wait up to 3 days for the user open the email and click any link in it
await step.waitForEvent("wait-for-engagement", {
event: "resend/email.clicked",
if: `async.data.email_id == ${emailId}`,
timeout: "3 days",
});
// if the user clicked the email, send them power user tips
if (clickEvent) {
await step.sleep("delay-power-tips-email", "1 day");
await step.run("send-power-user-tips", async () => {
await sendEmail(
email,
"Supercharge your ACME experience",
Hello {firstName}, here are tips to get the most out of ACME
);
});
// wait one more day before sending the trial offer
await step.sleep("delay-trial-email", "1 day");
}
// check that the user is not already on the pro plan
db.users.byEmail(email);
if (dbUser.plan !== "pro") {
// send them a free trial offer
await step.run("trial-offer-email", async () => {
await sendEmail(
email,
"Free ACME Pro trial",
Hello {firstName}, try our Pro features for 30 days for free
);
});
}
}
);
```
Voilà! You've created a dynamic marketing drip campaign where subsequent emails are informed by your user's behavior.
## Testing webhook events using the Inngest Dev Server
During local development with Inngest, you can use the Inngest Dev Server to run and test your functions on your own machine. To start the server, in your project directory run the following command:
```bash
npx inngest-cli@latest dev
```
In your browser open [http://localhost:8288](http://localhost:8288/) to see the development UI.
To forward and quickly test events from Inngest Cloud to your Dev Server, head over to [Inngest Cloud](https://app.inngest.com/env/production/events). Choose **Events** tab from the nav bar. Select any individual event, choose **Logs** from the sidebar, and then select the **Send to Dev Server**.
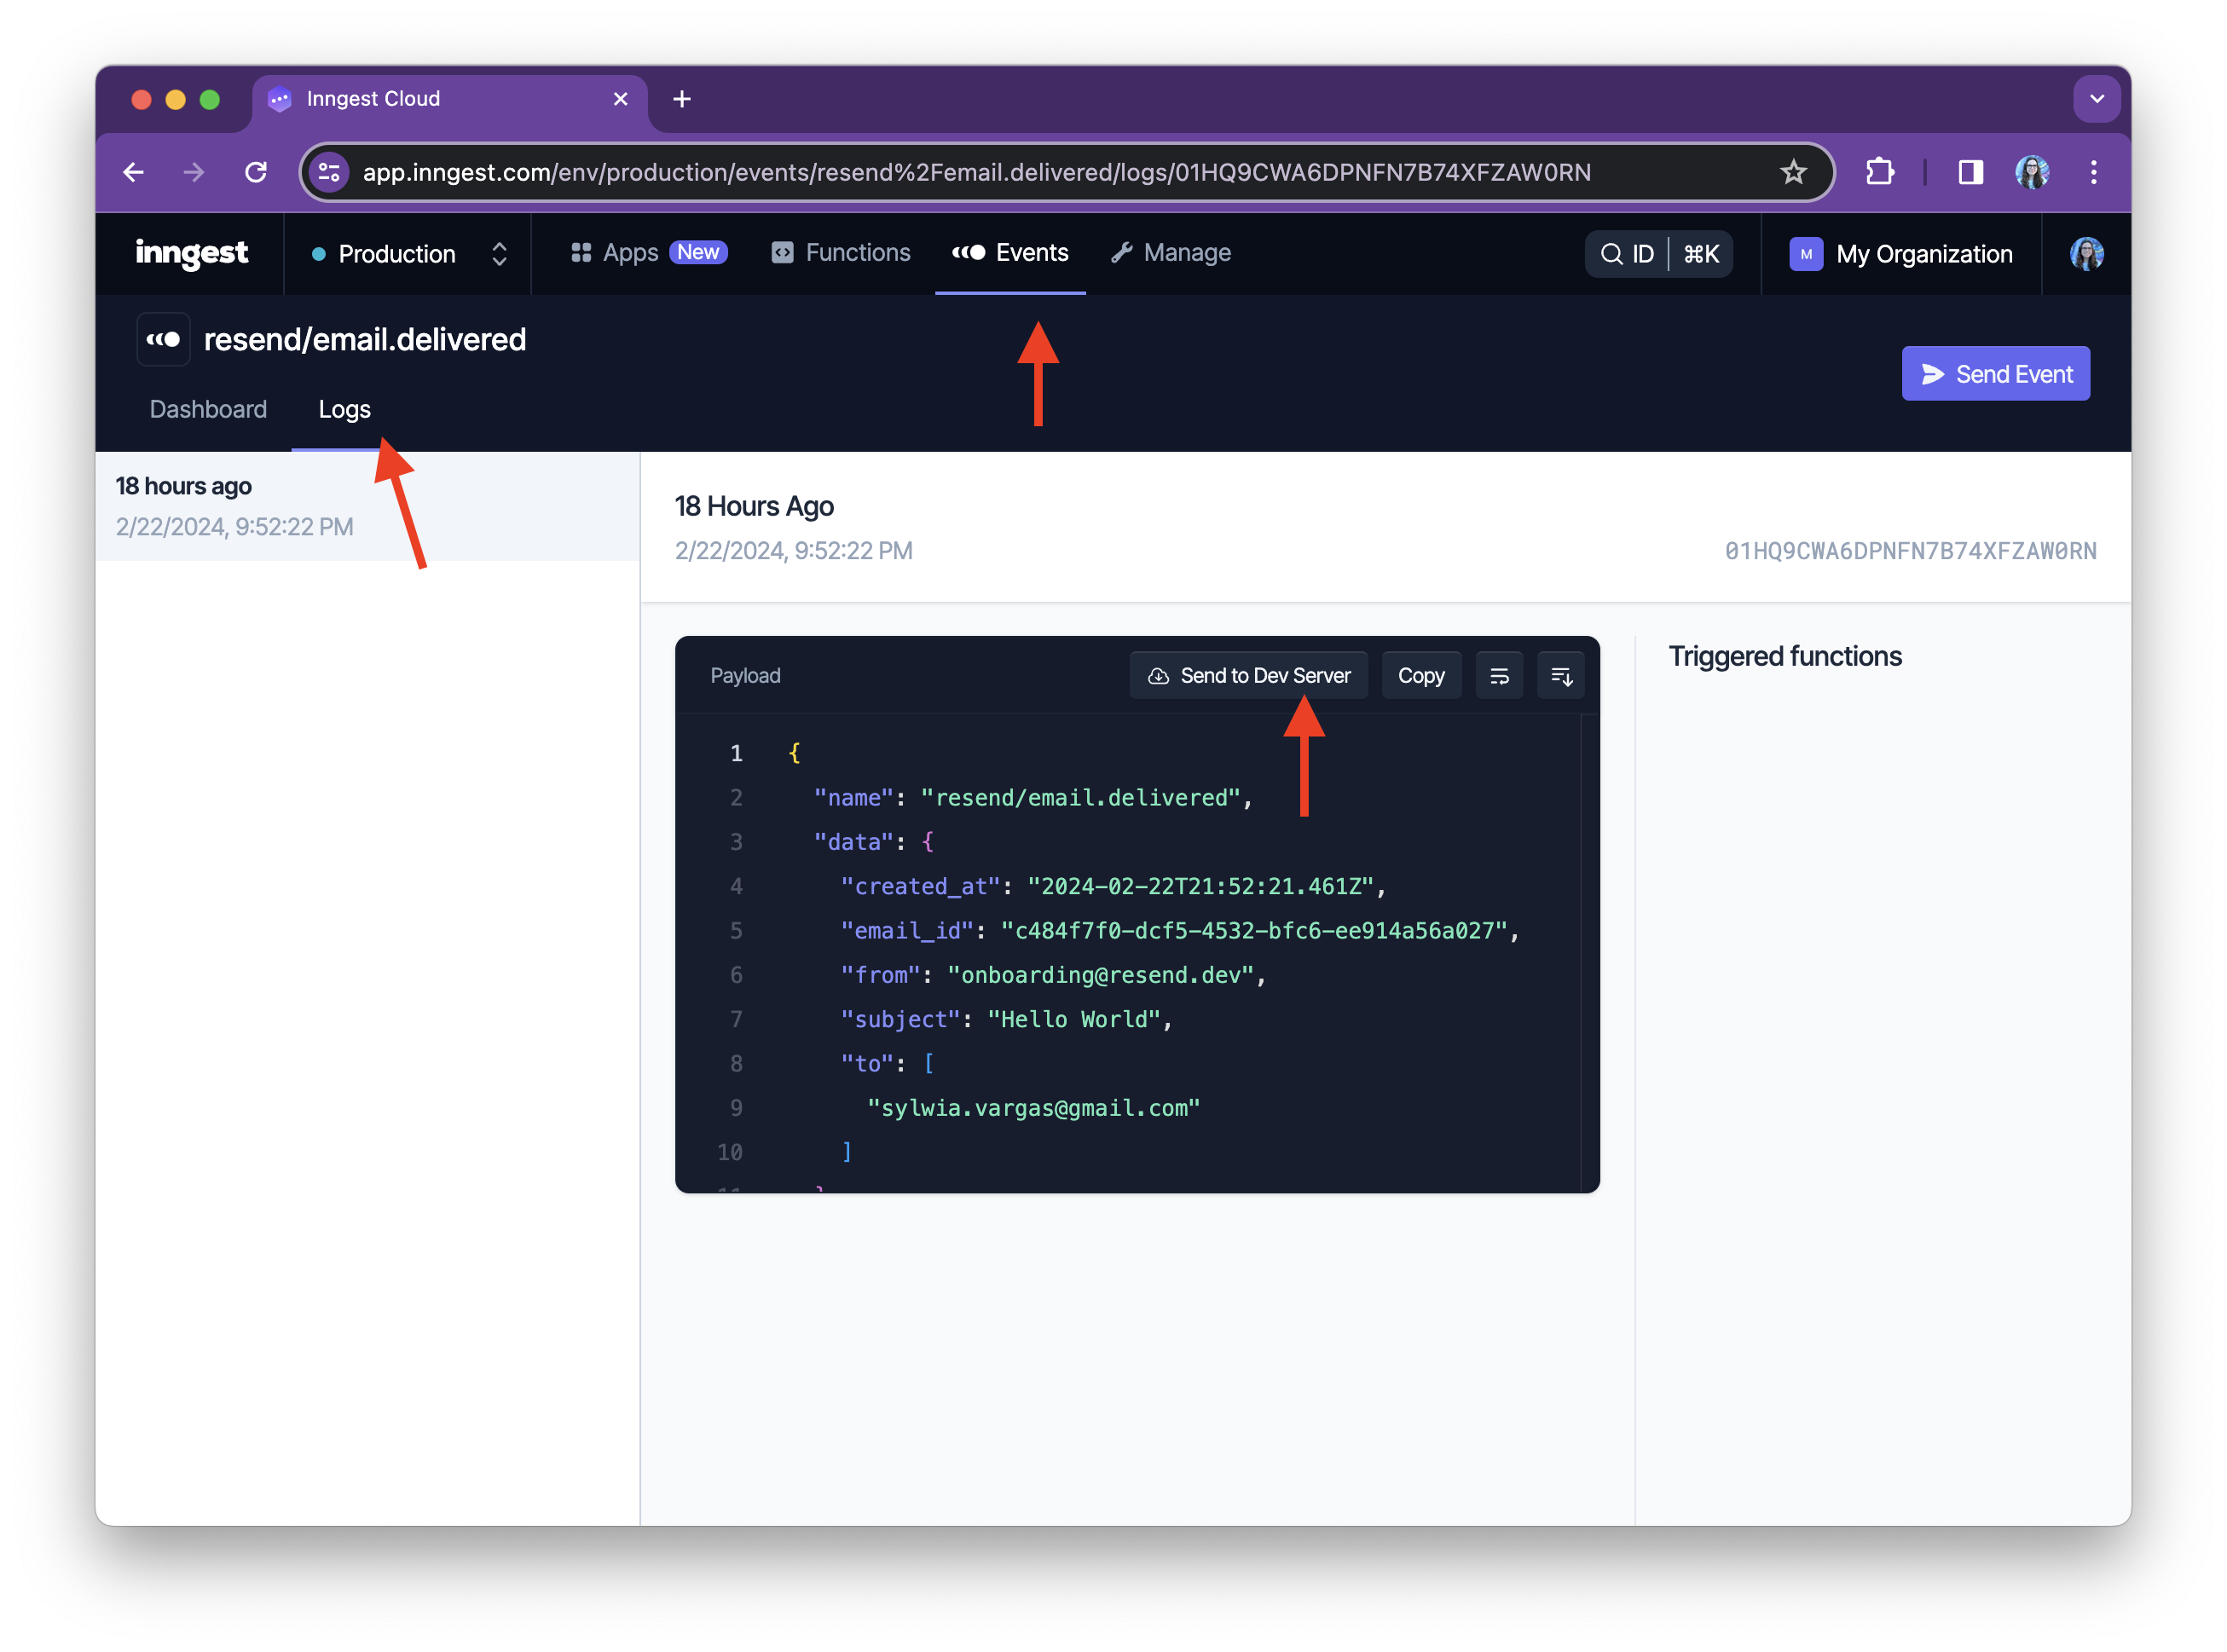
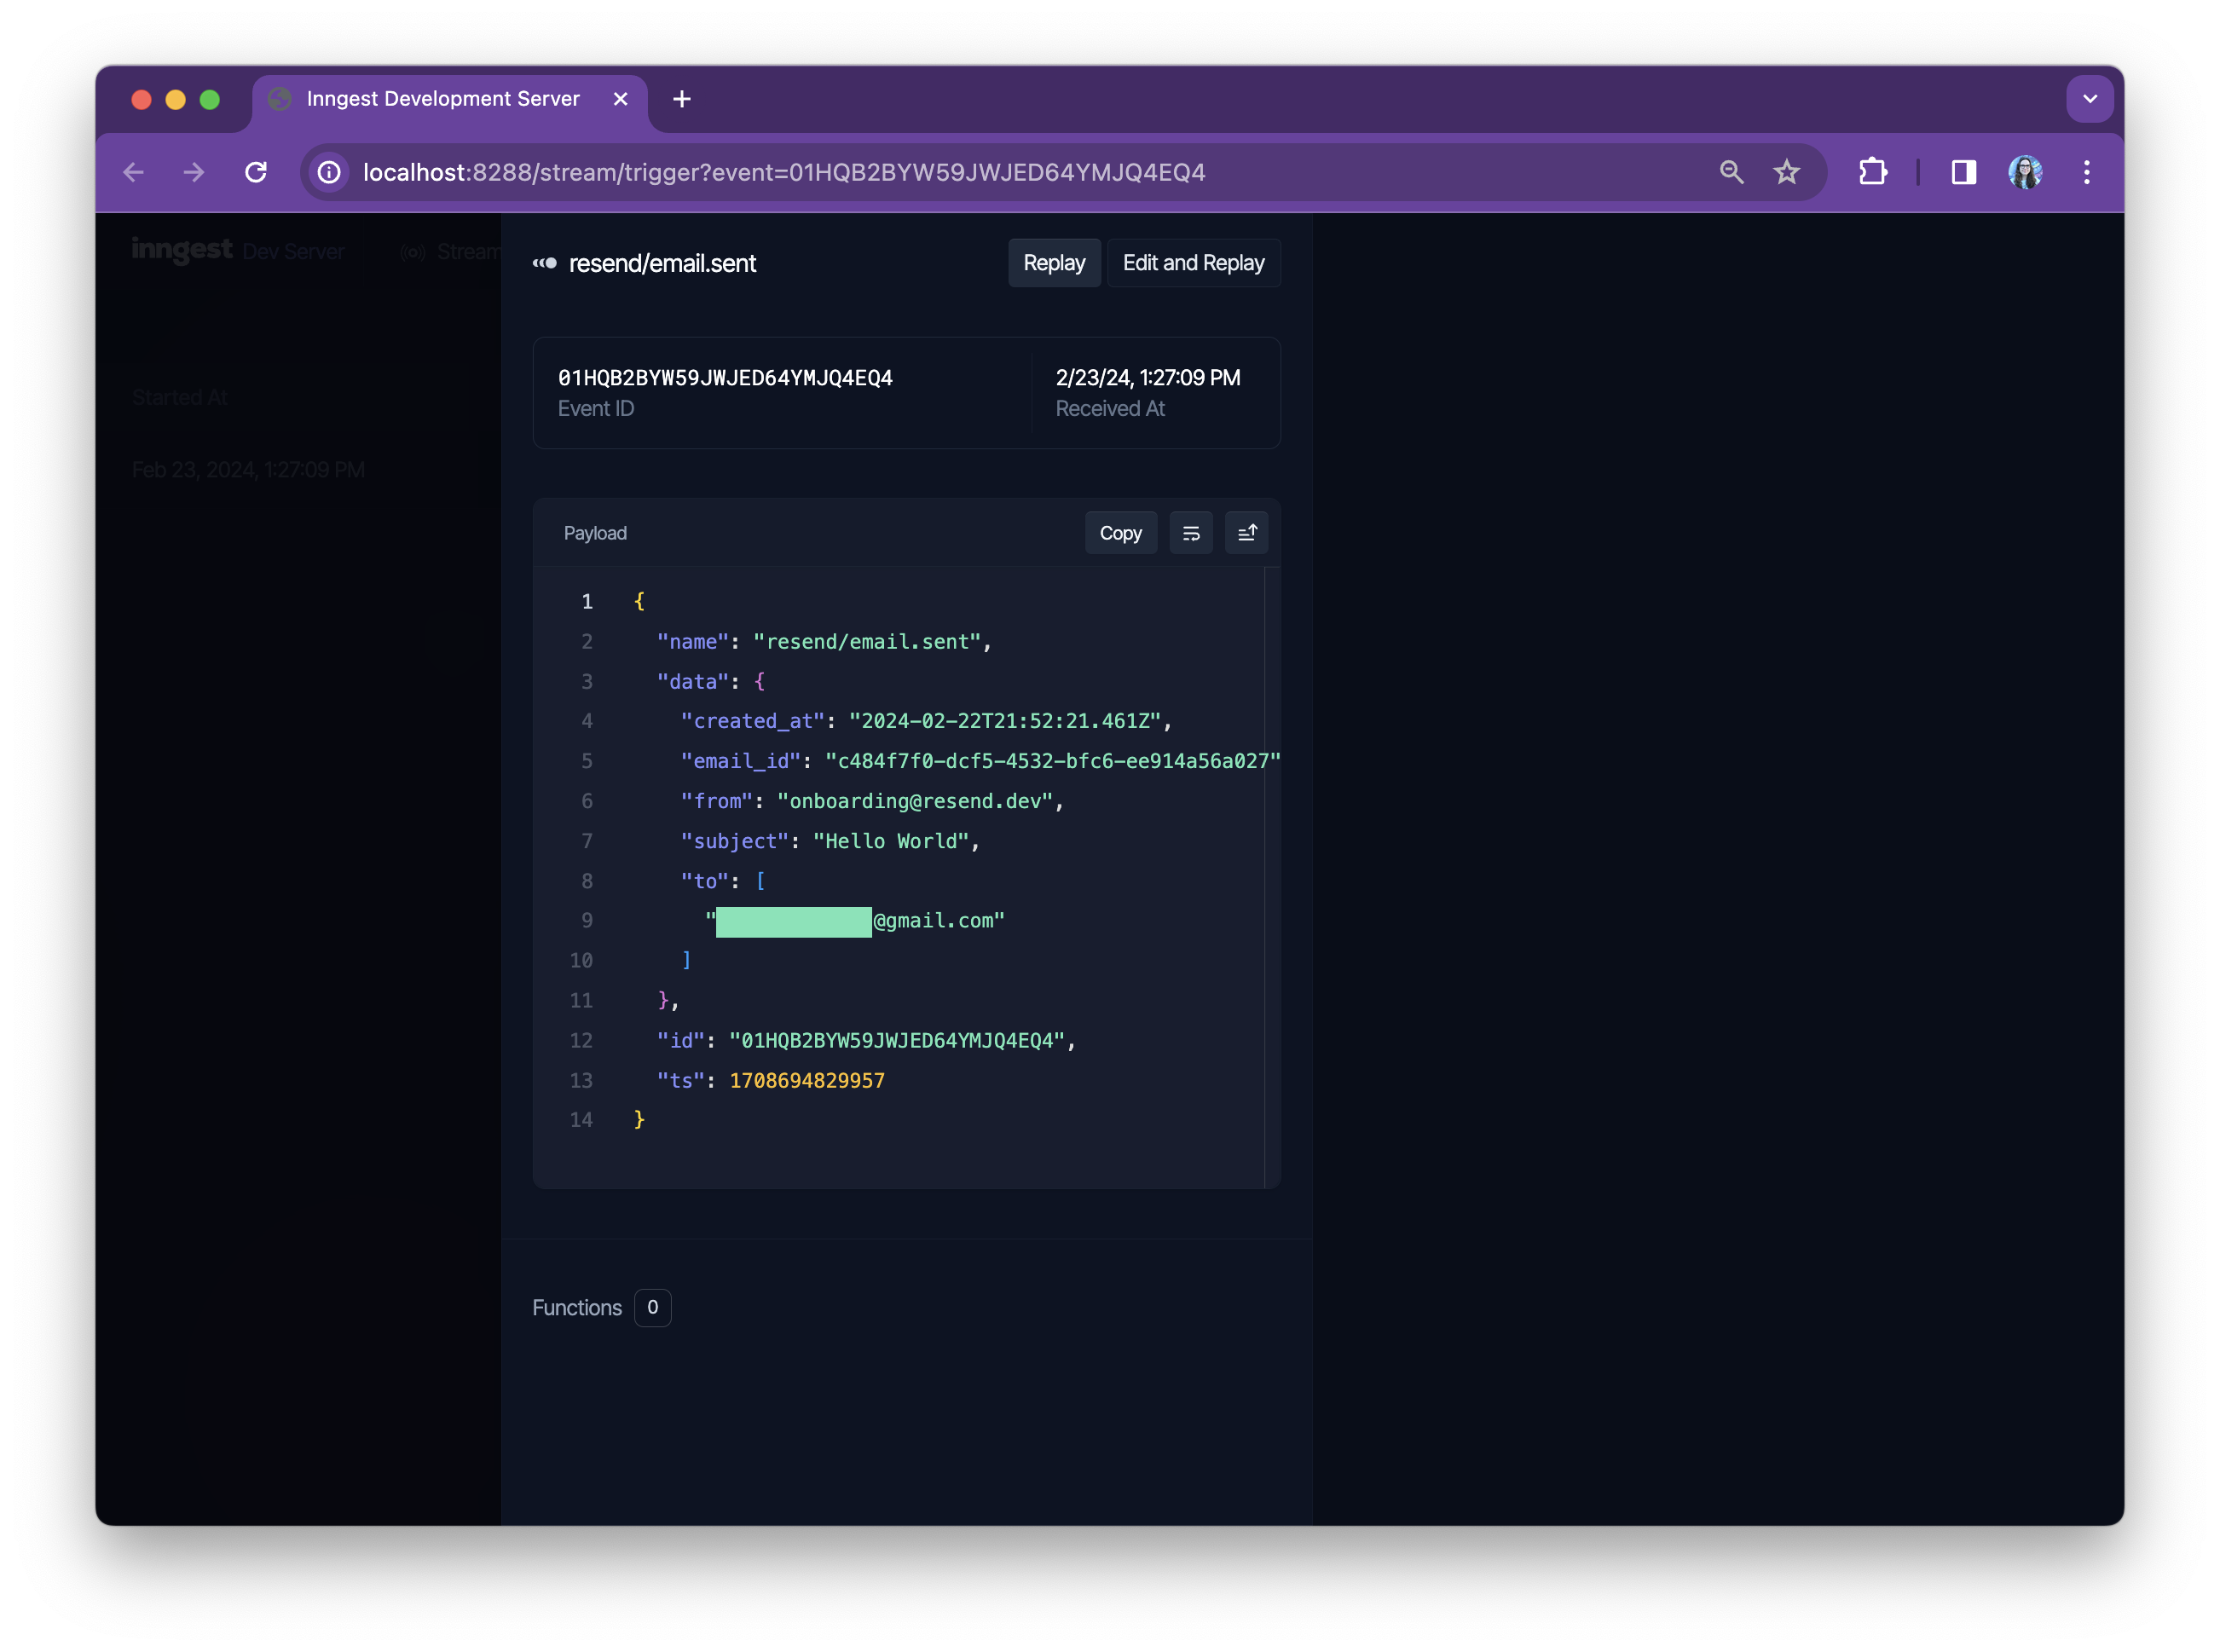
You'll now see the event in the Inngest Dev Server's **Stream** tab alongside any functions that it triggered.
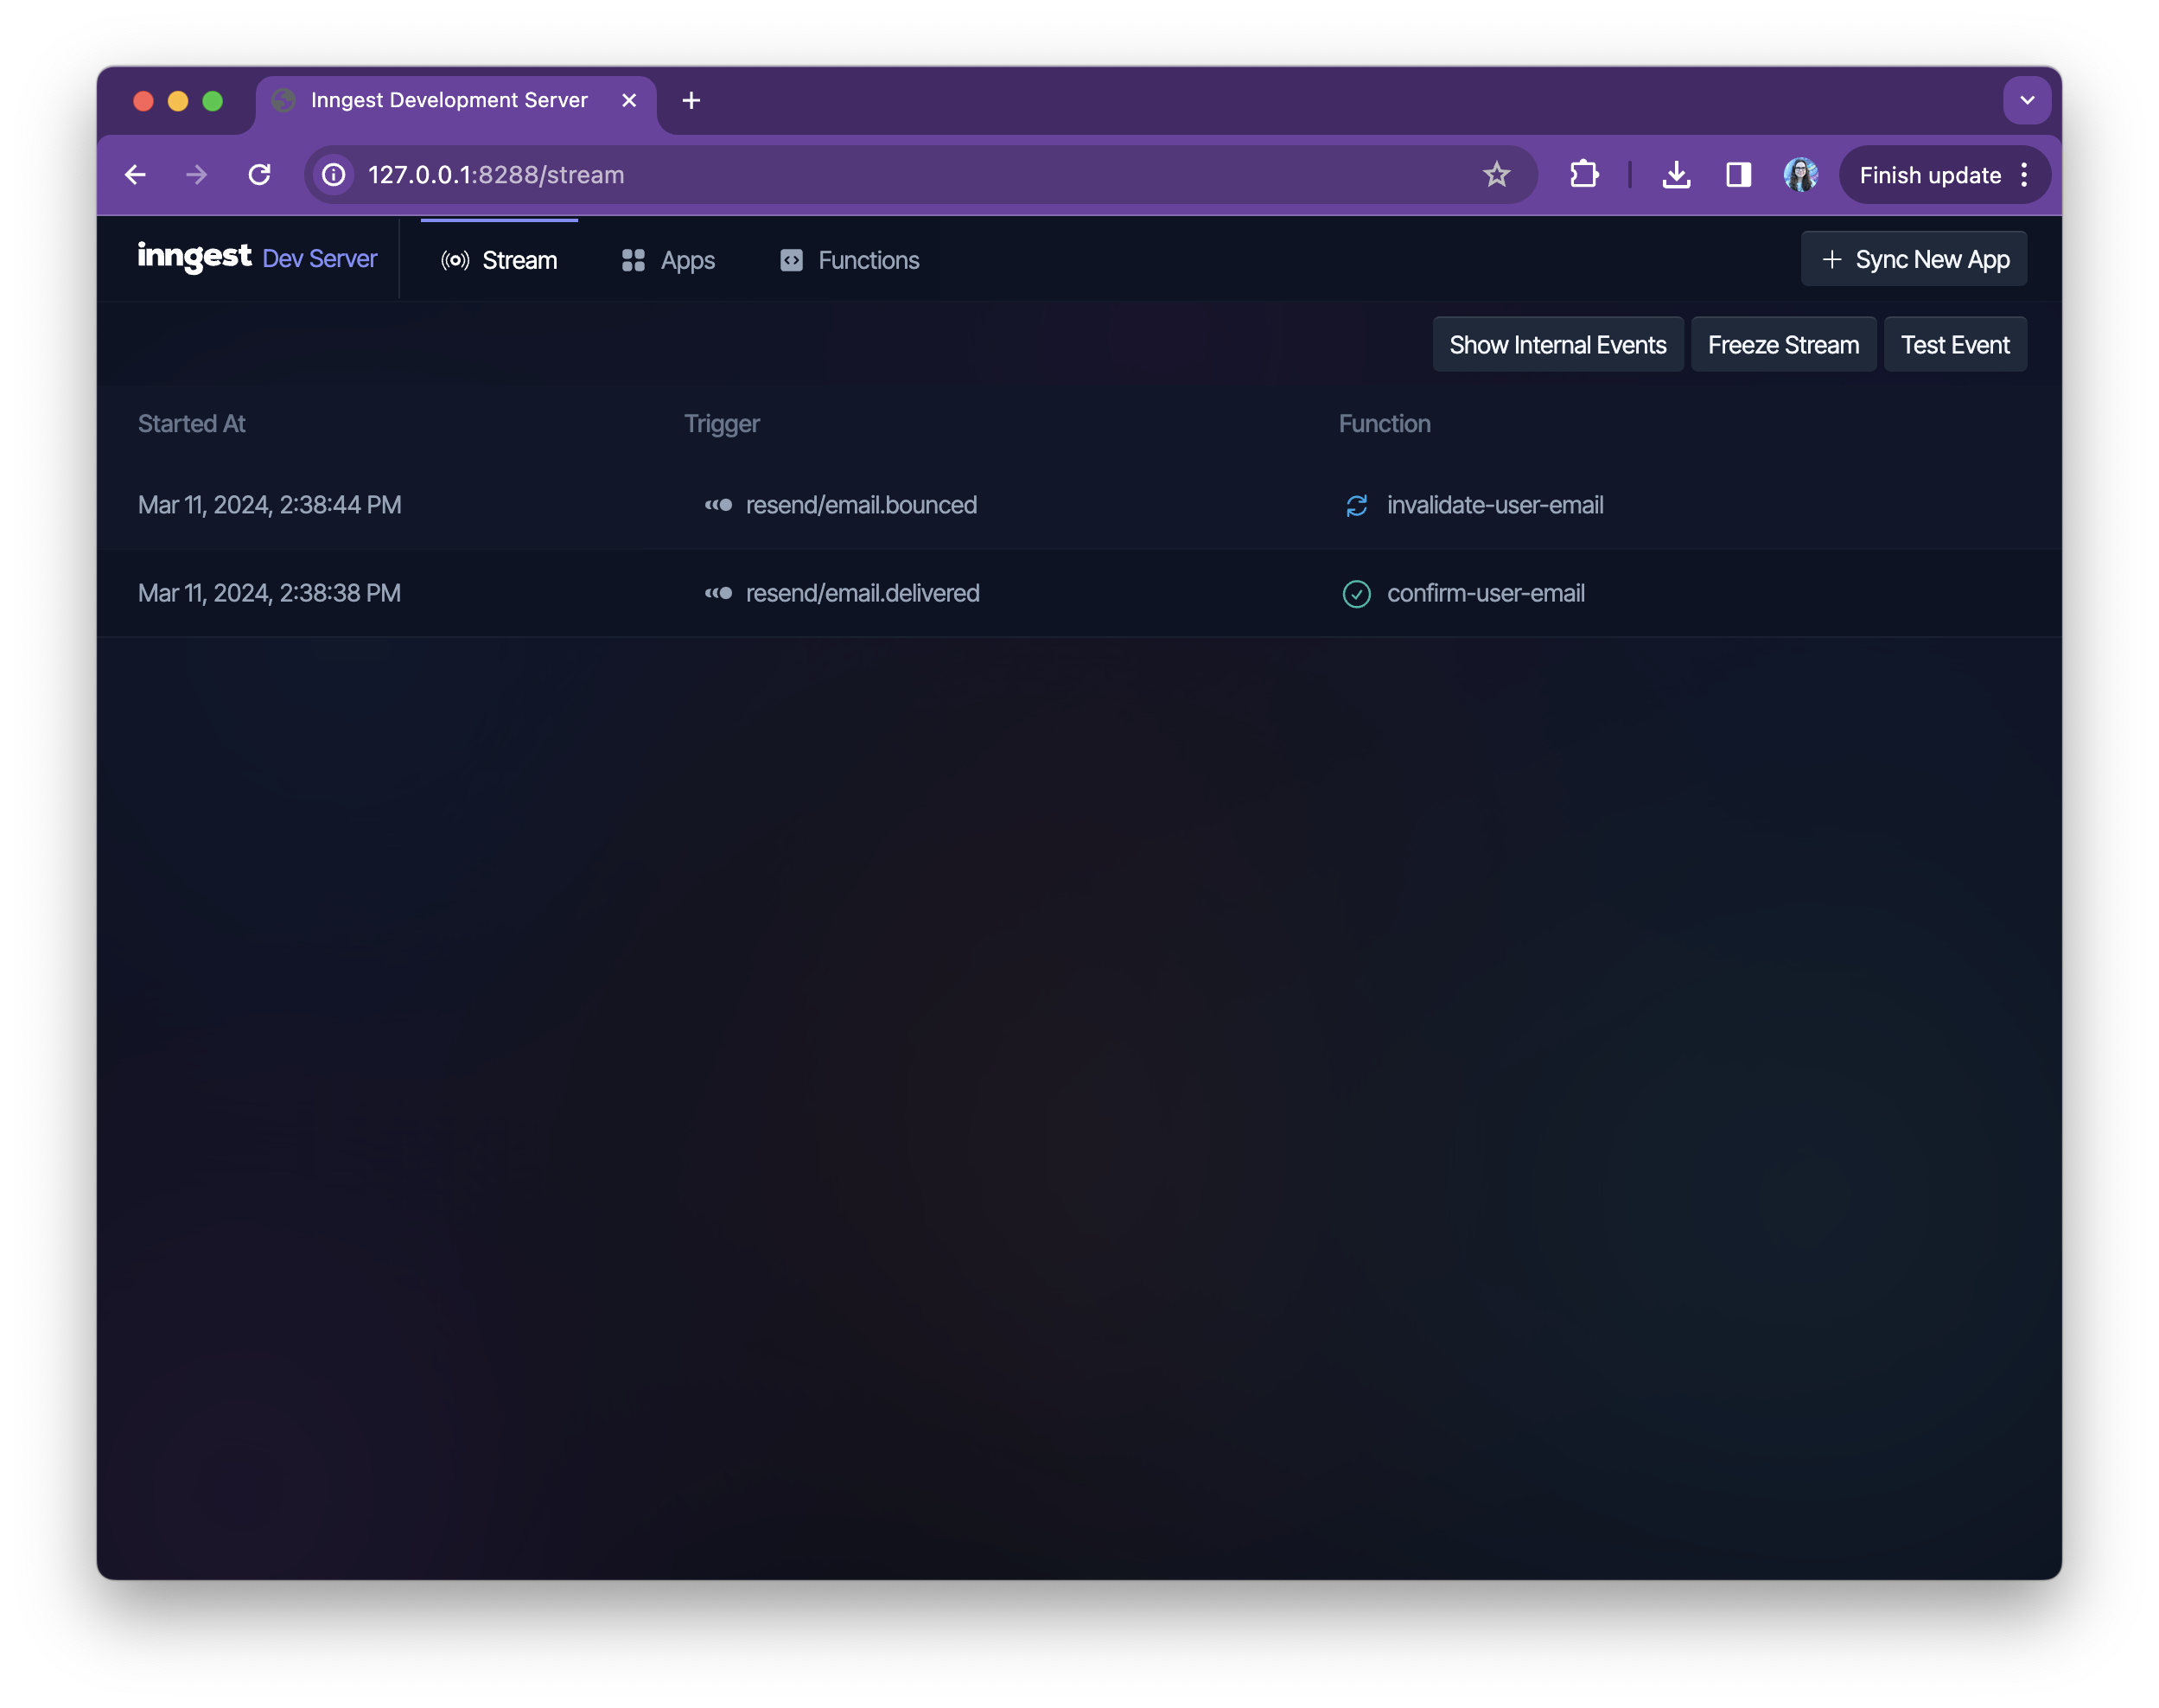
From here you can select the event, replay it to re-run any functions or edit and replay to edit the event payload to test different types of events.
## Conclusion
Congratulations! You've now learned how to use Inngest to create functions that use Resend webhook events.
# Crons (Scheduled Functions)
Source: https://www.inngest.com/docs/guides/scheduled-functions
You can create scheduled jobs using cron schedules within Inngest natively. Inngest's cron schedules also support timezones, allowing you to schedule work in whatever timezone you need work to run in.
You can create scheduled functions that run in any timezone using the SDK's [`createFunction()`](/docs/reference/functions/create):
```ts
new Inngest({ id: "signup-flow" });
// This weekly digest function will run at 12:00pm on Friday in the Paris timezone
prepareWeeklyDigest = inngest.createFunction(
{ id: "prepare-weekly-digest" },
{ cron: "TZ=Europe/Paris 0 12 * * 5" },
async ({ step }) => {
// Load all the users from your database:
await step.run(
"load-users",
async () => await db.load("SELECT * FROM users")
);
// 💡 Since we want to send a weekly digest to each one of these users
// it may take a long time to iterate through each user and send an email.
// Instead, we'll use this scheduled function to send an event to Inngest
// for each user then handle the actual sending of the email in a separate
// function triggered by that event.
// ✨ This is known as a "fan-out" pattern ✨
// 1️⃣ First, we'll create an event object for every user return in the query:
users.map((user) => {
return {
name: "app/send.weekly.digest",
data: {
user_id: user.id,
email: user.email,
},
};
});
// 2️⃣ Now, we'll send all events in a single batch:
await step.sendEvent("send-digest-events", events);
// This function can now quickly finish and the rest of the logic will
// be handled in the function below ⬇️
}
);
// This is a regular Inngest function that will send the actual email for
// every event that is received (see the above function's inngest.send())
// Since we are "fanning out" with events, these functions can all run in parallel
sendWeeklyDigest = inngest.createFunction(
{ id: "send-weekly-digest-email" },
{ event: "app/send.weekly.digest" },
async ({ event }) => {
// 3️⃣ We can now grab the email and user id from the event payload
event.data;
// 4️⃣ Finally, we send the email itself:
await email.send("weekly_digest", email, user_id);
// 🎇 That's it! - We've used two functions to reliably perform a scheduled
// task for a large list of users!
}
);
```
You can create scheduled functions that run in any timezone using the SDK's [`CreateFunction()`](https://pkg.go.dev/github.com/inngest/inngestgo#CreateFunction):
```go
package main
import (
"context"
"github.com/inngest/inngest-go"
"github.com/inngest/inngest-go/step"
)
func init() {
// This weekly digest function will run at 12:00pm on Friday in the Paris timezone
inngestgo.CreateFunction(
inngestgo.FunctionOpts{ID: "prepare-weekly-digest", Name: "Prepare Weekly Digest"},
inngestgo.CronTrigger("TZ=Europe/Paris 0 12 * * 5"),
func(ctx context.Context, input inngestgo.Input[any]) (any, error) {
// Load all the users from your database:
users, err := step.Run("load-users", func() ([]*User, error) {
return loadUsers()
})
if err != nil {
return nil, err
}
// 💡 Since we want to send a weekly digest to each one of these users
// it may take a long time to iterate through each user and send an email.
// Instead, we'll use this scheduled function to send an event to Inngest
// for each user then handle the actual sending of the email in a separate
// function triggered by that event.
// ✨ This is known as a "fan-out" pattern ✨
// 1️⃣ First, we'll create an event object for every user return in the query:
events := make([]inngestgo.Event, len(users))
for i, user := range users {
events[i] = inngestgo.Event{
Name: "app/send.weekly.digest",
Data: map[string]interface{}{
"user_id": user.ID,
"email": user.Email,
},
}
}
// 2️⃣ Now, we'll send all events in a single batch:
err = step.SendEvent("send-digest-events", events)
if err != nil {
return nil, err
}
// This function can now quickly finish and the rest of the logic will
// be handled in the function below ⬇️
return nil, nil
},
)
// This is a regular Inngest function that will send the actual email for
// every event that is received (see the above function's inngest.send())
// Since we are "fanning out" with events, these functions can all run in parallel
inngestgo.CreateFunction(
inngestgo.FunctionOpts{ID: "send-weekly-digest-email"},
inngestgo.EventTrigger("app/send.weekly.digest", nil),
func(ctx context.Context, input inngestgo.Input) (any, error) {
// 3️⃣ We can now grab the email and user id from the event payload
email := input.Event.Data["email"].(string)
userID := input.Event.Data["user_id"].(string)
// 4️⃣ Finally, we send the email itself:
err := email.Send("weekly_digest", email, userID)
if err != nil {
return nil, err
}
// 🎇 That's it! - We've used two functions to reliably perform a scheduled
// task for a large list of users!
return nil, nil
},
)
}
```
You can create scheduled functions that run in any timezone using the SDK's [`create_function()`](/docs/reference/python/functions/create):
```py
from inngest import Inngest
inngest_client = Inngest(app_id="signup-flow")
# This weekly digest function will run at 12:00pm on Friday in the Paris timezone
@inngest_client.create_function(
fn_id="prepare-weekly-digest",
trigger=inngest.TriggerCron(cron="TZ=Europe/Paris 0 12 * * 5")
)
async def prepare_weekly_digest(ctx: inngest.Context) -> None:
# Load all the users from your database:
users = await ctx.step.run(
"load-users",
lambda: db.load("SELECT * FROM users")
)
# 💡 Since we want to send a weekly digest to each one of these users
# it may take a long time to iterate through each user and send an email.
# Instead, we'll use this scheduled function to send an event to Inngest
# for each user then handle the actual sending of the email in a separate
# function triggered by that event.
# ✨ This is known as a "fan-out" pattern ✨
# 1️⃣ First, we'll create an event object for every user return in the query:
events = [
{
"name": "app/send.weekly.digest",
"data": {
"user_id": user.id,
"email": user.email,
}
}
for user in users
]
# 2️⃣ Now, we'll send all events in a single batch:
await ctx.step.send_event("send-digest-events", events)
# This function can now quickly finish and the rest of the logic will
# be handled in the function below ⬇️
# This is a regular Inngest function that will send the actual email for
# every event that is received (see the above function's inngest.send())
# Since we are "fanning out" with events, these functions can all run in parallel
@inngest_client.create_function(
fn_id="send-weekly-digest-email",
trigger=inngest.TriggerEvent(event="app/send.weekly.digest")
)
async def send_weekly_digest(ctx: inngest.Context) -> None:
# 3️⃣ We can now grab the email and user id from the event payload
email = ctx.event.data["email"]
user_id = ctx.event.data["user_id"]
# 4️⃣ Finally, we send the email itself:
await email.send("weekly_digest", email, user_id)
# 🎇 That's it! - We've used two functions to reliably perform a scheduled
# task for a large list of users!
```
👉 Note: You'll need to [serve these functions in your Inngest API](/docs/learn/serving-inngest-functions) for the functions to be available to Inngest.
On the free plan, if your function fails 20 times consecutively it will automatically be paused.
# Sending events from functions
Source: https://www.inngest.com/docs/guides/sending-events-from-functions
Description: How to send events from within functions to trigger other functions to run in parallel'
# Sending events from functions
In some workflows or pipeline functions, you may want to broadcast events from within your function to trigger _other_ functions. This pattern is useful when:
* You want to decouple logic into separate functions that can be re-used across your system
* You want to send an event to [fan-out](/docs/guides/fan-out-jobs) to multiple other functions
* Your function is handling many items that you want to process in parallel functions
* You want to [cancel](/docs/guides/cancel-running-functions) another function
* You want to send data to another function [waiting for an event](/docs/reference/functions/step-wait-for-event)
If your function needs to handle the result of another function, or wait until that other function has completed, you should use [direct function invocation](/docs/guides/invoking-functions-directly) instead.
## How to send events from functions
To send events from within functions, you will use [`step.sendEvent()`](/docs/reference/functions/step-send-event). This method takes a single event, or an array of events. The example below uses an array of events.
This is an example of a [scheduled function](/docs/guides/scheduled-functions) that sends a weekly activity email to all users.
First, the function fetches all users, then it maps over all users to create a `"app/weekly-email-activity.send"` event for each user, and finally it sends all events to Inngest.
```ts
new Inngest({ id: "signup-flow" });
type Events = GetEvents;
loadCron = inngest.createFunction(
{ id: "weekly-activity-load-users" },
{ cron: "0 12 * * 5" },
async ({ event, step }) => {
// Fetch all users
await step.run("fetch-users", async () => {
return fetchUsers();
});
// For each user, send us an event. Inngest supports batches of events
// as long as the entire payload is less than 512KB.
users.map(
(user) => {
return {
name: "app/weekly-email-activity.send",
data: {
...user,
},
user,
};
}
);
// Send all events to Inngest, which triggers any functions listening to
// the given event names.
await step.sendEvent("fan-out-weekly-emails", events);
// Return the number of users triggered.
return { count: users.length };
}
);
```
Next, create a function that listens for the `"app/weekly-email-activity.send"` event. This function will be triggered for each user that was sent an event in the previous function.
```ts
sendReminder = inngest.createFunction(
{ id: "weekly-activity-send-email" },
{ event: "app/weekly-email-activity.send" },
async ({ event, step }) => {
await step.run("load-user-data", async () => {
return loadUserData(event.data.user.id);
});
await step.run("email-user", async () => {
return sendEmail(event.data.user, data);
});
}
);
```
Each of these functions will run in parallel and individually retry on error, resulting in a faster, more reliable system.
💡 **Tip**: When triggering lots of functions to run in parallel, you will likely want to configure `concurrency` limits to prevent overloading your system. See our [concurrency guide](/docs/guides/concurrency) for more information.
##
By using [`step.sendEvent()`](/docs/reference/functions/step-send-event) Inngest's SDK can automatically add context and tracing which ties events to the current function run. If you use [`inngest.send()`](/docs/reference/events/send), the context around the function run is not present.
To send events from within functions, you will use [`inngestgo.Send()`](https://pkg.go.dev/github.com/inngest/inngestgo#Send). This method takes a single event, or an array of events. The example below uses an array of events.
This is an example of a [scheduled function](/docs/guides/scheduled-functions) that sends a weekly activity email to all users.
First, the function fetches all users, then it maps over all users to create a `"app/weekly-email-activity.send"` event for each user, and finally it sends all events to Inngest.
```go
package main
import (
"context"
"github.com/inngest/inngestgo"
"github.com/inngest/inngestgo/step"
)
func loadCron(client inngestgo.Client) (inngestgo.ServableFunction, error) {
return inngestgo.CreateFunction(
client,
inngestgo.FunctionOpts{
ID: "weekly-activity-load-users",
},
inngestgo.CronTrigger("0 12 * * 5"),
func(ctx context.Context, input inngestgo.Input[any]) (any, error) {
// Fetch all users
users, err := step.Run(ctx, "fetch-users", func(ctx context.Context) ([]User, error) {
return fetchUsers()
})
if err != nil {
return nil, err
}
// For each user, send us an event. Inngest supports batches of events
// as long as the entire payload is less than 512KB.
events := make([]inngestgo.Event, len(users))
for i, user := range users {
events[i] = inngestgo.Event{
Name: "app/weekly-email-activity.send",
Data: map[string]interface{}{
"user": user,
},
}
}
// Send all events to Inngest, which triggers any functions listening to
// the given event names.
_, err = step.SendMany(ctx, "send-events", events)
if err != nil {
return nil, err
}
// Return the number of users triggered
return map[string]any{
"count": len(users),
}, nil
},
)
}
```
Next, create a function that listens for the `"app/weekly-email-activity.send"` event. This function will be triggered for each user that was sent an event in the previous function.
```go
package main
import (
"context"
"github.com/inngest/inngestgo"
"github.com/inngest/inngestgo/step"
)
func sendReminder(client inngestgo.Client) (inngestgo.ServableFunction, error) {
type Data struct {
User struct {
ID string
}
}
return inngestgo.CreateFunction(
client,
inngestgo.FunctionOpts{
ID: "weekly-activity-send-email",
},
inngestgo.EventTrigger("app/weekly-email-activity.send", nil),
func(ctx context.Context, input inngestgo.Input[Data]) (any, error) {
data, err := step.Run(ctx, "load-user-data", func(ctx context.Context) (any, error) {
return loadUserData(input.Event.Data.User.ID)
})
if err != nil {
return nil, err
}
_, err = step.Run(ctx, "email-user", func(ctx context.Context) (any, error) {
return sendEmail(input.Event.Data.User, data)
})
if err != nil {
return nil, err
}
return nil, nil
},
)
}
```
Each of these functions will run in parallel and individually retry on error, resulting in a faster, more reliable system.
💡 **Tip**: When triggering lots of functions to run in parallel, you will likely want to configure `concurrency` limits to prevent overloading your system. See our [concurrency guide](/docs/guides/concurrency) for more information.
To send events from within functions, you will use [`step.send_event()`](/docs/reference/python/steps/send-event). This method takes a single event, or an array of events. The example below uses an array of events.
This is an example of a [scheduled function](/docs/guides/scheduled-functions) that sends a weekly activity email to all users.
First, the function fetches all users, then it maps over all users to create a `"app/weekly-email-activity.send"` event for each user, and finally it sends all events to Inngest.
```py
import inngest
from src.inngest.client import inngest_client
@inngest_client.create_function(
fn_id="weekly-activity-load-users",
trigger=inngest.TriggerCron(cron="0 12 * * 5")
)
async def load_cron(ctx: inngest.Context):
# Fetch all users
async def fetch():
return await fetch_users()
users = await ctx.step.run("fetch-users", fetch)
# For each user, send us an event. Inngest supports batches of events
# as long as the entire payload is less than 512KB.
events = []
for user in users:
events.append(
inngest.Event(
name="app/weekly-email-activity.send",
data={
**user,
"user": user
}
)
)
# Send all events to Inngest, which triggers any functions listening to
# the given event names.
await ctx.step.send_event("fan-out-weekly-emails", events)
# Return the number of users triggered.
return {"count": len(users)}
```
Next, create a function that listens for the `"app/weekly-email-activity.send"` event. This function will be triggered for each user that was sent an event in the previous function.
```py
@inngest_client.create_function(
fn_id="weekly-activity-send-email",
trigger=inngest.TriggerEvent(event="app/weekly-email-activity.send")
)
async def send_reminder(ctx: inngest.Context):
async def load_data():
return await load_user_data(ctx.event.data["user"]["id"])
data = await ctx.step.run("load-user-data", load_data)
async def send():
return await send_email(ctx.event.data["user"], data)
await ctx.step.run("email-user", send)
```
Each of these functions will run in parallel and individually retry on error, resulting in a faster, more reliable system.
💡 **Tip**: When triggering lots of functions to run in parallel, you will likely want to configure `concurrency` limits to prevent overloading your system. See our [concurrency guide](/docs/guides/concurrency) for more information.
### Why `step.send_event()` vs. `inngest.send()`?
By using [`step.send_event()`](/docs/reference/python/steps/send-event) Inngest's SDK can automatically add context and tracing which ties events to the current function run. If you use [`inngest.send()`](/docs/reference/python/client/send), the context around the function run is not present.
## Parallel functions vs. parallel steps
Another technique similar is running multiple steps in parallel (read the [step parallelism guide](/docs/guides/step-parallelism)). Here are the key differences:
* Both patterns run code in parallel
* With parallel steps, you can access the output of each step, whereas with the above example, you cannot
* Parallel steps have limit of 1,000 steps, though you can trigger as many functions as you'd like using the send event pattern
* Decoupled functions can be tested and [replayed](/docs/platform/replay) separately, whereas parallel steps can only be tested as a whole
* You can retry individual functions easily if they permanently fail, whereas if a step permanently fails (after retrying) the function itself will fail and terminate.
## Sending events vs. invoking
A related pattern is invoking external functions directly instead of just triggering them with an event. See the [Invoking functions directly](/docs/guides/invoking-functions-directly) guide. Here are some key differences:
* Sending events from functions is better suited for parallel processing of independent tasks and invocation is better for coordinated, interdependent functions
* Sending events can be done in bulk, whereas invoke can only invoke one function at a time.
* Sending events can be combined with [fan-out](/docs/guides/fan-out-jobs) to trigger multiple functions from a single event
* Unlike invocation, sending events will not receive the result of the invoked function
# Singleton Functions
Source: https://www.inngest.com/docs/guides/singleton
These docs are part of a developer preview for Inngest's Singleton Functions API. Learn more about the [developer preview here](#developer-preview).
Singleton Functions enable you to ensure that only a single run of your function (_or a set of specific function runs, based on specific event properties_) is happening at a time.
Singleton Functions are available in the TypeScript SDK starting from version 3.38.0.
## When to use Singleton Functions
Singleton Functions are useful when you want to ensure that only a single instance of a function is running at a time, for example:
- A third-party data synchronization workflow
- A compute- or time-intensive function that should not be run multiple times at the same time (ex: AI processing)
### Singleton compared to concurrency:
While [Concurrency](/docs/guides/concurrency) set to `1` ensures that only a single step of a given function is running at a time, Singleton Functions ensure that only a single run of a given function is happening at a time.
### Singleton compared to Rate Limiting:
[Rate Limiting](/docs/guides/rate-limiting) is similar to Singleton Functions, but it is designed to limit the number of runs started within a time period, whereas Singleton Functions are designed to ensure that only a single run of a function occurs over a given time window.
Rate Limiting is useful for controlling the rate of execution of a function, while Singleton Functions are useful for ensuring that only a single run of a function occurs over a given time window.
## How it works
Singleton Functions are configured using the `singleton` property in the function definition.
The following `data-sync` function will skip new runs if another run of the same function is already running for the same user:
```ts
inngest.createFunction({
id: "data-sync",
singleton: {
key: "event.data.user_id",
mode: "skip",
}
},
{ event: "data-sync.start" },
async ({ event }) => {
// ...
},
);
```
Refer to the [reference documentation](/docs/reference/functions/singleton) for more details.
### Using a `key`
When a `key` is added, the unique runs rule is applied for each unique value of the `key` expression. For example, if your `key` is set to `event.data.user_id`,
each user would have their individual singleton rule applied to functions runs, ensuring that only a single run of the function is happening at a time for each user. Read [our guide to writing expressions](/docs/guides/writing-expressions) for more information.
{/* ### Two modes: Skip vs Cancel
Singleton Functions can be configured to either skip the new run or cancel the existing run and start a new one.
The `mode` property configures the behavior of the Singleton Function.
- `"skip"` skips the new run.
- `"cancel"` cancels the existing run and starts the new one. */}
## Compatibility with other flow control features
Singleton Functions can be combined with other flow control features, with the following considerations:
| Flow control | Compatibility | Considerations |
| --- | --- | --- |
| [Debounce](/docs/guides/debounce) | ✅ | Can be used together without issues. |
| [Rate limiting](/docs/guides/rate-limiting) | ✅ | Similar functionality but rate limiting operates over a predefined time window rather than function execution duration. |
| [Throttling](/docs/guides/throttling) | ✅ | Similar functionality but throttling enqueues events over time rather than discarding/canceling them. |
| [Concurrency](/docs/guides/concurrency) | ❌ | Singleton functions implicitly have a concurrency of 1. A concurrency setting can be set but should be used with caution. |
| [Batching](/docs/guides/batching) | ❌ | Not compatible with singleton functions. |
## Developer preview
Singleton Functions is a developer preview feature and are subject to change without following semver.
Developer preview help us getting early feedback from the community. You can share your feedback in the [Inngest Discord](https://discord.gg/inngest) or via our [support channel](https://app.inngest.com/support).
The following limitations are known and will be addressed in a future release:
- Skipped runs are not visible in the Inngest dashboard.
- Singleton isn't compatible with batching; function registration will fail if both are set.
Read the [release phases](/docs/release-phases) for more details.
## FAQ
### How does Singleton Functions work with retries?
If a singleton function fails and is retrying, it should still skip new incoming runs.
# Step parallelism
Source: https://www.inngest.com/docs/guides/step-parallelism
- If you’re using a serverless platform to host, code will run in true parallelism similar to multi-threading (without shared state)
- Each step will be individually retried
### Platform support
**Parallelism works across all providers and platforms**. True parallelism is supported for serverless functions; if you’re using a single Express server you’ll be splitting all parallel jobs amongst a single-threaded node server.
## Running steps in parallel
You can run steps in parallel via `Promise.all()`:
- Create each step via [`step.run()`](/docs/reference/functions/step-run) without awaiting, which returns an unresolved promise.
- Await all steps via `Promise.all()`. This triggers all steps to run in parallel via separate executions.
A common use case is to split work into chunks:
```ts
new Inngest({ id: "signup-flow" });
fn = inngest.createFunction(
{ id: "post-payment-flow" },
{ event: "stripe/charge.created" },
async ({ event, step }) => {
// These steps are not `awaited` and run in parallel when Promise.all
// is invoked.
step.run("confirmation-email", async () => {
await sendEmail(event.data.email);
return emailID;
});
step.run("update-user", async () => {
return db.updateUserWithCharge(event);
});
// Run both steps in parallel. Once complete, Promise.all will return all
// parallelized state here.
//
// This ensures that all steps complete as fast as possible, and we still have
// access to each step's data once they're compelte.
await Promise.all([sendEmail, updateUser]);
return { emailID, updates };
}
);
```
When each step is finished, Inngest will aggregate each step's state and re-invoke the function with all state available.
### Step parallelism in Python
Inngest supports parallel steps regardless of whether you're using asynchronous or synchronous code. For both approaches, you can use `step.parallel`:
#### async - with `inngest.Step` and `await ctx.group.parallel()`
```py
@client.create_function(
fn_id="my-fn",
trigger=inngest.TriggerEvent(event="my-event"),
)
async def fn(ctx: inngest.Context) -> None:
user_id = ctx.event.data["user_id"]
(updated_user, sent_email) = await ctx.group.parallel(
(
lambda: step.run("update-user", update_user, user_id),
lambda: step.run("send-email", send_email, user_id),
)
)
```
#### sync - with `inngest.StepSync` and `group.parallel()`
```py
@client.create_function(
fn_id="my-fn",
trigger=inngest.TriggerEvent(event="my-event"),
)
def fn(ctx: inngest.ContextSync) -> None:
user_id = ctx.event.data["user_id"]
(updated_user, sent_email) = ctx.group.parallel(
(
lambda: ctx.step.run("update-user", update_user, user_id),
lambda: ctx.step.run("send-email", send_email, user_id),
)
)
```
At this time, Inngest does not have stable support for `asyncio.gather` or `asyncio.wait`. If you'd like to try out experimental support, use the `_experimental_execution` option when creating your function:
```py
@client.create_function(
fn_id="my-fn",
trigger=inngest.TriggerEvent(event="my-event"),
_experimental_execution=True,
)
def fn(ctx: inngest.ContextSync) -> None:
user_id = ctx.event.data["user_id"]
(updated_user, sent_email) = asyncio.gather(
asyncio.create_task(ctx.step.run("update-user", update_user, user_id)),
asyncio.create_task(ctx.step.run("send-email", send_email, user_id)),
)
```
When using `asyncio.wait`, `asyncio.FIRST_COMPLETED` is supported. However, `asyncio.FIRST_EXCEPTION` is not supported due to the way Inngest interrupts the execution of the function.
## Chunking jobs
A common use case is to chunk work. For example, when using OpenAI's APIs you might need to chunk a user's input and run the API on many chunks, then aggregate all data:
```ts
new Inngest({ id: "signup-flow" });
fn = inngest.createFunction(
{ id: "summarize-text" },
{ event: "app/text.summarize" },
async ({ event, step }) => {
splitTextIntoChunks(event.data.text);
await Promise.all(
chunks.map((chunk) =>
step.run("summarize-chunk", () => summarizeChunk(chunk))
)
);
await step.run("summarize-summaries", () => summarizeSummaries(summaries));
}
);
```
This allows you to run many independent steps, wait until they're all finished, then fetch the results from all steps within a few lines of code. Doing this in a traditional system would require creating many jobs, polling the status of all jobs, and manually combining state.
## Limitations
Currently, the total data returned from **all** steps must be under 4MB (eg. a single step can return a max of. 4MB, or 4 steps can return a max of 1MB each). Functions are also limited to a maximum of 1,000 steps.
## Parallelism vs fan-out
Another technique similar to parallelism is fan-out ([read the guide here](/docs/guides/fan-out-jobs)): when one function sends events to trigger other functions. Here are the key differences:
- Both patterns run jobs in parallel
- You can access the output of steps ran in parallel within your function, whereas with fan-out you cannot
- Parallelism has a limit of 1,000 steps, though you can create as many functions as you'd like using fan-out
- You can replay events via fan-out, eg. to test functions locally
- You can retry individual functions easily if they permanently fail, whereas if a step permanently fails (after retrying) the function itself will fail and terminate.
- Fan-out splits functionality into different functions, using step functions keeps all related logic in a single, easy to read function
# Throttling
Source: https://www.inngest.com/docs/guides/throttling
Description: Limit the throughput of function execution over a period of time. Ideal for working around third-party API rate limits.';
# Throttling
Throttling allows you to specify how many function runs can start within a time period. When the limit is reached, new function runs over the throttling limit will be _enqueued for the future_. Throttling is FIFO (first in first out). Some use cases for priority include:
* Evenly distributing function execution over time to reduce spikes.
* Working around third-party API rate limits.
## How to configure throttling
```ts {{ title:
TypeScript" }}
inngest.createFunction(
{
id: "unique-function-id",
throttle: {
limit: 1,
period: "5s",
burst: 2,
key: "event.data.user_id",
},
}
{ event: "ai/summary.requested" },
async ({ event, step }) => {
}
);
```
```go {{ title: "Go" }}
inngestgo.CreateFunction(
&inngestgo.FunctionOpts{
ID: "unique-function-id",
Throttle: &inngestgo.Throttle{
Limit: 1,
Period: 5 * time.Second,
Key: inngestgo.StrPtr("event.data.user_id"),
Burst: 2,
},
},
inngestgo.EventTrigger("ai/summary.requested", nil),
func(ctx context.Context, input inngestgo.Input) (any, error) {
// This function will be throttled to 1 run per 5 seconds for a given event payload with matching user_id
return nil, nil
},
)
```
```py {{ title: "Python" }}
@inngest.create_function(
id="unique-function-id",
throttle=inngest.Throttle(
limit=1,
period=datetime.timedelta(seconds=5),
key="event.data.user_id",
burst=2,
),
trigger=inngest.Trigger(event="ai/summary.requested")
)
async def synchronize_data(ctx: inngest.Context):
```
You can configure throttling on each function using the optional `throttle` parameter. The options directly control the generic cell rate algorithm parameters used within the queue.
### Configuration reference
- `limit`: The total number of runs allowed to start within the given `period`.
- `period`: The period within the limit will be applied.
- `burst`: The number of runs allowed to start in the given window in a single burst. This defaults to 1, which ensures that requests are smoothed amongst the given `period`.
- `key`: An optional expression which returns a throttling key using event data. This allows you to apply unique throttle limits specific to a user.
**Configuration information**
- The rate limit smooths requests in the given period, allowing `limit/period` requests a second.
- Period must be between `1s` and `7d`, or between 1 second and 7 days. The minimum granularity is one second.
- Throttling is currently applied per function. Two functions with the same key have two separate limits.
- Every request is evenly weighted and counts as a single unit in the rate limiter.
## How throttling works
Throttling uses the [generic cell rate algorithm (GCRA)](https://en.wikipedia.org/wiki/Generic_cell_rate_algorithm) to limit function run *starts* directly in the queue. When you send an event or invoke a function that specifies throttling configuration, Inngest checks the function's throttle limit to see if there's capacity:
- If there's capacity, the function run starts as usual.
- If there is no capacity, the function run will begin when there's capacity in the future.
Note that throttling only applies to function run starts. It does not apply to steps within a function. This allows you to regulate how often functions begin work, *without* worrying about how many steps are in a function, or if steps run in parallel. To limit how many steps can execute at once, use [concurrency controls](/docs/guides/concurrency).
Throttling is [FIFO (first in first out)](https://en.wikipedia.org/wiki/FIFO_(computing_and_electronics)), so the first function run to be enqueued will be the first to start when there's capacity.
## Throttling vs Concurrency
**Concurrency** limits the *number of executing steps across your function runs*. This allows you to manage the total capacity of your functions.
**Throttling** limits the number of *new function runs* being started. It does not limit the number of executing steps. For example, with a throttling limit of 1 per minute, only one run will start in a single minute. However, that run may execute hundreds of steps, as throttling does not limit steps.
## Throttling vs Rate Limiting
Rate limiting also specifies how many functions can start within a time period. However, in Inngest rate limiting ignores function runs over the limit and does not enqueue them for future work. Throttling will enqueue runs over the limit for the future.
Rate limiting is *lossy* and provides hard limits on function runs, while throttling delays function runs over the limit until there’s capacity, smoothing spikes.
## Tips
* Configure [start timeouts](/docs/features/inngest-functions/cancellation/cancel-on-timeouts) to prevent large backlogs with throttling
## Further reference
* [TypeScript SDK Reference](/docs/reference/functions/create#throttle)
* [Python SDK Reference](/docs/reference/python/functions/create#configuration)
# Trigger your code from Retool
Source: https://www.inngest.com/docs/guides/trigger-your-code-from-retool
Internal tools are a pain to build and maintain. Fortunately, [Retool](https://retool.com/) has helped tons of companies reduce the burden. Retool primarily focuses on building dashboards and forms and it integrates well with several databases and cloud APIs.
Often though, there are actions that your support or customer success team needs to perform that are too complex for Retool built-in features. You may have even written some of necessary code in your application, but you can't easily run it from Retool.
## The problem
Let's say you have an integration built in your application and you backend code imports a bunch of data from that third party. The third party API or your backend may have went down for a few hours and you may have missing data for certain user. When someone reaches out to support, you may need to re-run that import script to backfill the missing data.
{/* TBD diagram? */}
We're going to walk through how you can do this so your team can trigger important scripts right from your Retool app. This guide assumes you have a basic experience building forms with Retool (*If you don't, check out [this great guide](https://docs.retool.com/docs/create-forms-using-form-component)*).
## The plan
The goal is to enable your team to trigger a script anytime they click a button in Retool. To achieve this we will:
1. Create a Retool button that sends an event to Inngest
2. Write an Inngest function that uses our existing script
3. Configure that function to run when our event is received
4. See how it works end to end
## Sending an event from Retool
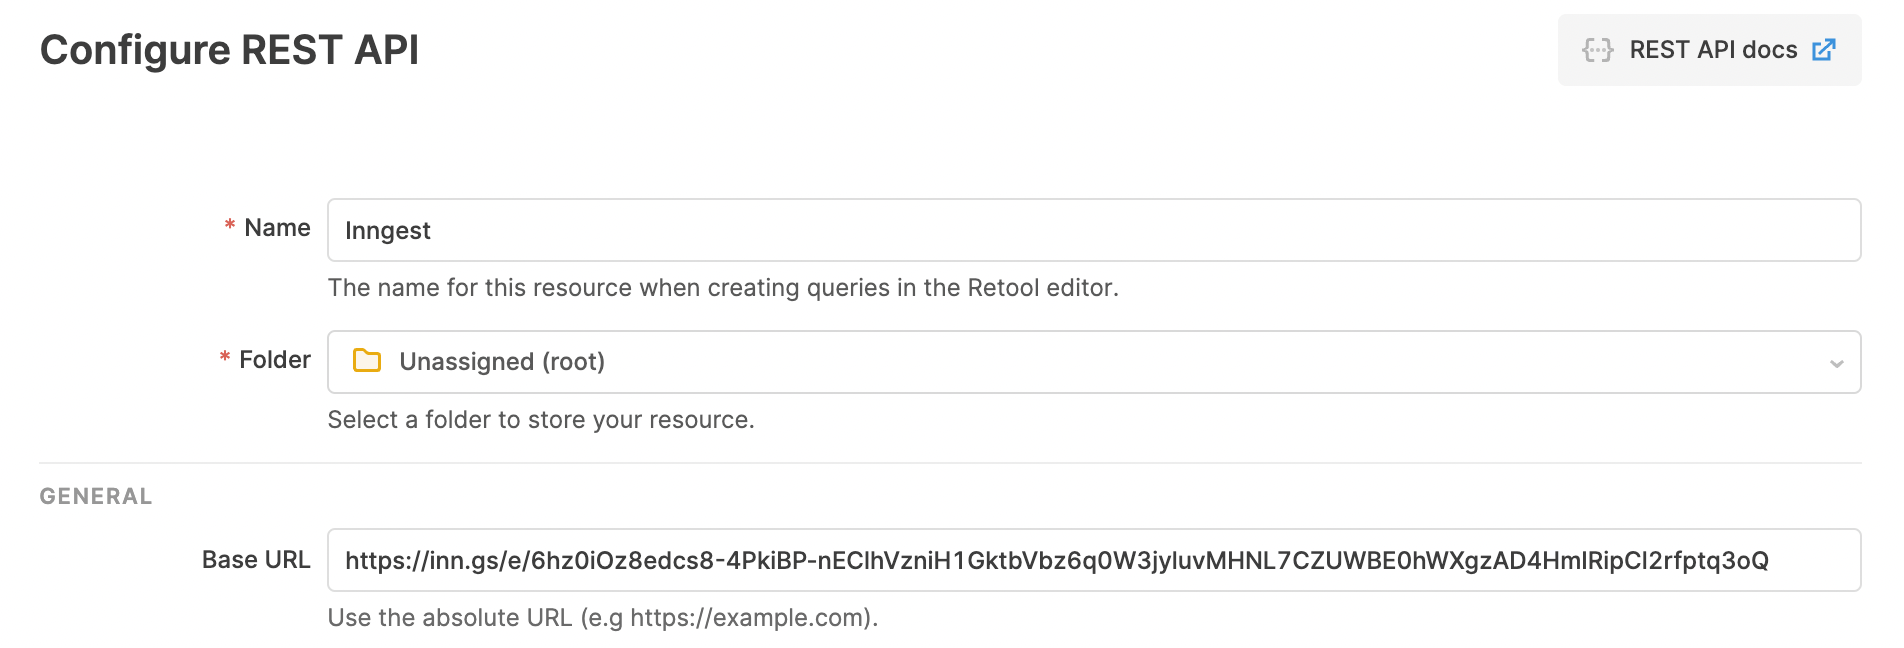
To send data from Retool, we'll need to set up a “[Resource](https://docs.retool.com/docs/resources)” first. On your Resources tab in Retool, click “Create New” then select “Resource.” Then select “Rest API.” Now jump over to the Inngest Cloud dashboard and [create a new Event Key in the Inngest dashboard](/docs/events/creating-an-event-key). Copy your brand new key and in the Retool dashboard, prefix your key with the Inngest Event API URL and path: `https://inn.gs/e/`
```shell
https://inn.gs/e/
```
Your new resource will look like this. When it does, click “Create resource.”
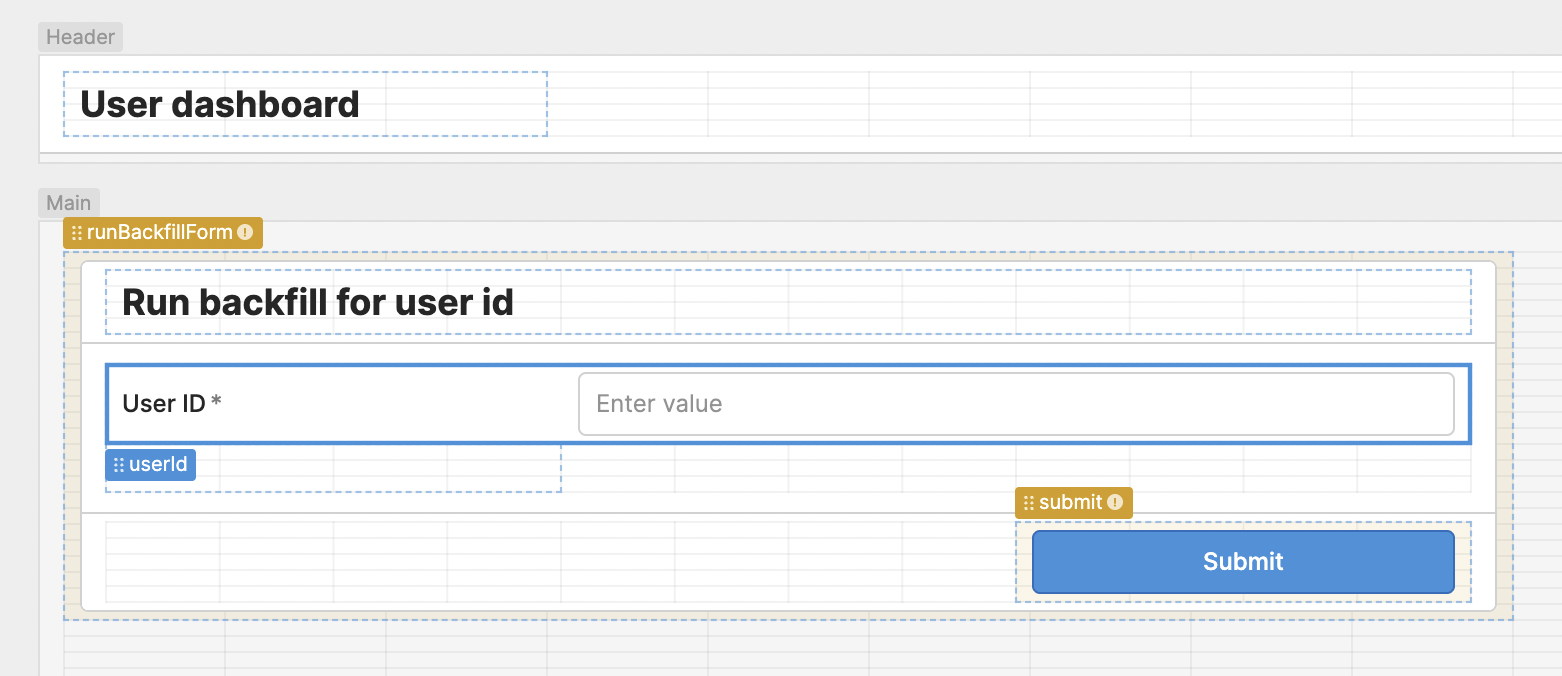
Now, let's head to the Retool app that you want to add the button form to. Let's say you have already built out the following form called `runBackfillForm` with a single input called `userId` and a submit button:
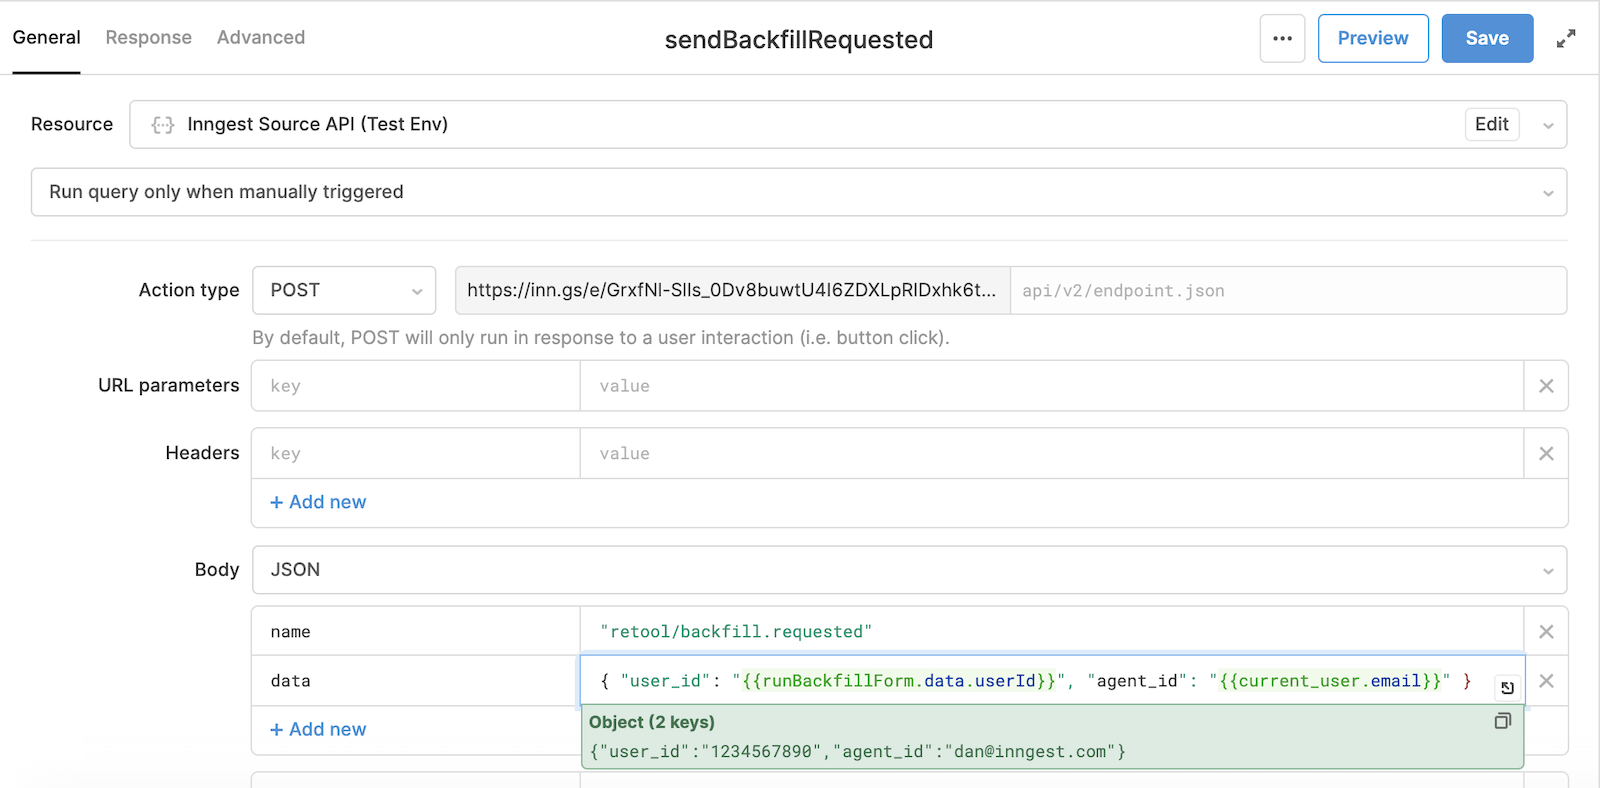
Next, create a new “Resource query” from the “Code” panel at the bottom left (use the + button). Let's name our new query `sendBackfillRequested` and select our new “Inngest” resource from the drop down. Update the “Action type” to a `POST` request. In the “Body” section, we need add the data that we want to send to Inngest. Inngest events require a name and some data as JSON. It's useful to prefix your event names to group them, here we'll call our event `"retool/backfill.requested"` and we'll pass the user id from the form and for future auditing purposes, the email of the current Retool user on your team:
```json
{ "user_id": "{{runBackfillForm.data.userId}}", "agent_id": "{{current_user.email}}" }
```
At the end, your resource query will look like this. Let's save it then click “Run” to test it.
In the Inngest Cloud dashboard's “Events” tab, you should see a brand new `retool/backfill.requested` event. Click on the event and you should be able to select the payload that we just sent.
{/* TODO - Update screenshots!! */}
Now that we've verified the data is sent over to Inngest, you can attach the resource query as an event handler to the submit button. Select the “Default” interaction type and click “+ Add” to select our resource query `sendBackfillRequested`. For fun, you can add an `isFetching` to show loading.

We're halfway there - with this in place any agent from our team can trigger this event as needed.
## Writing our Inngest function
Using [the Inngest SDK](/features/sdk?ref=retool-guide) you can define your Inngest function and it's event trigger in one file. We'll create a directory called `inngest` in our project root:
```
mkdir -p inngest
```
Now we'll create a file in this directory for our function - `runBackfillForUser.js`. This will be our Inngest function which will import our existing backfill code, use the `user_id` from the event payload to run that code, and return a http status code in our response to tell Inngest [if it should be retried or not](/docs/functions/retries?ref=retool-guide).
```ts {{ title: "runBackfillForUser.ts" }}
export default inngest.createFunction(
{ id: "run-backfill-for-user" }, // The name displayed in the Inngest dashboard
{ event: "retool/backfill.requested" }, // The event triggger
async ({ event }) => {
await runBackfillForUser(event.data.user_id);
return {
status: result.ok ? 200 : 500,
message: `Ran backfill for user ${event.data.user_id}`,
};
}
);
```
```ts {{ title: "client.ts" }}
inngest = new Inngest({ id: "my-app" })
```
That's our function - now, we just need to serve our function.
### Serving our function
You need to serve your function to enable Inngest to remotely and securely invoke your function via HTTP.
For this guide, we'll explain how to do this with an existing [Express.js](https://expressjs.com/) application. Inngest's default [`serve()`](/docs/reference/serve) handler can be imported and passed to Express.js' `app.use` or `router.use`. You can get your Inngest signing key from [the Inngest dashboard](https://app.inngest.com/env/production/manage/signing-key).
```js
app.use("/api/inngest", serve("My API", process.env.INNGEST_SIGNING_KEY, [
runBackfillForUser,
]))
// your existing routes...
app.get("/api/whatever", ...)
app.post("/api/something_else", ...)
```
## Deploying your function
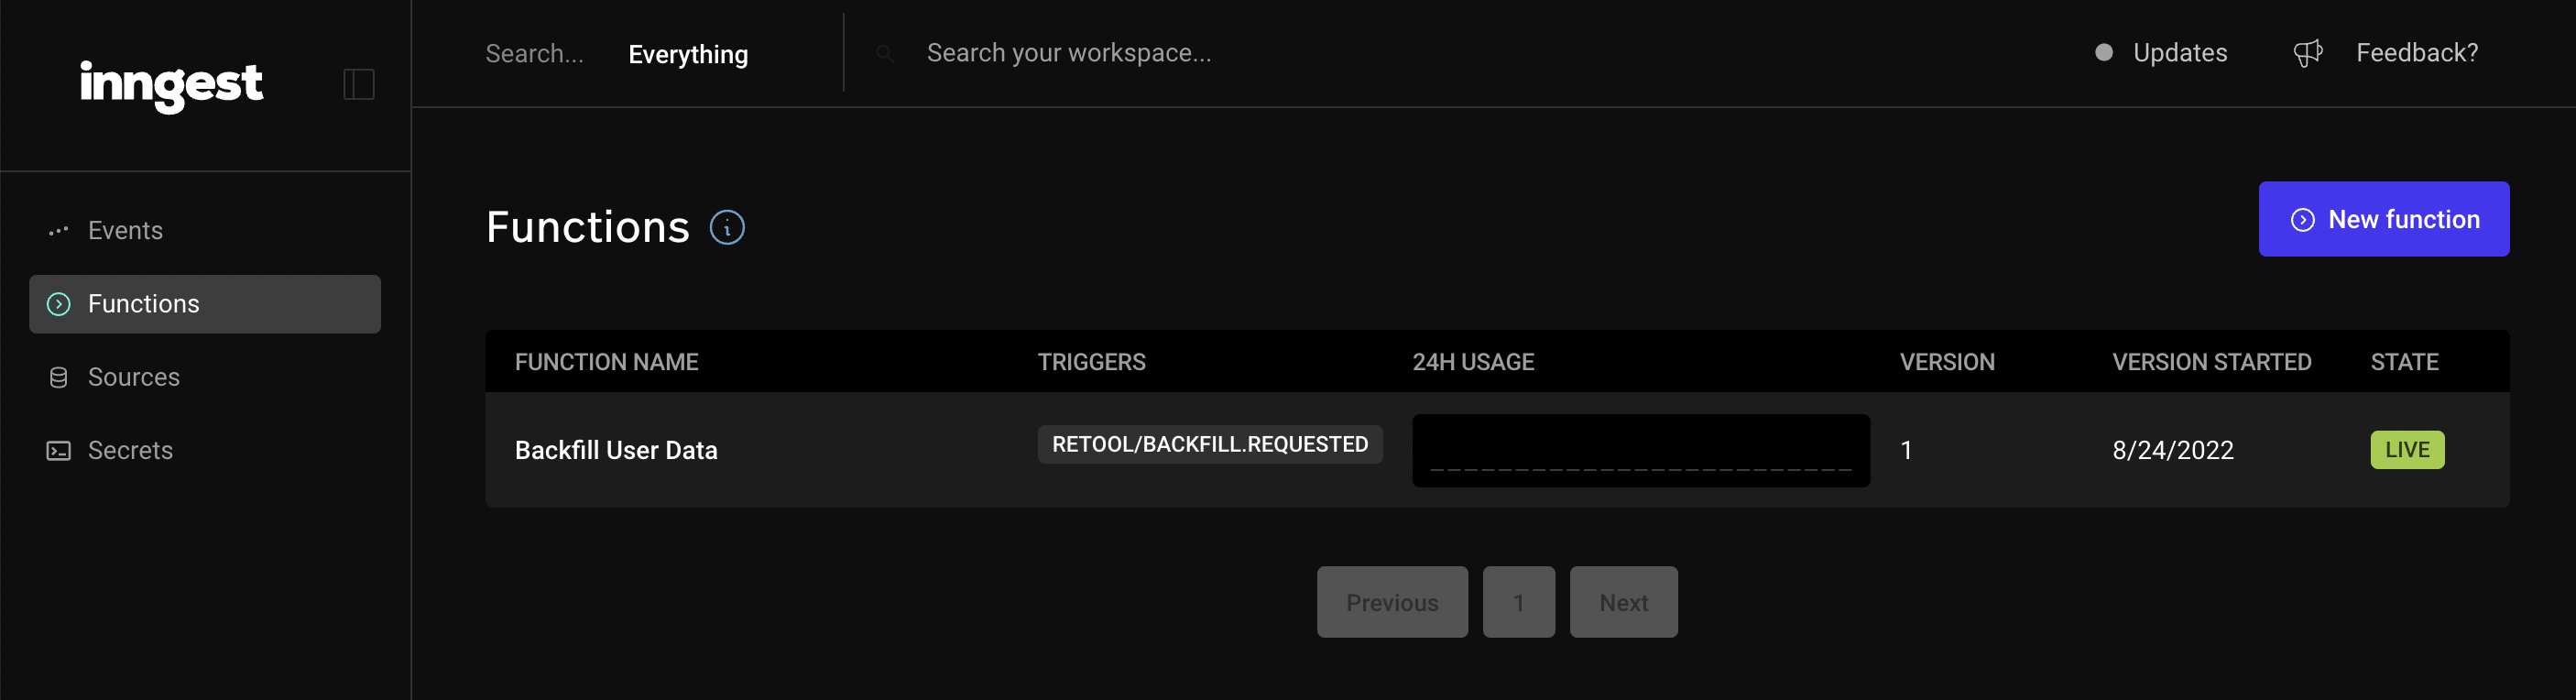
By serving your functions via HTTP, you don't need to deploy your code to Inngest Cloud or set up a new deployment process. After you deploy your code, you need to visit the Inngest dashboard to sync your app. This allows Inngest to discover and remotely execute your functions.
After syncing your app, your new function should appear in the Functions tab of the Inngest Cloud dashboard:
## Bringing it all together
Now that our code is pushed to production and we've set the secrets that we need, let's test it end to end.
And a few seconds later in the Inngest cloud dashboard:
Fantastic. We've now used our Retool form to trigger a backfill script on-demand with no infrastructure required to setup. Every time your support team needs to trigger this script, they can do it and ensure your users are happy.
## Over to you
You now know how to get some existing code from your application shipped to Inngest and triggered right from Retool with a full audit trail of who triggered it, for what user and full logs. There was no need to set up a more complex infrastructure with a queue or new endpoint on your production API - Just push your code to Inngest and send an event from Retool - done and dusted.
# Build workflows configurable by your users
Source: https://www.inngest.com/docs/guides/user-defined-workflows
Users today are demanding customization and integrations from every product. Your users may want your product to support custom workflows to automate key user actions.
Leverage our [Workflow Kit](/docs/reference/workflow-kit) to add powerful user-defined workflows features to your product.
Inngest's Workflow Kit ships as a full-stack package ([`@inngest/workflow-kit`](https://npmjs.com/package/@inngest/workflow-kit)), aiming to simplify the development of user-defined workflows on both the front end and back end:
## Use case: adding AI automation to a Next.js CMS application
}>
This use case is available a open-source Next.js demo on GitHub.
Our Next.js CMS application features the following `blog_posts` table:
|Column name|Column type|Description|
|-----------|-----------|-----------|
id| `bigint`|
title | `text`| _The title of the blog post_
subtitle | `text`| _The subtitle of the blog post_
status | `text`| _"draft" or "published"_
markdown | `text`| _The content of the blog post as markdown_
created_at | `timestamp`|
You will find a ready-to-use database seed [in the repository](https://github.com/inngest/workflow-kit/blob/main/examples/nextjs-blog-cms/supabase/seed.sql).
We would like to provide the following AI automation tasks to our users:
**Review tasks**
- Add a Table of Contents: _a task leveraging OpenAI to insert a Table of Contents in the blog post_
- Perform a grammar review: _a task leveraging OpenAI to perform some grammar fixes_
**Social content tasks**
- Generate LinkedIn posts: _a task leveraging OpenAI to generate some Tweets_
- Generate Twitter posts: _a task leveraging OpenAI to generate a LinkedIn post_
Our users will be able to combine those tasks to build their custom workflows.
### 1. Adding the tasks definition to the application
After [installing and setup Inngest](/docs/getting-started/nextjs-quick-start?ref=docs-guide-user-defined-workflows) in our Next.js application, we will create the following [Workflow Actions definition](/docs/reference/workflow-kit/actions) file:
```ts {{ title: "lib/inngest/workflowActions.ts" }}
actions: PublicEngineAction[] = [
{
kind: "add_ToC",
name: "Add a Table of Contents",
description: "Add an AI-generated ToC",
},
{
kind: "grammar_review",
name: "Perform a grammar review",
description: "Use OpenAI for grammar fixes",
},
{
kind: "wait_for_approval",
name: "Apply changes after approval",
description: "Request approval for changes",
},
{
kind: "apply_changes",
name: "Apply changes",
description: "Save the AI revisions",
},
{
kind: "generate_linkedin_posts",
name: "Generate LinkedIn posts",
description: "Generate LinkedIn posts",
},
{
kind: "generate_tweet_posts",
name: "Generate Twitter posts",
description: "Generate Twitter posts",
},
];
```
Explore how Workflow actions get declared as `PublicEngineAction` and `EngineAction`.
### 2. Updating our database schema
To enable our users to configure the workflows, we will create the following `workflows` table.
The `workflows` tables stores the [Workflow instance object](/docs/reference/workflow-kit/workflow-instance) containing how the user ordered
the different selected [Workflow actions](/docs/reference/workflow-kit/actions). Other columns are added to store extra properties specific to
our application such as: the automation name and description, the event triggering the automation and its status (`enabled`).
|Colunm name|Column type|Description|
|-----------|-----------|-----------|
id| `bigint`|
name | `text`| _The name of the automation_
description | `text`| _A short description of the automation_
workflow | `jsonb`| _A [Workflow instance object](/docs/reference/workflow-kit/workflow-instance)_
enabled | `boolean`|
trigger | `text`| _The name of the [Inngest Event](/docs/features/events-triggers) triggering the workflow_
created_at | `timestamp`|
Once the `workflows` table created, we will add two [workflow instances](/docs/reference/workflow-kit/workflow-instance) records:
- _"When a blog post is published"_: Getting a review from AI
- _"When a blog post is moved to review"_: Actions performed to optimize the distribution of blog posts
using the following SQL insert statement:
```sql
INSERT INTO "public"."workflows" ("id", "created_at", "workflow", "enabled", "trigger", "description", "name") VALUES
(2, '2024-09-14 20:19:41.892865+00', NULL, true, 'blog-post.published', 'Actions performed to optimize the distribution of blog posts', 'When a blog post is published'),
(1, '2024-09-14 15:46:53.822922+00', NULL, true, 'blog-post.updated', 'Getting a review from AI', 'When a blog post is moved to review');
```
You will find a ready-to-use database seed [in the repository](https://github.com/inngest/workflow-kit/blob/main/examples/nextjs-blog-cms/supabase/seed.sql).
### 3. Adding the Workflow Editor page
With our workflow actions definition and `workflows` table ready, we will create a new Next.js Page featuring the Workflow Editor.
First, we will add a new [Next.js Page](https://nextjs.org/docs/app/building-your-application/routing/pages) to load the worklow and render the Editor:
```tsx {{ title: "app/automation/[id]/page.tsx" }}
runtime = "edge";
export default async function Automation({
params,
}: {
params: { id: string };
}) {
createClient();
await supabase
.from("workflows")
.select("*")
.eq("id", params.id!)
.single();
if (workflow) {
return ;
} else {
notFound();
}
}
```
The `` component is then rendered with the following required properties:
- `workflow={}`: [workflow instance](/docs/reference/workflow-kit/workflow-instance) loaded from the database along side
- `event={}`: the name of the event triggering the workflow
- `availableActions={}`: [actions](/docs/reference/workflow-kit/actions#passing-actions-to-the-react-components-public-engine-action) that the user can select to build its automation
```tsx {{ title: "src/components/automation-editor.ts" }}
import "@inngest/workflow-kit/ui/ui.css";
import "@xyflow/react/dist/style.css";
AutomationEditor = ({ workflow }: { workflow: Workflow }) => {
useState(workflow);
return (
{
updateWorkflowDraft({
...workflowDraft,
workflow: updated,
});
}}
>
);
};
```
[``](/docs/reference/workflow-kit/components-api) is a [Controlled Component](https://react.dev/learn/sharing-state-between-components#controlled-and-uncontrolled-components), relying on the `workflow={}` object to update its UI.
Every change performed by the user will trigger the `onChange={}` callback to be called. This callback should update the object passed to the
`workflow={}` prop and can be used to also implement an auto save mechanism.
The complete version of the `` is [available on GitHub](https://github.com/inngest/workflow-kit/blob/main/examples/nextjs-blog-cms/components/automation-editor.tsx).
Navigating to `/automation/1` renders tht following Workflow Editor UI using our workflow actions:
### 4. Implementing the Workflow Actions handlers
Let's now implement the logic our automation tasks by creating a new file in `lib/inngest` and starting with the "Add a Table of Contents" workflow action:
```tsx {{ title: "lib/inngest/workflowActionHandlers.ts" }}
actions: EngineAction[] = [
{
// Add a Table of Contents
...actionsDefinition[0],
handler: async ({ event, step, workflowAction }) => {
createClient();
await step.run("load-blog-post", async () =>
loadBlogPost(event.data.id)
);
await step.run("add-toc-to-article", async () => {
new OpenAI({
apiKey: process.env["OPENAI_API_KEY"], // This is the default and can be omitted
});
`
Please update the below markdown article by adding a Table of Content under the h1 title. Return only the complete updated article in markdown without the wrapping "\`\`\`".
Here is the text wrapped with "\`\`\`":
\`\`\`
${getAIworkingCopy(workflowAction, blogPost)}
\`\`\`
`;
await openai.chat.completions.create({
model: process.env["OPENAI_MODEL"] || "gpt-3.5-turbo",
messages: [
{
role: "system",
content: "You are an AI that make text editing changes.",
},
{
role: "user",
content: prompt,
},
],
});
return response.choices[0]?.message?.content || "";
});
await step.run("save-ai-revision", async () => {
await supabase
.from("blog_posts")
.update({
markdown_ai_revision: aiRevision,
status: "under review",
})
.eq("id", event.data.id)
.select("*");
});
},
}
},
];
```
This new file adds the `handler` property to the existing _"Add a Table of Contents"_ action.
A [workflow action `handler()`](/docs/reference/workflow-kit/actions#handler-function-argument-properties) has a similar signature to Inngest's function handlers, receiving two key arguments: `event` and [`step`](/docs/reference/functions/create#step).
Our _"Add a Table of Contents"_ leverages Inngest's [step API](/docs/reference/functions/step-run) to create reliable and retriable steps generating and inserting a Table of Contents.
The complete implementation of all workflow actions are [available on GitHub](https://github.com/inngest/workflow-kit/blob/main/examples/nextjs-blog-cms/lib/inngest/workflowActionHandlers.ts).
### 5. Creating an Inngest Function
With all the workflow action handlers of our automation tasks [implemented](https://github.com/inngest/workflow-kit/blob/main/examples/nextjs-blog-cms/lib/inngest/workflowActionHandlers.ts),
we can create a [`Engine`](/docs/reference/workflow-kit/engine) instance and pass it to a dedicated [Inngest Function](/docs/features/inngest-functions) that will run the automation when the `"blog-post.updated"` and `"blog-post.published"` events will be triggered:
```tsx {{ title: "lib/inngest/workflow.ts" }}
new Engine({
actions: actionsWithHandlers,
loader: loadWorkflow,
});
export default inngest.createFunction(
{ id: "blog-post-workflow" },
// Triggers
// - When a blog post is set to "review"
// - When a blog post is published
[{ event: "blog-post.updated" }, { event: "blog-post.published" }],
async ({ event, step }) => {
// When `run` is called, the loader function is called with access to the event
await workflowEngine.run({ event, step });
}
);
```
### Going further
This guide demonstrated how quickly and easily user-defined workflows can be added to your product when using our [Workflow Kit](/docs/reference/workflow-kit).
}>
This use case is available a open-source Next.js demo on GitHub.
# Working with Loops in Inngest
Source: https://www.inngest.com/docs/guides/working-with-loops
Description: Implement loops in your Inngest functions and avoid common pitfalls.';
# Working with Loops in Inngest
In Inngest each step in your function is executed as a separate HTTP request. This means that for every step in your function, the function is re-entered, starting from the beginning, up to the point where the next step is executed. This [execution model](/docs/learn/how-functions-are-executed) helps in managing retries, timeouts, and ensures robustness in distributed systems.
This page covers how to implement loops in your Inngest functions and avoid common pitfalls.
## Simple function example
Let's start with a simple example to illustrate the concept:
```javascript
inngest.createFunction(
{ id: "simple-function" },
{ event: "test/simple.function" },
async ({ step }) => {
console.log("hello");
await step.run("a", async () => { console.log("a") });
await step.run("b", async () => { console.log("b") });
await step.run("c", async () => { console.log("c") });
}
);
```
In the above example, you will see "hello" printed four times, once for the initial function entry and once for each step execution (`a`, `b`, and `c`).
```bash {{ title: "✅ How Inngest executes the code" }}
"hello"
"hello"
"a"
"hello"
"b"
"hello"
"c"
```
```bash {{ title: "❌ Common incorrect misconception" }}
# This is a common assumption of how Inngest executes the code above.
# It is not correct.
"hello"
"a"
"b"
"c"
```
Any non-deterministic logic (like database calls or API calls) must be placed inside a `step.run` call to ensure it is executed correctly within each step.
With this in mind, here is how the previous example can be fixed:
```ts
inngest.createFunction(
{ id: "simple-function" },
{ event: "test/simple.function" },
async ({ step }) => {
await step.run("hello", () => { console.log("hello") });
await step.run("a", async () => { console.log("a") });
await step.run("b", async () => { console.log("b") });
await step.run("c", async () => { console.log("c") });
}
);
// hello
// a
// b
// c
```
Now, "hello" is printed only once, as expected.
Let's start with a simple example to illustrate the concept:
```go
import (
"fmt"
"github.com/inngest/inngest-go"
"github.com/inngest/inngest-go/step"
)
inngestgo.CreateFunction(
inngestgo.FunctionOpts{ID: "simple-function"},
inngestgo.EventTrigger("test/simple.function", nil),
func(ctx context.Context, input inngestgo.Input) (any, error) {
fmt.Println("hello")
_, err := step.Run("a", func() error {
fmt.Println("a")
return nil
})
if err != nil {
return nil, err
}
_, err = step.Run("b", func() error {
fmt.Println("b")
return nil
})
if err != nil {
return nil, err
}
_, err = step.Run("c", func() error {
fmt.Println("c")
return nil
})
if err != nil {
return nil, err
}
return nil, nil
},
)
```
In the above example, you will see "hello" printed four times, once for the initial function entry and once for each step execution (`a`, `b`, and `c`).
```bash {{ title: "✅ How Inngest executes the code" }}
# This is how Inngest executes the code above:
"hello"
"hello"
"a"
"hello"
"b"
"hello"
"c"
```
```bash {{ title: "❌ Common incorrect misconception" }}
# This is a common assumption of how Inngest executes the code above.
# It is not correct.
"hello"
"a"
"b"
"c"
```
Any non-deterministic logic (like database calls or API calls) must be placed inside a `step.run` call to ensure it is executed correctly within each step.
With this in mind, here is how the previous example can be fixed:
```go
import (
"fmt"
"github.com/inngest/inngest-go"
"github.com/inngest/inngest-go/step"
)
inngest.CreateFunction(
"simple-function",
inngest.EventTrigger("test/simple.function"),
func(ctx context.Context, step inngest.Step) error {
if _, err := step.Run("hello", func() error {
fmt.Println("hello")
return nil
}); err != nil {
return err
}
if _, err := step.Run("a", func() error {
fmt.Println("a")
return nil
}); err != nil {
return err
}
if _, err := step.Run("b", func() error {
fmt.Println("b")
return nil
}); err != nil {
return err
}
if _, err := step.Run("c", func() error {
fmt.Println("c")
return nil
}); err != nil {
return err
}
return nil
},
)
// hello
// a
// b
// c
```
Now, "hello" is printed only once, as expected.
Let's start with a simple example to illustrate the concept:
```python
@inngest_client.create_function(
fn_id="simple-function",
trigger=inngest.TriggerEvent(event="test/simple.function")
)
async def simple_function(ctx: inngest.Context):
print("hello")
async def step_a():
print("a")
await ctx.step.run("a", step_a)
async def step_b():
print("b")
await ctx.step.run("b", step_b)
async def step_c():
print("c")
await ctx.step.run("c", step_c)
```
In the above example, you will see "hello" printed four times, once for the initial function entry and once for each step execution (`a`, `b`, and `c`).
```bash {{ title: "✅ How Inngest executes the code" }}
# This is how Inngest executes the code above:
"hello"
"hello"
"a"
"hello"
"b"
"hello"
"c"
```
```bash {{ title: "❌ Common incorrect misconception" }}
# This is a common assumption of how Inngest executes the code above.
# It is not correct.
"hello"
"a"
"b"
"c"
```
Any non-deterministic logic (like database calls or API calls) must be placed inside a `step.run` call to ensure it is executed correctly within each step.
With this in mind, here is how the previous example can be fixed:
```python
import inngest
from src.inngest.client import inngest_client
@inngest_client.create_function(
id="simple-function",
trigger=inngest.TriggerEvent(event="test/simple.function")
)
async def simple_function(ctx: inngest.Context):
await ctx.step.run("hello", lambda: print("hello"))
await ctx.step.run("a", lambda: print("a"))
await ctx.step.run("b", lambda: print("b"))
await ctx.step.run("c", lambda: print("c"))
# hello
# a
# b
# c
```
Now, "hello" is printed only once, as expected.
## Loop example
Here's [an example](/blog/import-ecommerce-api-data-in-seconds) of an Inngest function that imports all products from a Shopify store into a local system. This function iterates over all pages combining all products into a single array.
```typescript
export default inngest.createFunction(
{ id: "shopify-product-import"},
{ event: "shopify/import.requested" },
async ({ event, step }) => {
[]
let cursor = null
let hasMore = true
// Use the event's "data" to pass key info like IDs
// Note: in this example is deterministic across multiple requests
// If the returned results must stay in the same order, wrap the db call in step.run()
await database.getShopifySession(event.data.storeId)
while (hasMore) {
await step.run(`fetch-products-${pageNumber}`, async () => {
return await shopify.rest.Product.all({
session,
since_id: cursor,
})
})
// Combine all of the data into a single list
allProducts.push(...page.products)
if (page.products.length === 50) {
cursor = page.products[49].id
} else {
hasMore = false
}
}
// Now we have the entire list of products within allProducts!
}
)
```
In the example above, each iteration of the loop is managed using `step.run()`, ensuring that **all non-deterministic logic (like fetching products from Shopify) is encapsulated within a step**. This approach guarantees that if the request fails, it will be retried automatically, in the correct order. This structure aligns with Inngest's execution model, where each step is a separate HTTP request, ensuring robust and consistent loop behavior.
Note that in the example above `getShopifySession` is deterministic across multiple requests (and it's added to all API calls for authorization). If the returned results must stay in the same order, wrap the database call in `step.run()`.
Read more about this use case in the [blog post](/blog/import-ecommerce-api-data-in-seconds).
Here's an example of an Inngest function that imports all products from a Shopify store into a local system. This function iterates over all pages combining all products into a single array.
```go
inngest.CreateFunction(
"shopify-product-import",
inngest.EventTrigger("shopify/import.requested"),
func(ctx context.Context, event inngest.Event) error {
var allProducts []Product
var cursor *string
hasMore := true
// Use the event's "data" to pass key info like IDs
// Note: in this example is deterministic across multiple requests
// If the returned results must stay in the same order, wrap the db call in step.run()
session, err := database.GetShopifySession(event.Data["storeId"].(string))
if err != nil {
return err
}
for hasMore {
if page, err := step.Run(fmt.Sprintf("fetch-products-%v", cursor), func() error {
return shopify.Product.All(&shopify.ProductListOptions{
Session: session,
SinceID: cursor,
})
}); err != nil {
return err
}
// Combine all of the data into a single list
allProducts = append(allProducts, page.Products...)
if len(page.Products) == 50 {
id := page.Products[49].ID
cursor = &id
} else {
hasMore = false
}
}
// Now we have the entire list of products within allProducts!
return nil
},
)
```
In the example above, each iteration of the loop is managed using `step.Run()`, ensuring that **all non-deterministic logic (like fetching products from Shopify) is encapsulated within a step**. This approach guarantees that if the request fails, it will be retried automatically, in the correct order. This structure aligns with Inngest's execution model, where each step is a separate HTTP request, ensuring robust and consistent loop behavior.
Note that in the example above `getShopifySession` is deterministic across multiple requests (and it's added to all API calls for authorization). If the returned results must stay in the same order, wrap the database call in `step.Run()`.
Read more about this use case in the [blog post](/blog/import-ecommerce-api-data-in-seconds).
Here's an example of an Inngest function that imports all products from a Shopify store into a local system. This function iterates over all pages combining all products into a single array.
```python
@inngest.create_function(
id="shopify-product-import",
trigger=inngest.TriggerEvent(event="shopify/import.requested")
)
async def shopify_product_import(ctx: inngest.Context):
all_products = []
cursor = None
has_more = True
# Use the event's "data" to pass key info like IDs
# Note: in this example is deterministic across multiple requests
# If the returned results must stay in the same order, wrap the db call in step.run()
session = await database.get_shopify_session(ctx.event.data["store_id"])
while has_more:
page = await ctx.step.run(f"fetch-products-{cursor}", lambda: shopify.Product.all(
session=session,
since_id=cursor
))
# Combine all of the data into a single list
all_products.extend(page.products)
if len(page.products) == 50:
cursor = page.products[49].id
else:
has_more = False
# Now we have the entire list of products within all_products!
```
In the example above, each iteration of the loop is managed using `step.run()`, ensuring that **all non-deterministic logic (like fetching products from Shopify) is encapsulated within a step**. This approach guarantees that if the request fails, it will be retried automatically, in the correct order. This structure aligns with Inngest's execution model, where each step is a separate HTTP request, ensuring robust and consistent loop behavior.
Note that in the example above `get_shopify_session` is deterministic across multiple requests (and it's added to all API calls for authorization). If the returned results must stay in the same order, wrap the database call in `step.run()`.
Read more about this use case in the [blog post](/blog/import-ecommerce-api-data-in-seconds).
## Best practices: implementing loops in Inngest
To ensure your loops run correctly within [Inngest's execution model](/docs/learn/how-functions-are-executed):
### 1. Treat each loop iterations as a single step
In a typical programming environment, loops maintain their state across iterations. In Inngest, each step re-executes the function from the beginning to ensure that only the failed steps will be re-tried. To handle this, treat each loop iteration as a separate step. This way, the loop progresses correctly, and each iteration builds on the previous one.
### 2. Place non-deterministic logic inside steps
Place non-deterministic logic (like API calls, database queries, or random number generation) inside `step.run` calls. This ensures that such operations are executed correctly and consistently within each step, preventing repeated execution with each function re-entry.
### 3. Use sleep effectively
When using `step.sleep` inside a loop, ensure it is combined with structuring the loop to handle each iteration as a separate step. This prevents the function from appearing to restart and allows for controlled timing between iterations.
## Next steps
- Docs explanation: [Inngest execution model](/docs/learn/how-functions-are-executed).
- Docs guide: [multi-step functions](/docs/guides/multi-step-functions).
- Blog post: ["How to import 1000s of items from any E-commerce API in seconds with serverless functions"](/blog/import-ecommerce-api-data-in-seconds).
# Writing expressions
Source: https://www.inngest.com/docs/guides/writing-expressions
Expressions are used in a number of ways for configuring your functions. They are used for:
* Defining keys based on event properties for [concurrency](/docs/functions/concurrency), [rate limiting](/docs/reference/functions/rate-limit), [debounce](/docs/reference/functions/debounce), or [idempotency](/docs/guides/handling-idempotency)
* Conditionally matching events for [wait for event](/docs/reference/functions/step-wait-for-event), [cancellation](/docs/guides/cancel-running-functions), or the [function trigger's `if` option](/docs/reference/functions/create#trigger)
* Returning values for function [run priority](/docs/reference/functions/run-priority)
All expressions are defined using the [Common Expression Language (CEL)](https://github.com/google/cel-go). CEL offers simple, fast, non-turing complete expressions. It allows Inngest to evaluate millions of expressions for all users at scale.
## Types of Expressions
Within the scope of Inngest, expressions should evaluate to either a boolean or a value:
* **Booleans** - Any expression used for conditional matching should return a boolean value. These are used in wait for event, cancellation, and the function trigger's `if` option.
* **Values** - Other expressions can return any value which might be used as keys (for example, concurrency, rate limit, debounce or [idempotency keys](/docs/guides/handling-idempotency)) or a dynamic value (for example, run priority).
## Variables
- `event` refers to the event that triggered the function run, in every case.
- `async` refers to a new event in `step.waitForEvent` and [cancellation](/docs/guides/cancel-running-functions). It's the incoming event which is matched asynchronously. This is only present when matching new events in a function run.
## Examples
Most expressions are given the `event` payload object as the input. Expressions that match additional events (for example, wait for event, cancellation) will also have the `async` object for the matched event payload. To learn more, consult this [reference of all the operators available in CEL](https://github.com/google/cel-spec/blob/master/doc/langdef.md#list-of-standard-definitions).
### Boolean Expressions
```js
// Match a field to a string
"event.data.billingPlan == 'enterprise'"
// Number comparison
"event.data.amount > 1000"
// Combining multiple conditions
"event.data.billingPlan == 'enterprise' && event.data.amount > 1000"
"event.data.billingPlan != 'pro' || event.data.amount < 300"
// Compare the function trigger with an inbound event (for wait for event or cancellation)
"event.data.userId == async.data.userId"
// Alternatively, you can use JavaScript string interpolation for wait for event
`${userId} == async.data.userId` // => "user_1234 == async.data.userId"
```
{/* Omit macros until we review support individually
```js
// Advanced CEL methods (see reference linked above):
// Check if a string contains a substring
"event.data.email.contains('gmail.com')"
// Check that a field is set
"has(event.data.email)"
// Compare timestamps
"timestamp(event.data.created) > timestamp('2024-01-01T00:00:00Z')"
"timestamp(event.data.createdAt) + duration('5m') > timestamp(event.data.expireAt)"
```
*/}
### Value Expressions
#### Keys
```js
// Use the user's id as a concurrency key
"event.data.id" // => "1234"
// Concatenate two strings together to create a unique key
`event.data.userId + "-" + event.type` // => "user_1234-signup"
```
{/* Omit macros until we review support individually
```js
// Advanced CEL methods (see reference linked above):
// Convert a number to a string for concatenation
`string(event.data.amount) + "-" event.data.planId`
```
*/}
#### Dynamic Values
```js
// Return a 0 priority if the billing plan is enterprise, otherwise return 1800
`event.data.billingPlan == 'enterprise' ? 0 : 1800`
// Return a value based on multiple conditions
`event.data.billingPlan == 'enterprise' && event.data.requestNumber < 10 ? 0 : 1800`
```
{/* Omit macros until we review support individually
```js
// Advanced CEL methods (see reference linked above):
// Return a priority if the value is set in the payload
`has(event.data.priority) ? event.data.priority : 0`
```
*/}
## Tips
* Use `+` to concatenate strings
* Use `==` for equality checks
* You can use single `'` or double quotes `"` for strings, but we recommend sticking with one for code consistency
* When working with the TypeScript SDK, write expressions within backticks `` ` `` to use quotes in your expression or use JavaScript's string interpolation.
* Use ternary operators to return default values
* When using the or operator (`||`), CEL will always return a boolean. This is different from JavaScript, where the or operator returns the value of the statement left of the operator if truthy. Use the ternary operator (`?`) instead of `||` for conditional returns.
Please note that while CEL supports a wide range of helpers and macros, Inngest only supports a subset of these to ensure a high level of performance and reliability.
{/* TODO - Omit these advanced macros for now until we review support individually
### CEL Helpers & Macros
This is a non-exhaustive list of CEL [helpers](https://github.com/google/cel-spec/blob/master/doc/langdef.md#list-of-standard-definitions) and [macros](https://github.com/google/cel-spec/blob/master/doc/langdef.md#macros) that are useful for writing expressions:
```js
// Check if a field is set
"has(event.data.email)"
// Convert a number to a string
"string(event.data.count)"
// Convert a string to an int
"int(event.data.amount)"
// Get the first item in an array
"event.data.items[0]"
// Check if an item exists in an array
"event.data.items.exists(e, e == 'shirt_1234')"
// Check if only one item matches a condition
"event.data.items.exists_one(e, e.starsWith('shirt_'))"
// Check if all items in an array match a condition
"event.data.amounts.all(n, n > 10)"
// Convert a timestamp to an int (unix timestamp)
"int(timestamp(event.data.createdAt))"
// Add a duration to a timestamp
"timestamp(event.data.createdAt) + duration('5m')"
```
*/}
## Testing out expressions
You can test out expressions on [Undistro's CEL Playground](https://playcel.undistro.io/). It's a great way to quickly test out more complex expressions, especially with conditional returns.
# Inngest Documentation
Source: https://www.inngest.com/docs/index
import {
RiCloudLine,
RiNextjsFill,
RiNodejsFill,
RiGitPullRequestFill,
RiGuideFill,
} from "@remixicon/react";
hidePageSidebar = true;
Inngest is an event-driven durable execution platform that allows you to run fast, reliable code on any platform, without managing queues, infra, or state.
Write functions in TypeScript, Python or Go to power background and scheduled jobs, with steps built in. We handle the backend infra, queueing, scaling, concurrency, throttling, rate limiting, and observability for you.
## Get started
}
iconPlacement="top"
>
Add queueing, events, crons, and step functions to your Next app on any cloud provider.
}
iconPlacement="top"
>
Write durable step functions in any Node.js app and run on servers or serverless.
}
iconPlacement="top"
>
Develop reliable step functions in Python without managing queueing systems or DAG based workflows.
}
iconPlacement="top"
>
Write fast, durable step functions in your Go application using the standard library.
Learn how Inngest's Durable Execution Engine ensures that your workflow already run until completion with steps.
## Build with Inngest
Users today are demanding customization and integrations. Discover how to build a Workflow Engine for your users using Inngest.
Inngest offers tools to support the development of AI-powered applications. Learn how to build a RAG workflow with Inngest.
A drip campaign is usually based on your user's behavior.
This example will walk you through many examples of email workflows.
## Explore
}
>
Learn how to leverage Function steps to build reliable workflows.
}
>
Add multi-tenant aware prioritization, concurrency, throttling, batching, and rate limiting capabilities to your Inngest Functions.
}
>
Monitor your deployments with Metrics and Function & Events Logs.
}
>
Deploy your Inngest Functions to Vercel, Netlify, Cloudflare Pages and other Cloud Providers.
## LLM Docs
An LLM-friendly version of the Inngest docs is available in two formats: `llms.txt` and `llms-full.txt`. These are useful for passing context to LLMs, AI-enabled IDEs, or similar tools to answer questions about Inngest.
* [inngest.com/llms.txt](https://www.inngest.com/llms.txt) - A table of contents for the docs, ideal for smaller context windows or tools that can crawl the docs.
* [inngest.com/llms-full.txt](https://www.inngest.com/llms-full.txt) - The entire docs in markdown format.
## Community & Support
If you need help with Inngest, you can reach out to us in the following ways:
* [Ask your questions in our Discord community](/discord)
* [Open a ticket in our support center](https://app.inngest.com/support)
* [Contact our sales engineering team](/contact?ref=docs)
# Glossary
Source: https://www.inngest.com/docs/learn/glossary
description = `Key terms for Inngest's documentation explained.`
This glossary serves as a quick reference for key terminology used in Inngest's documentation. The terms are organized alphabetically.
## Batching
Batching is one of the methods offered by Inngest's [Flow Control](#flow-control). It allows you to process multiple events in a single batch function to improve efficiency and reduce system load. By handling high volumes of data in batches, you can optimize performance, minimize processing time, and reduce costs associated with handling individual events separately. Read more about [Batching](https://www.inngest.com/docs/guides/batching).
## Concurrency Management
Concurrency management is one of the methods offered by Inngest's [Flow Control](#flow-control). It involves controlling the number of [steps](#inngest-step) executing simultaneously within a [function](#inngest-function). It prevents system overload by limiting how many processes run at once, which can be set at various levels such as globally, per-function, or per-user. This ensures efficient resource use and system stability, especially under high load conditions. Read more about [Concurrency Management](/docs/guides/concurrency).
## Debouncing
Debouncing is one of the methods offered by Inngest's [Flow Control](#flow-control). It prevents a [function](#inngest-function) from being executed multiple times in rapid succession by ensuring it is only triggered after a specified period of inactivity. This technique helps to eliminate redundant function executions caused by quick, repeated events, thereby optimizing performance and reducing unnecessary load on the system. It is particularly useful for managing user input events and other high-frequency triggers. Read more about [Debouncing](/docs/guides/debounce).
## Durable Execution
Durable Execution ensures that functions are fault-tolerant and resilient by handling failures and interruptions gracefully. It uses automatic retries and state persistence to allow [functions](#inngest-function) to continue running from the point of failure, even if issues like network failures or timeouts occur. This approach enhances the reliability and robustness of applications, making them capable of managing even complex and long-running workflows. Read more about [Durable Execution](/docs/learn/how-functions-are-executed).
## Fan-out Function
A fan-out function (also known as "fan-out job") in Inngest is designed to trigger multiple [functions](#inngest-function) simultaneously from a single [event](#inngest-event). This is particularly useful when an event needs to cause several different processes to run in parallel, such as sending notifications, updating databases, or performing various checks. Fan-out functions enhance the efficiency and responsiveness of your application by allowing concurrent execution of tasks, thereby reducing overall processing time and enabling complex workflows. Read more about [Fan-out Functions](/docs/guides/fan-out-jobs).
## Flow Control
Flow control in Inngest encompasses rate, throughput, priority, timing, and conditions of how functions are executed in regard to events. It helps optimize the performance and reliability of workflows by preventing bottlenecks and managing the execution order of tasks with tools like [steps](#inngest-step). Read more about [Flow Control](/docs/guides/flow-control).
## Function Replay
Function replay allows developers to rerun failed functions from any point in their execution history. This is useful for debugging and correcting errors without needing to manually re-trigger events, thus maintaining workflow integrity and minimizing downtime. Read more about [Function Replay](/docs/platform/replay).
## Idempotency
Idempotency is one of the methods offered by Inngest's [Flow Control](#flow-control). It guarantees that multiple identical requests have the same effect as a single request, preventing unintended side effects from repeated executions. By handling idempotency, you can avoid issues such as duplicate transactions or repeated actions, ensuring that your workflows remain accurate and dependable. Read more about [Handling idempotency](/docs/guides/handling-idempotency).
## Inngest App
Inngest apps are higher-level constructs that group multiple [functions](#inngest-function) and configurations under a single entity. An Inngest app can consist of various functions that work together to handle complex workflows and business logic. This abstraction helps in organizing and managing related functions and their configurations efficiently within the Inngest platform. Read more about [Inngest Apps](/docs/apps/cloud).
## Inngest Client
The Inngest client is a component that interacts with the Inngest platform. It is used to define and manage [functions](#inngest-function), send [events](#inngest-event), and configure various aspects of the Inngest environment. The client serves as the main interface for developers to integrate Inngest's capabilities into their applications, providing methods to create functions, handle events, and more. Read more about [Inngest Client](/docs/reference/client/create).
## Inngest Cloud
Inngest Cloud (also referred to as "Inngest UI" or inngest.com) is the managed service for running and managing your [Inngest functions](#inngest-function). It comes with multiple environments for developing, testing, and production. Inngest Cloud handles tasks like state management, retries, and scalability, allowing you to focus on building your application logic. Read more about [Inngest Cloud](/docs/platform/environments).
## Inngest Dev Server
The Inngest Dev Server provides a local development environment that mirrors the production setup. It allows developers to test and debug their [functions](#inngest-function) locally, ensuring that code behaves as expected before deployment. This tool significantly enhances the development experience by offering real-time feedback and simplifying local testing. Read more about [Inngest Dev Server](/docs/local-development).
## Inngest Event
An event is a trigger that initiates the execution of a [function](#inngest-function). Events can be generated from various sources, such as user actions or external services (third party webhooks or API requests). Each event carries data that functions use to perform their tasks. Inngest supports handling these events seamlessly. Read more about [Events](/docs/events).
## Inngest Function
Inngest functions are the fundamental building blocks of the Inngest platform,
which enable developers to run reliable background logic, from background jobs to complex workflows. They provide robust tools for retrying, scheduling, and coordinating complex sequences of operations. They are composed of [steps](#inngest-step) that can run independently and be retried in case of failure. Inngest functions are powered by [Durable Execution](#durable-execution), ensuring reliability and fault tolerance, and can be deployed on any platform, including serverless environments. Read more about [Inngest Functions](/docs/learn/inngest-functions).
## Inngest Step
In Inngest, a "step" represents a discrete, independently retriable unit of work within a [function](#inngest-function). Steps enable complex workflows by breaking down a function into smaller, manageable blocks, allowing for automatic retries and state persistence. This approach ensures that even if a step fails, only that task is retried, not the entire function. Read more about [Inngest Steps](/docs/learn/inngest-steps).
## Priority
Priority is one of the methods offered by Inngest's [Flow Control](#flow-control). It allows you to assign different priority levels to [functions](#inngest-function), ensuring that critical tasks are executed before less important ones. By setting priorities, you can manage the order of execution, improving the responsiveness and efficiency of your workflows. This feature is essential for optimizing resource allocation and ensuring that high-priority operations are handled promptly. Read more about [Priority](/docs/guides/priority).
{/* Once we add the new o11y
## Observability
Observability in Inngest refers to the ability to monitor and analyze the execution of functions. It includes features like real-time metrics, full logs, and historical data of function runs. This visibility helps in diagnosing issues, optimizing performance, and ensuring the reliability of applications. Read more about [Observability](). */}
## Rate Limiting
Rate limiting is one of the methods offered by Inngest's [Flow Control](#flow-control). It controls the frequency of [function](#inngest-function) executions over a specified period to prevent overloading the system. It helps manage API calls and other resources by setting limits on how many requests or processes can occur within a given timeframe, ensuring system stability and fair usage. Read more about [Rate Limiting](/docs/guides/rate-limiting).
## SDK
The Software Development Kit (SDK) is a collection of tools, libraries, and documentation that allows developers to easily integrate and utilize Inngest's features within their applications. The SDK simplifies the process of creating, managing, and executing functions, handling events, and configuring workflows. It supports multiple programming languages and environments, ensuring broad compatibility and ease of use. Currently, Inngest offers SDKs for TypeScript, Python, and Go. Read more about [Inngest SDKs](/docs/reference).
## Step Memoization
Step memoization in Inngest refers to the technique of storing the results of steps so they do not need to be re-executed if already completed. This optimization enhances performance and reliability by preventing redundant computations and ensuring that each step's result is consistently available for subsequent operations. Read more about [Step Memoization](/docs/learn/how-functions-are-executed#secondary-executions-memoization-of-steps).
## Throttling
Throttling is one of the methods offered by Inngest's [Flow Control](#flow-control). It controls the rate at which [functions](#inngest-function) are executed to prevent system overload. By setting limits on the number of executions within a specific timeframe, throttling ensures that resources are used efficiently and helps maintain the stability and performance of your application. It can be configured on a per-user or per-function basis, allowing for flexible and precise control over execution rates. Read more about [Throttling](/docs/guides/throttling).
## Next Steps
- Explore Inngest through our [Quick Start](/docs/getting-started/nextjs-quick-start?ref=docs-glossary).
- Learn about [Inngest Functions](/docs/learn/inngest-functions).
- Learn about [Inngest Steps](/docs/learn/inngest-steps).
- Understand how [Inngest functions are executed](/docs/learn/how-functions-are-executed).
# How Inngest functions are executed: Durable Execution
Source: https://www.inngest.com/docs/learn/how-functions-are-executed
Description: Learn how Inngest functions are executed using Durable Execution. Understand how steps are executed, how errors are handled, and how state is persisted.
One of the core features of Inngest is Durable Execution. Durable Execution allows your functions to be fault-tolerant and resilient to failures. The end result is that your code, and therefore, your overall application, is more reliable.
This page covers what Durable Execution is, how it works, and how it works with Inngest functions.
{/* Note - this page is written a specific way for search optimization */}
## What is Durable Execution?
Durable Execution is a fault-tolerant approach to executing code that is achieved by handling failures and interruptions gracefully with automatic retries and state persistence. This means that your code can continue to run even if there are issues like network failures, timeouts, infrastructure outages, and other transient errors.
Key aspects of Durable Execution include:
* **State persistance** - Function state is persisted outside of the function execution context. This enables function execution to be resumed from the point of failure on the same _or_ different infrastructure.
* **Fault-tolerance** - Errors or exceptions are caught by the execution layer and are automatically retried. Retry behavior can be customized to handle the accepted number of retries and handle different types of errors.
In practice, Durable Execution is implemented in the form of "durable functions," sometimes also called "durable workflows." Durable functions can throw errors or exceptions and automatically retry, resuming execution from the point of failure. Durable functions are designed to be long-running and stateful, meaning that they can persist state across function invocations and retries.
## How Inngest functions work
Inngest functions are durable: they throw errors or exceptions, automatically retry from the point of failure, and can be stateful and long-running.
Inngest functions use "**Steps**" to define the execution flow of a function. Each step:
* Is a unit of work that can be run and retried independently.
* Captures any error or exception thrown within it.
* Will not be re-executed if it has already been successfully executed.
* Returns state (_data_) that can be used by subsequent steps.
* Can be executed in parallel or sequentially, depending on the function's configuration.
Complex functions can consist of many steps. This allows a long-running function to be broken down into smaller, more manageable units of work. As each step is retried independently, and the function can be resumed from the point of failure, avoiding unnecessary re-execution of work.
In comparison, some Durable Execution systems modify the runtime environment to persist state or interrupt errors or exceptions. Inngest SDKs are written using standard language primitives, which enables Inngest functions to run in any environment or runtime - including serverless environments - without modification.
### How steps are executed
Inngest functions are defined with a series of steps that define the execution flow of the function. Each step is defined with a unique ID and a function that defines the work to be done. The data returned can be used by subsequent steps.
Inngest functions execute incrementally, _step by step_. As a function is executed, the results of each step are returned to Inngest and persisted in a managed function state store. The steps that successfully executed are [_memoized_](https://en.wikipedia.org/wiki/Memoization). The function then resumes, skipping any steps that have already been completed and the SDK injects the data returned by the previous step into the function.
Each step in your function is executed as **a separate HTTP request**. Any non-deterministic logic (such as DB calls or API calls) must be placed within a `step.run()` call to ensure it executes efficiently and correctly in the context of the execution model.
Let's look at an example of a function and walk through how it is executed:
```typescript
inngest.createFunction(
{ id: "import-contacts" },
{ event: "contacts/csv.uploaded" },
// The function handler:
async ({ event, step }) => {
await step.run("parse-csv", async () => {
return await parseCsv(event.data.fileURI);
});
await step.run("normalize-raw-csv", async () => {
getNormalizedColumnNames();
return normalizeRows(rows, normalizedColumnMapping);
});
await step.run("input-contacts", async () => {
return await importContacts(normalizedRows);
});
return { results };
}
);
```
### Initial execution
1. When the function is first called, the _function handler_ is called with only the `event` payload data sent.
2. When the first step is discovered, the `"parse-csv"` step is run. As the step has not been executed before, the step's code (the callback function) is run and the result is captured.
3. The function does not continue executing beyond this step. Each SDK uses a different method to interrupt the function execution before running any more code in your function handler.
4. Internally, the step's ID (`"parse-csv"`) is hashed as the state identifier to be used in future executions. Additionally, the steps' index (`0` in this case) is also included in the result.
5. The result is sent back to Inngest and persisted in the function state store.
### Secondary executions - Memoization of steps
Each of the subsequent steps leverages the state of previous executions and memoization. Here's how it works:
6. The function is re-executed, this time with the `event` payload data and the state of the previous execution in JSON.
7. The next step is discovered (`"parse-csv"`).
8. The previous result is found in the state of previous executions. Internally, the SDK uses the hash of the step name to look up the result in the state data.
9. The step's code is not executed, instead the SDK injects the result into the return value of `step.run`, (in this example, the data will be returned as `rows`).
10. The function continues execution until the next step is discovered (`"normalize-raw-csv"`).
11. The step's code is executed and the result is returned to Inngest (in the same approach as steps 2-5 above).
### Error handling
Some steps may throw errors or exceptions during execution. Here's how error handling works within function execution:
12. If an error occurs during the execution of a step (for example, `"input-contacts"`), the function is interrupted and the error is caught by the SDK.
13. The error is serialized and returned to Inngest. The number of attempts are logged and the error is persisted in the function state store.
14. Depending on the number of attempts configured for the function, the function may be retried (see: [Error handling](/docs/guides/error-handling)):
* If the the function _has not_ exhausted the number of attempts, the function is re-executed from the point of failure with the state of all previous step executions. The step is re-executed and follows the same process as above (see: steps 6-11).
* If the function _has_ exhausted the number of attempts, the function is re-executed with the error thrown. The function can then catch and handle the error as desired (see: [Handling a failing step](/docs/guides/error-handling#handling-a-failing-step)).
{/* TODO - Add how parallel steps are executed differently (more complex topic) */}
To learn about how determinism is handled and how you can version functions, read the [Versioning long running functions](/docs/learn/versioning) guide.
## Conclusion
Inngest functions use steps and memoization to execute functions incrementally and durably. This approach ensures that functions are fault-tolerant and resilient to failures. By breaking down functions into steps, Inngest functions can be retried and resumed from the point of failure. This approach ensures that your code is more reliable and can handle transient errors gracefully.
## Further reading
More information on Durable Execution in Inngest:
- Blog post: ["How we built a fair multi-tenant queuing system"](/blog/building-the-inngest-queue-pt-i-fairness-multi-tenancy)
- Blog post: ["Debouncing in Queueing Systems: Optimizing Efficiency in Asynchronous Workflows"](/blog/debouncing-in-queuing-systems-optimizing-efficiency-in-async-workflows)
- Blog post: ["Accidentally Quadratic: Evaluating trillions of event matches in real-time"](/blog/accidentally-quadratic-evaluating-trillions-of-event-matches-in-real-time)
- Blog post: ["Queues aren't the right abstraction"](/blog/queues-are-no-longer-the-right-abstraction)
# Inngest Functions
Source: https://www.inngest.com/docs/learn/inngest-functions
Description: Learn what Inngest functions are and of what they are capable.';
# Inngest Functions
Inngest functions enable developers to run reliable background logic, from background jobs to complex workflows. They provide robust tools for retrying, scheduling, and coordinating complex sequences of operations.
This page covers components of an Inngest function, as well as introduces different kinds of functions. If you'd like to learn more about Inngest's execution model, check the [
How Inngest functions are executed"](/docs/learn/how-functions-are-executed) page.
#
Let's have a look at the following Inngest function:
```ts
export default inngest.createFunction(
// config
{ id: "import-product-images" },
// trigger (event or cron)
{ event: "shop/product.imported" },
// handler function
async ({ event, step }) => {
// Here goes the business logic
// By wrapping code in steps, it will be retried automatically on failure
await step.run("copy-images-to-s3", async () => {
return copyAllImagesToS3(event.data.imageURLs);
});
// You can include numerous steps in your function
await ctx.step.run('resize-images', async () => {
await resizer.bulk({ urls: s3Urls, quality: 0.9, maxWidth: 1024 });
})
};
);
```
```go
import (
"github.com/inngest/inngestgo"
"github.com/inngest/inngestgo/step"
)
inngestgo.CreateFunction(
// config
&inngestgo.FunctionOpts{
ID: "import-product-images",
},
// trigger (event or cron)
inngestgo.EventTrigger("shop/product.imported", nil),
// handler function
func(ctx context.Context, input inngestgo.Input) (any, error) {
// Here goes the business logic
// By wrapping code in steps, it will be retried automatically on failure
s3Urls, err := step.Run("copy-images-to-s3", func() ([]string, error) {
return copyAllImagesToS3(input.Event.Data["imageURLs"].([]string))
})
if err != nil {
return nil, err
}
// You can include numerous steps in your function
_, err = step.Run("resize-images", func() (any, error) {
return nil, resizer.Bulk(ResizerOpts{
URLs: s3Urls,
Quality: 0.9,
MaxWidth: 1024,
})
})
if err != nil {
return nil, err
}
return nil, nil
},
)
```
```py
import inngest
from src.inngest.client import inngest_client
@inngest_client.create_function(
# config
id="import-product-images",
# trigger (event or cron)
trigger=inngest.Trigger(event="shop/product.imported")
)
async def import_product_images(ctx: inngest.Context):
# Here goes the business logic
# By wrapping code in steps, it will be retried automatically on failure
s3_urls = await ctx.step.run(
"copy-images-to-s3",
lambda: copy_all_images_to_s3(ctx.event.data["imageURLs"])
)
# You can include numerous steps in your function
await ctx.step.run(
"resize-images",
lambda: resizer.bulk(
urls=s3_urls,
quality=0.9,
max_width=1024
)
)
```
The above code can be explained as:
> This Inngest function is called `import-product-images`. When an event called `shop/product.imported` is received, run two steps: `copy-images-to-s3` and `resize-images`.
Let's have a look at each of this function's components.
{/*
💡 You can test Inngest functions using standard tooling such as Jest or Mocha. To do so, export the job code and run standard unit tests.
*/}
### Config
The first parameter of the `createFunction` method specifies Inngest function's configuration. In the above example, the `id` is specified, which will be used to identify the function in the Inngest system.
You can see this ID in the [Inngest Dev Server's](/docs/local-development) function list:
[IMAGE]
You can also provide other [configuration options](/docs/reference/functions/create#configuration), such as `concurrency`, `throttle`, `debounce`, `rateLimit`, `priority`, `batchEvents`, or `idempotency` (learn more about [Flow Control](/docs/guides/flow-control)). You can also specify how many times the function will retry, what callback function will run on failure, and when to cancel the function.
### Trigger
Inngest functions are designed to be triggered by events or crons (schedules). Events can be [sent from your own code](/docs/events) or received from third party webhooks or API requests. When an event is received, it triggers a corresponding function to execute the tasks defined in the function handler (see the ["Handler" section](#handler) below).
Each function needs at least one trigger. However, you can also work with [multiple triggers](/docs/guides/multiple-triggers) to invoke your function whenever any of the events are received or cron schedule occurs.
### Handler
A "handler" is the core function that defines what should happen when the function is triggered.
The handler receives context, which includes the event data, tools for managing execution flow, or logging configuration. Let's take a closer look at them.
#### `event`
Handler has access to the data which you pass when sending events to Inngest via [`inngest.send()`](/docs/reference/events/send) or [`step.sendEvent()`](/docs/reference/functions/step-send-event).
You can see this in the example above in the `event` parameter.
#### `step`
[Inngest steps](/docs/learn/inngest-steps) are fundamental building blocks in Inngest functions. They are used to manage execution flow. Each step is a discrete task, which can be executed, retried, and recovered independently, without re-executing other successful steps.
It's helpful to think of steps as code-level transactions. If your handler contains several independent tasks, it's good practice to [wrap each one in a step](/docs/guides/multi-step-functions).
In this way, you can manage complex state easier and if any task fails, it will be retried independently from others.
There are several step methods available at your disposal, for example, `step.run`, `step.sleep()`, or `step.waitForEvent()`.
In the example above, the handler contains two steps: `copy-images-to-s3` and `resize-images`.
### Config
The first parameter of the `createFunction` method specifies Inngest function's configuration. In the above example, the `id` is specified, which will be used to identify the function in the Inngest system.
You can see this ID in the [Inngest Dev Server's](/docs/local-development) function list:
[IMAGE]
You can also provide other [configuration options](https://pkg.go.dev/github.com/inngest/inngestgo#CreateFunction), such as `Concurrency`, `Throttle`, `Debounce`, `RateLimit`, `Priority`, `BatchEvents`, or `Idempotency` (learn more about [Flow Control](/docs/guides/flow-control)). You can also specify how many times the function will retry, what callback function will run on failure, and when to cancel the function.
### Trigger
Inngest functions are designed to be triggered by events or crons (schedules). Events can be [sent from your own code](/docs/events) or received from third party webhooks or API requests. When an event is received, it triggers a corresponding function to execute the tasks defined in the function handler (see the ["Handler" section](#handler) below).
Each function needs at least one trigger. However, you can also work with [multiple triggers](/docs/guides/multiple-triggers) to invoke your function whenever any of the events are received or cron schedule occurs.
### Handler
A "handler" is the core function that defines what should happen when the function is triggered.
The handler receives context, which includes the event data, tools for managing execution flow, or logging configuration. Let's take a closer look at them.
#### `event`
Handler has access to the data which you pass when sending events to Inngest via [`inngest.Send()`](https://pkg.go.dev/github.com/inngest/inngestgo#Send).
You can see this in the example above in the `event` parameter.
#### `step`
[Inngest steps](/docs/learn/inngest-steps) are fundamental building blocks in Inngest functions. They are used to manage execution flow. Each step is a discrete task, which can be executed, retried, and recovered independently, without re-executing other successful steps.
It's helpful to think of steps as code-level transactions. If your handler contains several independent tasks, it's good practice to [wrap each one in a step](/docs/guides/multi-step-functions).
In this way, you can manage complex state easier and if any task fails, it will be retried independently from others.
There are several step methods available at your disposal, for example, `step.Run`, `step.Sleep()`, or `step.WaitForEvent()`.
In the example above, the handler contains two steps: `copy-images-to-s3` and `resize-images`.
### Config
The first parameter of the `createFunction` method specifies Inngest function's configuration. In the above example, the `id` is specified, which will be used to identify the function in the Inngest system.
You can see this ID in the [Inngest Dev Server's](/docs/local-development) function list:
[IMAGE]
You can also provide other [configuration options](/docs/reference/python/functions/create), such as `concurrency`, `throttle`, `debounce`, `rateLimit`, `priority`, `batchEvents`, or `idempotency` (learn more about [Flow Control](/docs/guides/flow-control)). You can also specify how many times the function will retry, what callback function will run on failure, and when to cancel the function.
### Trigger
Inngest functions are designed to be triggered by events or crons (schedules). Events can be [sent from your own code](/docs/events) or received from third party webhooks or API requests. When an event is received, it triggers a corresponding function to execute the tasks defined in the function handler (see the ["Handler" section](#handler) below).
Each function needs at least one trigger. However, you can also work with [multiple triggers](/docs/guides/multiple-triggers) to invoke your function whenever any of the events are received or cron schedule occurs.
### Handler
A "handler" is the core function that defines what should happen when the function is triggered.
The handler receives context, which includes the event data, tools for managing execution flow, or logging configuration. Let's take a closer look at them.
#### `event`
Handler has access to the data which you pass when sending events to Inngest via [`inngest.send()`](/docs/reference/python/client/send) or [`step.send_event()`](/docs/reference/python/functions/step-send-event).
You can see this in the example above in the `event` parameter.
#### `step`
[Inngest steps](/docs/learn/inngest-steps) are fundamental building blocks in Inngest functions. They are used to manage execution flow. Each step is a discrete task, which can be executed, retried, and recovered independently, without re-executing other successful steps.
It's helpful to think of steps as code-level transactions. If your handler contains several independent tasks, it's good practice to [wrap each one in a step](/docs/guides/multi-step-functions).
In this way, you can manage complex state easier and if any task fails, it will be retried independently from others.
There are several step methods available at your disposal, for example, `step.run`, `step.sleep()`, or `step.wait_for_event()`.
In the example above, the handler contains two steps: `copy-images-to-s3` and `resize-images`.
## Kinds of Inngest functions
### Background functions {{anchor: false}}
Long tasks can be executed outside the critical path of the main flow, which improves app's performance and reliability. Perfect for communicating with third party APIs or executing long-running code.
### Scheduled functions {{anchor: false}}
Inngest's scheduled functions enable you to run tasks automatically at specified intervals using cron schedules. These functions ensure consistent and timely execution without manual intervention. Perfect for routine operations like sending weekly reports or clearing caches.
### Delayed functions {{anchor: false}}
You can enqueue an Inngest function to run at a specific time in the future. The task will be executed exactly when needed without manual intervention. Perfect for actions like sending follow-up emails or processing delayed orders.
### Step functions {{anchor: false}}
Step functions allow you to create complex workflows. You can coordinate between multiple steps, including waiting for other events, delaying execution, or running code conditionally based on previous steps or incoming events. Each [step](/docs/learn/inngest-steps) is individually retriable, making the workflow robust against failures. Ideal for scenarios like onboarding flows or conditional notifications.
### Fan-out functions {{anchor: false}}
Inngest's fan-out jobs enable a single event to trigger multiple functions simultaneously. Ideal for parallel processing tasks, like sending notifications to multiple services or processing data across different systems.
## Invoking functions directly
You can [call an Inngest function directly](/docs/guides/invoking-functions-directly) from within your event-driven system by using `step.invoke()`, even across different Inngest SDKs.
This is useful when you need to break down complex workflows into simpler, manageable parts or when you want to leverage existing functionality without duplicating code. Direct invocation is ideal for orchestrating dependent tasks, handling complex business logic, or improving code maintainability and readability.
## Further reading
- [Quick Start guide](/docs/getting-started/nextjs-quick-start?ref=docs-inngest-functions): learn how to build complex workflows.
- ["How Inngest functions are executed"](/docs/learn/how-functions-are-executed): learn more about Inngest's execution model.
- ["Inngest steps"](/docs/learn/inngest-steps): understand building Inngest's blocks.
- ["Flow Control"](/docs/guides/flow-control): learn how to manage execution within Inngest functions.
# Inngest Steps
Source: https://www.inngest.com/docs/learn/inngest-steps
Description: Learn about Inngest steps and their methods.';
import { GuideSelector, GuideSection } from
How Inngest functions are executed"](/docs/learn/how-functions-are-executed) page.
#
The first argument of every Inngest step method is an `id`. Each step is treated as a discrete task which can be individually retried, debugged, or recovered. Inngest uses the ID to memoize step state across function versions.
```typescript
export default inngest.createFunction(
{ id: "import-product-images" },
{ event: "shop/product.imported" },
async ({ event, step }) => {
await step.run(
// step ID
"copy-images-to-s3",
// other arguments, in this case: a handler
async () => {
return copyAllImagesToS3(event.data.imageURLs);
});
}
);
```
The ID is also used to identify the function in the Inngest system.
Inngest's SDK also records a counter for each unique step ID. The counter increases every time the same step is called. This allows you to run the same step in a loop, without changing the ID.
Please note that each step is executed as **a separate HTTP request**. To ensure efficient and correct execution, place any non-deterministic logic (such as DB calls or API calls) within a `step.run()` call.
## Available Step Methods
### step.run()
{{anchor: false}}
This method executes a defined piece of code.
Code within `step.run()` is automatically retried if it throws an error. When `step.run()` finishes successfully, the response is saved in the function run state and the step will not re-run.
Use it to run synchronous or asynchronous code as a retriable step in your function.
```typescript
export default inngest.createFunction(
{ id: "import-product-images" },
{ event: "shop/product.imported" },
async ({ event, step }) => {
// Here goes the business logic
// By wrapping code in steps, it will be retried automatically on failure
await step.run("copy-images-to-s3", async () => {
return copyAllImagesToS3(event.data.imageURLs);
});
}
);
```
`step.run()` acts as a code-level transaction. The entire step must succeed to complete.
### step.sleep()
{{anchor: false}}
This method pauses execution for a specified duration. Even though it seems like a `setInterval`, your function does not run for that time (you don't use any compute). Inngest handles the scheduling for you. Use it to add delays or to wait for a specific amount of time before proceeding. At maximum, functions can sleep for a year (seven days for the [free tier plans](/pricing)).
```typescript
export default inngest.createFunction(
{ id: "send-delayed-email" },
{ event: "app/user.signup" },
async ({ event, step }) => {
await step.sleep("wait-a-couple-of-days", "2d");
// Do something else
}
);
```
### step.sleepUntil()
{{anchor: false}}
This method pauses execution until a specific date time. Any date time string in the format accepted by the Date object, for example `YYYY-MM-DD` or `YYYY-MM-DDHH:mm:ss`. At maximum, functions can sleep for a year (seven days for the [free tier plans](/pricing)).
```typescript
export default inngest.createFunction(
{ id: "send-scheduled-reminder" },
{ event: "app/reminder.scheduled" },
async ({ event, step }) => {
new Date(event.data.remind_at);
await step.sleepUntil("wait-for-the-date", date);
// Do something else
}
);
```
### step.waitForEvent()
{{anchor: false}}
This method pauses the execution until a specific event is received.
```typescript
export default inngest.createFunction(
{ id: "send-onboarding-nudge-email" },
{ event: "app/account.created" },
async ({ event, step }) => {
await step.waitForEvent(
"wait-for-onboarding-completion",
{ event: "app/onboarding.completed", timeout: "3d", if: "event.data.userId == async.data.userId" }
);
// Do something else
}
);
```
### step.invoke()
{{anchor: false}}
This method is used to asynchronously call another Inngest function ([written in any language SDK](/blog/cross-language-support-with-new-sdks)) and handle the result. Invoking other functions allows you to easily re-use functionality and compose them to create more complex workflows or map-reduce type jobs.
This method comes with its own configuration, which enables defining specific settings like concurrency limits.
```typescript
// A function we will call in another place in our app
inngest.createFunction(
{ id: "compute-square" },
{ event: "calculate/square" },
async ({ event }) => {
return { result: event.data.number * event.data.number }; // Result typed as { result: number }
}
);
// In this function, we'll call `computeSquare`
inngest.createFunction(
{ id: "main-function" },
{ event: "main/event" },
async ({ step }) => {
await step.invoke("compute-square-value", {
function: computeSquare,
data: { number: 4 }, // input data is typed, requiring input if it's needed
});
return `Square of 4 is ${square.result}.`; // square.result is typed as number
}
);
```
### step.sendEvent()
{{anchor: false}}
This method sends events to Inngest to invoke functions with a matching event. Use `sendEvent()` when you want to trigger other functions, but you do not need to return the result. It is useful for example in [fan-out functions](/docs/guides/fan-out-jobs).
```typescript
export default inngest.createFunction(
{ id: "user-onboarding" },
{ event: "app/user.signup" },
async ({ event, step }) => {
// Do something
await step.sendEvent("send-activation-event", {
name: "app/user.activated",
data: { userId: event.data.userId },
});
// Do something else
}
);
```
The first argument of every Inngest step method is an `id`. Each step is treated as a discrete task which can be individually retried, debugged, or recovered. Inngest uses the ID to memoize step state across function versions.
```go
import (
"github.com/inngest/inngestgo"
"github.com/inngest/inngestgo/step"
)
inngestgo.CreateFunction(
// config
&inngestgo.FunctionOpts{
ID: "import-product-images",
},
// trigger (event or cron)
inngestgo.EventTrigger("shop/product.imported", nil),
// handler function
func(ctx context.Context, input inngestgo.Input) (any, error) {
// Here goes the business logic
// By wrapping code in steps, it will be retried automatically on failure
s3Urls, err := step.Run("copy-images-to-s3", func() ([]string, error) {
return copyAllImagesToS3(input.Event.Data["imageURLs"].([]string))
})
if err != nil {
return nil, err
}
return nil, nil
},
)
```
The ID is also used to identify the function in the Inngest system.
Inngest's SDK also records a counter for each unique step ID. The counter increases every time the same step is called. This allows you to run the same step in a loop, without changing the ID.
Please note that each step is executed as **a separate HTTP request**. To ensure efficient and correct execution, place any non-deterministic logic (such as DB calls or API calls) within a `step.run()` call.
## Available Step Methods
### step.Run()
{{anchor: false}}
This method executes a defined piece of code.
Code within `step.Run()` is automatically retried if it throws an error. When `step.Run()` finishes successfully, the response is saved in the function run state and the step will not re-run.
Use it to run synchronous or asynchronous code as a retriable step in your function.
```go
import (
"github.com/inngest/inngestgo"
"github.com/inngest/inngestgo/step"
)
inngestgo.CreateFunction(
&inngestgo.FunctionOpts{
ID: "import-product-images",
},
inngestgo.EventTrigger("shop/product.imported", nil),
func(ctx context.Context, input inngestgo.Input) (any, error) {
// Here goes the business logic
// By wrapping code in steps, it will be retried automatically on failure
s3Urls, err := step.Run("copy-images-to-s3", func() ([]string, error) {
return copyAllImagesToS3(input.Event.Data["imageURLs"].([]string))
})
if err != nil {
return nil, err
}
return nil, nil
},
)
```
`step.Run()` acts as a code-level transaction. The entire step must succeed to complete.
### step.Sleep()
{{anchor: false}}
This method pauses execution for a specified duration. Inngest handles the scheduling for you. Use it to add delays or to wait for a specific amount of time before proceeding. At maximum, functions can sleep for a year (seven days for the [free tier plans](/pricing)).
```go
import (
"github.com/inngest/inngestgo"
"github.com/inngest/inngestgo/step"
)
inngestgo.CreateFunction(
&inngestgo.FunctionOpts{
ID: "send-delayed-email",
},
inngestgo.EventTrigger("app/user.signup", nil),
// handler function
func(ctx context.Context, input inngestgo.Input) (any, error) {
step.Sleep("wait-a-couple-of-days", 2 * time.Day)
},
)
```
### step.WaitForEvent()
{{anchor: false}}
This method pauses the execution until a specific event is received.
```go
import (
"github.com/inngest/inngestgo"
"github.com/inngest/inngestgo/errors"
"github.com/inngest/inngestgo/step"
)
inngestgo.CreateFunction(
&inngestgo.FunctionOpts{
ID: "send-delayed-email",
},
inngestgo.EventTrigger("app/user.signup", nil),
// handler function
func(ctx context.Context, input inngestgo.Input) (any, error) {
// Sample from the event stream for new events. The function will stop
// running and automatically resume when a matching event is found, or if
// the timeout is reached.
fn, err := step.WaitForEvent[FunctionCreatedEvent](
ctx,
"wait-for-activity",
step.WaitForEventOpts{
Name: "Wait for a function to be created",
Event: "api/function.created",
Timeout: time.Hour * 72,
// Match events where the user_id is the same in the async sampled event.
If: inngestgo.StrPtr("event.data.user_id == async.data.user_id"),
},
)
if err == step.ErrEventNotReceived {
// A function wasn't created within 3 days. Send a follow-up email.
_, _ = step.Run(ctx, "follow-up-email", func(ctx context.Context) (any, error) {
// ...
return true, nil
})
return nil, nil
}
},
)
```
### step.Invoke()
{{anchor: false}}
This method is used to asynchronously call another Inngest function ([written in any language SDK](/blog/cross-language-support-with-new-sdks)) and handle the result. Invoking other functions allows you to easily re-use functionality and compose them to create more complex workflows or map-reduce type jobs.
This method comes with its own configuration, which enables defining specific settings like concurrency limits.
```go
import (
"github.com/inngest/inngestgo"
"github.com/inngest/inngestgo/errors"
"github.com/inngest/inngestgo/step"
)
inngestgo.CreateFunction(
&inngestgo.FunctionOpts{
ID: "send-delayed-email",
},
inngestgo.EventTrigger("app/user.signup", nil),
// handler function
func(ctx context.Context, input inngestgo.Input) (any, error) {
// Invoke another function and wait for its result
result, err := step.Invoke[any](
ctx,
"invoke-email-function",
step.InvokeOpts{
FunctionID: "send-welcome-email",
// Pass data to the invoked function
Data: map[string]any{
"user_id": input.Event.Data["user_id"],
"email": input.Event.Data["email"],
},
// Optional: Set a concurrency limit
Concurrency: step.ConcurrencyOpts{
Limit: 5,
Key: "user-{{event.data.user_id}}",
},
},
)
if err != nil {
return nil, err
}
return result, nil
},
)
```
The first argument of every Inngest step method is an `id`. Each step is treated as a discrete task which can be individually retried, debugged, or recovered. Inngest uses the ID to memoize step state across function versions.
```python
import inngest
from src.inngest.client import inngest_client
@inngest_client.create_function(
fn_id="import-product-images",
event="shop/product.imported"
)
async def import_product_images(ctx: inngest.Context):
uploaded_image_urls = await ctx.step.run(
# step ID
"copy-images-to-s3",
# other arguments, in this case: a handler
lambda: copy_all_images_to_s3(ctx.event.data["image_urls"])
)
```
The ID is also used to identify the function in the Inngest system.
Inngest's SDK also records a counter for each unique step ID. The counter increases every time the same step is called. This allows you to run the same step in a loop, without changing the ID.
Please note that each step is executed as **a separate HTTP request**. To ensure efficient and correct execution, place any non-deterministic logic (such as DB calls or API calls) within a `step.run()` call.
## Available Step Methods
### step.run()
{{anchor: false}}
This method executes a defined piece of code.
Code within `step.run()` is automatically retried if it throws an error. When `step.run()` finishes successfully, the response is saved in the function run state and the step will not re-run.
Use it to run synchronous or asynchronous code as a retriable step in your function.
```python
import inngest
from src.inngest.client import inngest_client
@inngest_client.create_function(
fn_id="import-product-images",
event="shop/product.imported"
)
async def import_product_images(ctx: inngest.Context):
# Here goes the business logic
# By wrapping code in steps, it will be retried automatically on failure
uploaded_image_urls = await ctx.step.run(
# step ID
"copy-images-to-s3",
# other arguments, in this case: a handler
lambda: copy_all_images_to_s3(ctx.event.data["image_urls"])
)
```
`step.run()` acts as a code-level transaction. The entire step must succeed to complete.
### step.sleep()
{{anchor: false}}
This method pauses execution for a specified duration. Inngest handles the scheduling for you. Use it to add delays or to wait for a specific amount of time before proceeding. At maximum, functions can sleep for a year (seven days for the [free tier plans](/pricing)).
```python
import inngest
from src.inngest.client import inngest_client
@inngest_client.create_function(
fn_id="send-delayed-email",
trigger=inngest.Trigger(event="app/user.signup")
)
async def send_delayed_email(ctx: inngest.Context):
await ctx.step.sleep("wait-a-couple-of-days", datetime.timedelta(days=2))
# Do something else
```
### step.sleep_until()
{{anchor: false}}
This method pauses execution until a specific date time. Any date time string in the format accepted by the Date object, for example `YYYY-MM-DD` or `YYYY-MM-DDHH:mm:ss`. At maximum, functions can sleep for a year (seven days for the [free tier plans](/pricing)).
```python
import inngest
from src.inngest.client import inngest_client
from datetime import datetime
@inngest_client.create_function(
fn_id="send-scheduled-reminder",
trigger=inngest.Trigger(event="app/reminder.scheduled")
)
async def send_scheduled_reminder(ctx: inngest.Context):
date = datetime.fromisoformat(ctx.event.data["remind_at"])
await ctx.step.sleep_until("wait-for-the-date", date)
# Do something else
```
### step.wait_for_event()
{{anchor: false}}
This method pauses the execution until a specific event is received.
```python
import inngest
from src.inngest.client import inngest_client
@inngest_client.create_function(
fn_id="send-onboarding-nudge-email",
trigger=inngest.Trigger(event="app/account.created")
)
async def send_onboarding_nudge_email(ctx: inngest.Context):
onboarding_completed = await ctx.step.wait_for_event(
"wait-for-onboarding-completion",
event="app/wait_for_event.fulfill",
if_exp="event.data.user_id == async.data.user_id",
timeout=datetime.timedelta(days=1),
);
# Do something else
```
### step.invoke()
{{anchor: false}}
This method is used to asynchronously call another Inngest function ([written in any language SDK](/blog/cross-language-support-with-new-sdks)) and handle the result. Invoking other functions allows you to easily re-use functionality and compose them to create more complex workflows or map-reduce type jobs.
This method comes with its own configuration, which enables defining specific settings like concurrency limits.
```python
import inngest
from src.inngest.client import inngest_client
@inngest_client.create_function(
fn_id="fn-1",
trigger=inngest.TriggerEvent(event="app/fn-1"),
)
async def fn_1(ctx: inngest.Context) -> None:
return "Hello!"
@inngest_client.create_function(
fn_id="fn-2",
trigger=inngest.TriggerEvent(event="app/fn-2"),
)
async def fn_2(ctx: inngest.Context) -> None:
output = await ctx.step.invoke(
"invoke",
function=fn_1,
)
# Prints "Hello!"
print(output)
```
### step.send_event()
{{anchor: false}}
This method sends events to Inngest to invoke functions with a matching event. Use `send_event()` when you want to trigger other functions, but you do not need to return the result. It is useful for example in [fan-out functions](/docs/guides/fan-out-jobs).
```python
import inngest
from src.inngest.client import inngest_client
@inngest_client.create_function(
fn_id="my_function",
trigger=inngest.TriggerEvent(event="app/my_function"),
)
async def fn(ctx: inngest.Context) -> list[str]:
return await ctx.step.send_event("send", inngest.Event(name="foo"))
```
## Further reading
- [Quick Start](/docs/getting-started/nextjs-quick-start?ref=docs-inngest-steps): learn how to build complex workflows.
- ["How Inngest functions are executed"](/docs/learn/how-functions-are-executed): Learn more about Inngest's execution model, including how steps are handled.
- Docs guide: ["Multi-step functions"](/docs/guides/multi-step-functions).
# Security
Source: https://www.inngest.com/docs/learn/security
Security is a primary consideration when moving systems into production. In this section we'll dive into how Inngest handles security, including endpoint security, encryption, standard practices, and how to add SAML authentication to your account.
## Compliance, audits, and reports
Inngest is [SOC 2 Type II compliant](/blog/soc2-compliant?ref=docs-security). Our company and platform is regularly audited to adhere to the standards of SOC 2. This ensures that we have the necessary controls in place to protect our customers' data and ensure the security and privacy of their information. Our platform and SDKs undergo periodic independent security assessments including penetration testing and red-team simulated attacks.
For more information on our security practices, or to request a copy of our SOC 2 report, please [contact our team](/contact?ref=docs-security).
## Signing keys and SDK security
Firstly, it's important to understand that in production all communication between Inngest and your servers is encrypted via TLS. The SDK also actively mitigates attacks by use of the [signing key](/docs/platform/signing-keys), a secret pre-shared key unique to each environment. By default, the signing key adds the following:
- **Authentication**: requests to your endpoint are authenticated, ensuring that they originate from Inngest. Inngest SDKs reject all requests that are not authenticated with the signing key.
- **Replay attack prevention:** requests are signed with a timestamp embedded, and old requests are rejected, even if the requests are authenticated correctly.
**It's important that the signing key is kept secret.** If your signing key is exposed, it puts the security of your endpoints at risk. Note that it's possible to [rotate signing keys](/docs/platform/signing-keys#rotation) with zero downtime.
### Function registration + handshake
Functions are defined and served on your own infrastructure using one of our SDKs. In order to run your functions, they must be [synced](/docs/apps/cloud), or registered, with your Inngest account. This is required for Inngest to know which functions your application is serving and the configuration of each function. Syncing functions is done via a secure handshake. Here's how the handshake works:
1. After your SDK's endpoint is live, a PUT request to the endpoint initiates a secure handshake with the Inngest servers.
2. The SDK sends function configuration to Inngest's API, with the signing key as a bearer token.
3. The SDK idempotently updates your apps and functions. If there are no changes, nothing happens.
This process is necessary for several reasons, largely as serverless environments are the lowest common denominator. Serverless environments have no default bootup/init process, which means serverless environments can't self-initiate the sync. Secondly, serverless platforms such as AWS Lambda and Vercel create unique URLs for each function deployed, which can't be known ahead of time. The incoming PUT request allows the SDK to introspect the request's URL, which is then used for all function calls.
Note that because the SDK only sends HTTP requests to `api.inngest.com` to complete the sync, it never leaks the signing key to clients attempting registration, keeping your key secure.
## End to end encryption
Inngest runs functions automatically, based off of event data that you send to Inngest. Additionally, Inngest runs steps transactionally, and stores the output of each `step.run` within function state. This may contain regulated, sensitive data.
**If you process sensitive data, we** **strongly recommend, and sometimes require, end-to-end encryption enabled in our SDKs**. [End-to-end encryption is a middleware](/docs/features/middleware/encryption-middleware) which intercepts requests, responses, and SDK logic on your own servers. With end to end encryption, data is encrypted on your servers with a key that only you have access to. The following applies:
- All data in `event.data.encrypted` is encrypted _before_ it leaves your servers. Inngest can never read data in this object.
- All step output and function output is encrypted _before_ it leaves your servers. Inngest only receives the encrypted values, and can never read this data. Function state is sent fully encrypted to the SDKs. The SDKs decrypt data on your servers and then resume as usual.
With this enabled, even in the case of unexpected issues your data is encrypted and secure. This greatly improves the security posture for sensitive data.
## SAML
Enterprise users can enable SAML authentication to access their account. In order to enable SAML, you must:
1. Reach out to your account manager and request a SAML integration.
2. From there, we'll request configuration related to your SAML provider. This differs depending on your provider, and may include:
1. A metadata URL; an SSO URL; An IdP entity ID; an IdP x.509 certificate, and so on.
3. Your account manager will then send you the ACS and Metadata URL used to configure your account.
4. Your account manager will work with you to correctly map attributes to ensure fully functioning sign in.
It's important to note that once SAML is enabled, users **must** sign in via SAML. If you're not on an enterprise plan, [contact us here](/contact?ref=docs-security), and we'll get you set up. There is no additional charge for SAML authentication below 200 users.
# Setting up your Inngest app
Source: https://www.inngest.com/docs/learn/serving-inngest-functions
description = `Serve the Inngest API as an HTTP endpoint in your application.`
hidePageSidebar = true;
With Inngest, you define functions or workflows using the SDK and deploy them to whatever platform or cloud provider you want including including serverless and container runtimes.
For Inngest to remotely execute your functions, you will need to set up a connection between your app and Inngest. This can be done in one of two ways:
Serve your Inngest functions by creating an HTTP endpoint in your application.
**Ideal for**:
- Serverless platforms like Vercel, Lambda, etc.
- Adding Inngest to an existing API.
- Zero changes to your CI/CD pipeline
Connect to Inngest's servers using out-bound WebSocket connection.
**Ideal for**:
- Container runtimes (Kubernetes, Docker, etc.)
- Latency sensitive applications
- Horizontal scaling with workers
Inngest functions are portable, so you can migrate between `serve()` and `connect()` as well as cloud providers.
## Serving Inngest functions
Inngest provides a `serve()` handler which adds an API endpoint to your router. You expose your functions to Inngest through this HTTP endpoint. To make automated deploys much easier, **the endpoint needs to be defined at `/api/inngest`** (though you can [change the API path](/docs/reference/serve#serve-client-functions-options)).
```ts {{ title: "./api/inngest.ts" }}
// All serve handlers have the same arguments:
serve({
client: inngest, // a client created with new Inngest()
functions: [fnA, fnB], // an array of Inngest functions to serve, created with inngest.createFunction()
/* Optional extra configuration */
});
```
## Supported frameworks and platforms
* [Astro](#framework-astro)
* [AWS Lambda](#framework-aws-lambda)
* [Bun](#bun-serve)
* [Cloudflare Pages](#framework-cloudflare-pages-functions)
* [Cloudflare Workers](#framework-cloudflare-workers)
* [DigitalOcean Functions](#framework-digital-ocean-functions)
* [Express](#framework-express)
* [Fastify](#framework-fastify)
* [Fresh (Deno)](#framework-fresh-deno)
* [Google Cloud Run Functions](#framework-google-cloud-run-functions)
* [Firebase Cloud functions](#framework-firebase-cloud-functions)
* [H3](#framework-h3)
* [Hono](#framework-hono)
* [Koa](#framework-koa)
* [NestJS](#framework-nest-js)
* [Next.js](#framework-next-js)
* [Nitro](#framework-nitro)
* [Nuxt](#framework-nuxt)
* [Redwood](#framework-redwood)
* [Remix](#framework-remix)
* [SvelteKit](#framework-svelte-kit)
You can also create a custom serve handler for any framework or platform not listed here - [read more here](#custom-frameworks).
Want us to add support for another framework? Open an issue on [GitHub](https://github.com/inngest/website) or tell us about it on our [Discord](/discord).
### Framework: Astro
Add the following to `./src/pages/api/inngest.ts`:
```ts {{ title: "v3" }}
{ GET, POST, PUT } = serve({
client: inngest,
functions,
});
```
See the [Astro example](https://github.com/inngest/inngest-js/tree/main/examples/framework-astro) for more information.
### Framework: AWS Lambda
We recommend using [Lambda function URLs](https://docs.aws.amazon.com/lambda/latest/dg/lambda-urls.html) to trigger your functions, as these require no other configuration or cost.
Alternatively, you can use an API Gateway to route requests to your Lambda. The handler supports [API Gateway V1](https://docs.aws.amazon.com/apigateway/latest/developerguide/http-api-develop-integrations-lambda.html) and [API Gateway V2](https://docs.aws.amazon.com/apigateway/latest/developerguide/http-api-develop-integrations-lambda.html). If you are running API Gateway behind a proxy or have some other configuration, you may have to specify the `serveHost` and `servePath` options when calling `serve()` to ensure Inngest knows the URL where you are serving your functions. See [Configuring the API path](/docs/reference/serve#serve-client-functions-options) for more details.
```ts {{ title: "v3" }}
// Your own function
handler = serve({
client: inngest,
functions: [fnA],
});
```
```ts {{ title: "v2" }}
// Your own function
handler = serve(inngest, [fnA]);
```
### Bun.serve()
You can use the `inngest/bun` handler with `Bun.serve()` for a lightweight
Inngest server:
```ts
Bun.serve({
port: 3000,
fetch(request: Request) {
new URL(request.url);
if (url.pathname === "/api/inngest") {
return serve({ client: inngest, functions })(request);
}
return new Response("Not found", { status: 404 });
},
});
```
See the [Bun example](https://github.com/inngest/inngest-js/tree/main/examples/bun) for more information.
### Framework: Cloudflare Pages Functions
You can import the Inngest API server when using Cloudflare pages functions within `/functions/api/inngest.js`:
```ts {{ title: "v3" }}
// Your own function
onRequest = serve({
client: inngest,
functions: [fnA],
});
```
```ts {{ title: "v2" }}
// Your own function
onRequest = serve({
client: inngest,
functions: [fnA],
});
```
### Framework: Cloudflare Workers
You can export `"inngest/cloudflare"`'s `serve()` as your Cloudflare Worker:
```ts
export default {
fetch: serve({
client: inngest,
functions: [fnA],
// We suggest explicitly defining the path to serve Inngest functions
servePath: "/api/inngest",
}),
};
```
To automatically pass environment variables defined with Wrangler to Inngest function handlers, use the [Cloudflare Workers bindings middleware](/docs/examples/middleware/cloudflare-workers-environment-variables).
#### Local development with Wrangler
When developing locally with Wrangler and the `--remote` flag, your code is
deployed and run remotely. To use this with a local Inngest Dev Server, you must
use a tool such as [ngrok](https://ngrok.com/) or
[localtunnel](https://theboroer.github.io/localtunnel-www/) to allow access to
the Dev Server from the internet.
```sh
ngrok http 8288
```
```toml {{ title: "wrangler.toml" }}
[vars]
# The URL of your tunnel. This enables the "cloud" worker to access the local Dev Server
INNGEST_DEV = "https://YOUR_TUNNEL_URL.ngrok.app"
# This may be needed:
# The URL of your local server. This enables the Dev Server to access the app at this local URL
# You may have to change this URL to match your local server if running on a different port.
# Without this, the "cloud" worker may attempt to redirect Inngest to the wrong URL.
INNGEST_SERVE_HOST = "http://localhost:8787"
```
See an example of this in the [Hono framework example on GitHub](https://github.com/inngest/inngest-js/tree/main/examples/framework-hono).
### Framework: DigitalOcean Functions
The DigitalOcean serve function allows you to deploy Inngest to DigitalOcean serverless functions.
Because DigitalOcean does not provide the request URL in its function arguments, you **must** include
the function URL and path when configuring your handler:
```ts {{ title: "v3" }}
// Your own function
serve({
client: inngest,
functions: [fnA],
// Your digitalocean hostname. This is required otherwise your functions won't work.
serveHost: "https://faas-sfo3-your-url.doserverless.co",
// And your DO path, also required.
servePath: "/api/v1/web/fn-your-uuid/inngest",
});
// IMPORTANT: Makes the function available as a module in the project.
// This is required for any functions that require external dependencies.
module.exports.main = main;
```
```ts {{ title: "v2" }}
// Your own function
serve(inngest, [fnA], {
// Your digitalocean hostname. This is required otherwise your functions won't work.
serveHost: "https://faas-sfo3-your-url.doserverless.co",
// And your DO path, also required.
servePath: "/api/v1/web/fn-your-uuid/inngest",
});
// IMPORTANT: Makes the function available as a module in the project.
// This is required for any functions that require external dependencies.
module.exports.main = main;
```
### Framework: Express
You can serve Inngest functions within your existing Express app, deployed to any hosting provider
like Render, Fly, AWS, K8S, and others:
```ts {{ title: "v3" }}
// Your own function
// Important: ensure you add JSON middleware to process incoming JSON POST payloads.
app.use(express.json());
app.use(
// Expose the middleware on our recommended path at `/api/inngest`.
"/api/inngest",
serve({ client: inngest, functions: [fnA] })
);
```
```ts {{ title: "v2" }}
// Your own function
// Important: ensure you add JSON middleware to process incoming JSON POST payloads.
app.use(express.json());
app.use(
// Expose the middleware on our recommended path at `/api/inngest`.
"/api/inngest",
serve(inngest, [fnA])
);
```
You must ensure you're using the `express.json()` middleware otherwise your functions won't be
executed. **Note** - You may need to set [`express.json()`'s `limit` option](https://expressjs.com/en/5x/api.html#express.json) to something higher than the default `100kb` to support larger event payloads and function state.
See the [Express
example](https://github.com/inngest/inngest-js/tree/main/examples/framework-express)
for more information.
#### Streaming
Express can also stream responses back to Inngest, potentially allowing much
longer timeouts.
To enable this, set add the `streaming: "force"` option to your serve handler:
```ts {{ title: "v3" }}
serve({
client: inngest,
functions: [...fns],
streaming: "force",
});
```
For more information, check out the [Streaming](/docs/streaming) page.
### Framework: Fastify
You can serve Inngest functions within your existing Fastify app.
We recommend using the exported `inngestFastify` plugin, though we also expose a generic `serve()` function if you'd like to manually create a route.
```ts {{ title: "Plugin" }}
Fastify();
fastify.register(fastifyPlugin, {
client: inngest,
functions: [fnA],
options: {},
});
fastify.listen({ port: 3000 }, function (err, address) {
if (err) {
fastify.log.error(err);
process.exit(1);
}
});
```
```ts {{ title: "Custom route (v3)" }}
Fastify();
fastify.route({
method: ["GET", "POST", "PUT"],
handler: serve({ client: inngest, functions: [fnA] }),
url: "/api/inngest",
});
fastify.listen({ port: 3000 }, function (err, address) {
if (err) {
fastify.log.error(err);
process.exit(1);
}
});
```
```ts {{ title: "Custom route (v2)" }}
Fastify();
fastify.route({
method: ["GET", "POST", "PUT"],
handler: serve(inngest, [fnA]),
url: "/api/inngest",
});
fastify.listen({ port: 3000 }, function (err, address) {
if (err) {
fastify.log.error(err);
process.exit(1);
}
});
```
See the [Fastify example](https://github.com/inngest/inngest-js/tree/main/examples/framework-fastify) for more information.
### Framework: Fresh (Deno)
Inngest works with Deno's Fresh
framework via the `esm.sh` CDN. Add the serve handler to `./api/inngest.ts` as follows:
```ts {{ title: "v3" }}
// Your own function
handler = serve({
client: inngest,
functions: [fnA],
});
```
```ts {{ title: "v2" }}
// Your own function
handler = serve(inngest, [fnA]);
```
### Framework: Google Cloud Run Functions
Google's [Functions Framework](https://github.com/GoogleCloudPlatform/functions-framework-nodejs) has an Express-compatible API which enables you to use the Express serve handler to deploy your Inngest functions to Google Cloud Run. This is an example of a function:
```ts {{ title: "v3" }}
// Your own function
ff.http(
"inngest",
serve({
client: inngest,
functions: [fnA],
servePath: "/",
})
);
```
```ts {{ title: "v2" }}
// Your own function
ff.http(
'inngest',
serve(
inngest,
[fnA],
{ servePath: "/" },
)
);
```
You can run this locally with `npx @google-cloud/functions-framework --target=inngest` which will serve your Inngest functions on port `8080`.
See the [Google Cloud Functions example](https://github.com/inngest/inngest-js/tree/main/examples/framework-google-functions-framework) for more information.
1st generation Cloud Run Functions are not officially supported. Using one may result in a signature verification error.
### Framework: Firebase Cloud Functions
Based on the Google Cloud Function architecture, the Firebase Cloud Functions provide a different API to serve functions using `onRequest`:
```typescript
inngest = onRequest(
serve({
client: inngestClient,
functions: [/* ...functions... */],
})
);
```
Firebase Cloud Functions require configuring `INNGEST_SERVE_PATH` with the custom function path.
For example, for a project named `inngest-firebase-functions` deployed on the `us-central1` region, the `INNGEST_SERVE_PATH` value will be as follows:
```
/inngest-firebase-functions/us-central1/inngest/
```
To serve your Firebase Cloud Function locally, use the following command:
```bash
firebase emulators:start
```
Please note that you'll need to start your Inngest Local Dev Server with the `-u` flag to match our Firebase Cloud Function's custom path as follows:
```bash
npx inngest-cli@latest dev -u http://127.0.0.1:5001/inngest-firebase-functions/us-central1/inngest
```
_The above command example features a project named `inngest-firebase-functions` deployed on the `us-central1` region_.
### Framework: H3
Inngest supports [H3](https://github.com/unjs/h3) and frameworks built upon it. Here's a simple H3 server that hosts serves an Inngest function.
```ts {{ title: "v3" }}
createApp();
app.use(
"/api/inngest",
eventHandler(
serve({
client: inngest,
functions: [fnA],
})
)
);
createServer(toNodeListener(app)).listen(process.env.PORT || 3000);
```
```ts {{ title: "v2" }}
createApp();
app.use("/api/inngest", eventHandler(serve(inngest, [fnA])));
createServer(toNodeListener(app)).listen(process.env.PORT || 3000);
```
See the [github.com/unjs/h3](https://github.com/unjs/h3) repository for more information about how to host an H3 endpoint.
### Framework: Hono
Inngest supports the [Hono](https://hono.dev/) framework which is popularly deployed to Cloudflare Workers. Add the following to `./src/index.ts`:
```ts
new Hono();
app.on(
["GET", "PUT", "POST"],
"/api/inngest",
serve({
client: inngest,
functions,
})
);
export default app;
```
To automatically pass environment variables defined with Wrangler to Inngest function handlers, use the [Hono bindings middleware](/docs/examples/middleware/cloudflare-workers-environment-variables).
If you're using Hono with Cloudflare's Wrangler CLI in "_cloud_" mode, follow [the documentation above](#local-development-with-wrangler) for Cloudflare Workers.
See the [Hono example](https://github.com/inngest/inngest-js/blob/main/examples/framework-hono) for more information.
### Framework: Koa
Add the following to your routing file:
```ts {{ title: "v3" }}
new Koa();
app.use(bodyParser()); // make sure we're parsing incoming JSON
serve({
client: inngest,
functions,
});
app.use((ctx) => {
if (ctx.request.path === "/api/inngest") {
return handler(ctx);
}
});
```
See the [Koa example](https://github.com/inngest/inngest-js/tree/main/examples/framework-koa) for more information.
### Framework: NestJS
Add the following to `./src/main.ts`:
```ts
async function bootstrap() {
await NestFactory.create(AppModule, {
bodyParser: true,
});
// Setup inngest
app.useBodyParser('json', { limit: '10mb' });
// Inject Dependencies into inngest functions
app.get(Logger);
app.get(AppService);
// Pass dependencies into this function
getInngestFunctions({
appService,
logger,
});
// Register inngest endpoint
app.use(
'/api/inngest',
serve({
client: inngest,
functions: inngestFunctions,
}),
);
// Start listening for http requests
await app.listen(3000);
}
bootstrap();
```
See the [NestJS example](https://github.com/inngest/inngest-js/tree/main/examples/framework-nestjs) for more information.
### Framework: Next.js
Inngest has first class support for Next.js API routes, allowing you to easily create the Inngest API. Both the App Router and the Pages Router are supported. For the App Router, Inngest requires `GET`, `POST`, and `PUT` methods.
```typescript {{ title: "App Router" }}
// src/app/api/inngest/route.ts
// Your own functions
{ GET, POST, PUT } = serve({
client: inngest,
functions: [fnA],
});
```
```typescript {{ title: "Pages Router" }}
// pages/api/inngest.ts
// Your own function
export default serve({
client: inngest,
functions: [fnA],
});
```
#### Streaming
Next.js Edge Functions hosted on [Vercel](/docs/deploy/vercel) can also stream responses back to Inngest, giving you a much higher request timeout of 15 minutes (up from 10 seconds on the Vercel Hobby plan!).
To enable this, set your runtime to `"edge"` (see [Quickstart for Using Edge Functions | Vercel Docs](https://vercel.com/docs/concepts/functions/edge-functions/quickstart)) and add the `streaming: "allow"` option to your serve handler:
**Next.js 13+**
```ts
runtime = "edge";
{ GET, POST, PUT } = serve({
client: inngest,
functions: [...fns],
streaming: "allow",
});
```
**Older versions (Next.js 12)**
```ts {{ title: "v3" }}
config = {
runtime: "edge",
};
serve({
client: inngest,
functions: [...fns],
streaming: "allow",
});
```
```ts {{ title: "v2" }}
config = {
runtime: "edge",
};
serve(inngest, [...fns], {
streaming: "allow",
});
```
For more information, check out the [Streaming](/docs/streaming) page.
### Framework: Nitro
Add the following to `./server/routes/api/inngest.ts`:
```ts
// Your own function
export default eventHandler(
serve({
client: inngest,
functions: [fnA],
})
);
```
See the [Nitro example](https://github.com/inngest/inngest-js/tree/main/examples/framework-nitro) for more information.
### Framework: Nuxt
Inngest has first class support for [Nuxt server routes](https://nuxt.com/docs/guide/directory-structure/server#server-routes), allowing you to easily create the Inngest API.
Add the following within `./server/api/inngest.ts`:
```ts {{ title: "v3" }}
// Your own function
export default defineEventHandler(
serve({
client: inngest,
functions: [fnA],
})
);
```
```ts {{ title: "v2" }}
// Your own function
export default defineEventHandler(
serve(inngest, [fnA])
);
```
See the [Nuxt example](https://github.com/inngest/inngest-js/tree/main/examples/framework-nuxt) for more information.
### Framework: Redwood
Add the following to `api/src/functions/inngest.ts`:
```ts {{ title: "v3" }}
// Your own function
handler = serve({
client: inngest,
functions: [fnA],
servePath: "/api/inngest",
});
```
```ts {{ title: "v2" }}
// Your own function
handler = serve(
inngest,
[fnA],
{ servePath: "/api/inngest" }
);
```
You should also update your `redwood.toml` to add `apiUrl = "/api"`, ensuring your API is served
at the `/api` root.
### Framework: Remix
Add the following to `./app/routes/api.inngest.ts`:
```ts {{ title: "v3" }}
// app/routes/api.inngest.ts
serve({
client: inngest,
functions: [fnA],
});
export { handler as action, handler as loader };
```
```ts {{ title: "v2" }}
// app/routes/api.inngest.ts
serve(inngest, [fnA]);
export { handler as loader, handler as action };
```
See the [Remix example](https://github.com/inngest/inngest-js/tree/main/examples/framework-remix) for more information.
#### Streaming
Remix Edge Functions hosted on [Vercel](/docs/deploy/vercel) can also stream responses back to Inngest, giving you a much higher request timeout of 15 minutes (up from 10 seconds on the Vercel Hobby plan!).
To enable this, set your runtime to `"edge"` (see [Quickstart for Using Edge Functions | Vercel Docs](https://vercel.com/docs/concepts/functions/edge-functions/quickstart)) and add the `streaming: "allow"` option to your serve handler:
```ts {{ title: "v3" }}
config = {
runtime: "edge",
};
serve({
client: inngest,
functions: [...fns],
streaming: "allow",
});
```
```ts {{ title: "v2" }}
config = {
runtime: "edge",
};
serve(inngest, [...fns], {
streaming: "allow",
});
```
For more information, check out the [Streaming](/docs/streaming) page.
### Framework: SvelteKit
Add the following to `./src/routes/api/inngest/+server.ts`:
```ts {{ title: "v3" }}
serve({ client: inngest, functions });
GET = inngestServe.GET;
POST = inngestServe.POST;
PUT = inngestServe.PUT;
```
See the [SvelteKit example](https://github.com/inngest/inngest-js/tree/main/examples/framework-sveltekit) for more information.
### Custom frameworks
If the framework that your application uses is not included in the above list of first-party supported frameworks, you can create a custom `serve` handler.
To create your own handler, check out the [example handler](https://github.com/inngest/inngest-js/blob/main/packages/inngest/src/test/functions/handler.ts) in our SDK's open source repository to understand how it works. Here's an example of a custom handler being created and used:
```ts
(options: ServeHandlerOptions) => {
new InngestCommHandler({
frameworkName: "edge",
fetch: fetch.bind(globalThis),
...options,
handler: (req: Request) => {
return {
body: () => req.json(),
headers: (key) => req.headers.get(key),
method: () => req.method,
url: () => new URL(req.url, `https://${req.headers.get("host") || ""}`),
transformResponse: ({ body, status, headers }) => {
return new Response(body, { status, headers });
},
};
},
});
return handler.createHandler();
};
new Inngest({ id: "example-edge-app" });
inngest.createFunction(
{ id: "hello-world" },
{ event: "test/hello.world" },
() => "Hello, World!"
);
export default serve({ client: inngest, functions: [fn] });
```
Inngest enables you to create a HTTP handler for your functions. This handler will be used to serve your functions over HTTP (compatible with `net/http`).
```go {{ title: "Go (HTTP)" }}
package main
import (
"context"
"fmt"
"net/http"
"time"
"github.com/inngest/inngestgo"
"github.com/inngest/inngestgo/step"
)
func main() {
h := inngestgo.NewHandler("core", inngestgo.HandlerOpts{})
f := inngestgo.CreateFunction(
inngestgo.FunctionOpts{
ID: "account-created",
Name: "Account creation flow",
},
// Run on every api/account.created event.
inngestgo.EventTrigger("api/account.created", nil),
AccountCreated,
)
h.Register(f)
http.ListenAndServe(":8080", h)
}
```
You expose your functions to Inngest through this HTTP endpoint.
Inngest provides integrations with Flask and FastAPI.
```python {{ title: "Python (Flask)" }}
import logging
import inngest
from src.flask import app
import inngest.flask
logger = logging.getLogger(f"{app.logger.name}.inngest")
logger.setLevel(logging.DEBUG)
inngest_client = inngest.Inngest(app_id="flask_example", logger=logger)
@inngest_client.create_function(
fn_id="hello-world",
trigger=inngest.TriggerEvent(event="say-hello"),
)
def hello(ctx: inngest.ContextSync) -> str:
inngest.flask.serve(
app,
inngest_client,
[hello],
)
app.run(port=8000)
```
```python {{ title: "Python (FastAPI)" }}
import logging
import inngest
import fastapi
import inngest.fast_api
logger = logging.getLogger("uvicorn.inngest")
logger.setLevel(logging.DEBUG)
inngest_client = inngest.Inngest(app_id="fast_api_example", logger=logger)
@inngest_client.create_function(
fn_id="hello-world",
trigger=inngest.TriggerEvent(event="say-hello"),
)
async def hello(ctx: inngest.Context) -> str:
return "Hello world!"
app = fastapi.FastAPI()
inngest.fast_api.serve(
app,
inngest_client,
[hello],
)
```
### Signing key
You'll need to assign your [signing key](/docs/platform/signing-keys) to an [`INNGEST_SIGNING_KEY`](/docs/sdk/environment-variables#inngest-signing-key) environment variable in your hosting
provider or `.env` file locally, which lets the SDK securely communicate with Inngest. If you can't
provide this as a signing key, you can pass it in to `serve` when setting up your framework. [Read
the reference for more information](/docs/sdk/reference/serve#reference).
## Reference
For more information about the `serve` handler, read the [the reference guide](/docs/reference/serve), which includes:
* [`serve()` configuration options](/docs/reference/serve#serve-client-functions-options)
* [How the serve handler works](/docs/reference/serve#how-the-serve-api-handler-works)
# Versioning
Source: https://www.inngest.com/docs/learn/versioning
Description: Learn how .
Long-running functions inevitably change over time. Inngest enables developers to implement multiple strategies for changing long-running code over time. To manage these changes effectively, it's crucial to understand how the SDK implements determinism and [executes steps](/docs/learn/how-functions-are-executed).
## Determinism in functions
Determinism is consistent in *every* Inngest language SDK. Except for language-specific idioms, all SDKs implement the same logic. In every SDK, functions in Inngest are a series of steps. Each step runs reliably, will retry on failure, and is as close to exactly-once execution as possible (excluding outbound network failures when reporting completed steps).
### How the SDK works with steps
As covered in [_How Inngest functions are executed_](/docs/learn/how-functions-are-executed), each step in a function has a unique identifier, represented as a string. Each time a step is found, the SDK checks whether the step has been executed. It does this by:
1. Hashing the step's unique identifier along with a counter of the number of times the step has been called. This enables steps to be used in a loop.
2. Looking up the resulting hash in function run state.
1. If the hash is present, the step has been executed. The SDK returns the memoized state and skips execution.
2. If the hash isn't found, the SDK executes the step and returns the output to Inngest to be stored in the function run state.
After a step completes, the function execution immediately ends. The function is re-executed from the top with the updated memoized state until the function completes.
### Handling determinism
The SDK handles determinism *gracefully* by default. The SDK keeps track of the order in which every step is executed. If new steps are added, they're executed when they're first discovered. This means that:
- The SDK always knows if functions are deterministic, even over months or years.
- **New steps, or steps with changed IDs, are executed when they're discovered.** If the order of step executions change, a warning is logged by default{/* (your functions can be made to permanently fail by enabling strict mode)*/}. Logging a warning allows you to comfortably extend and improve functions over time, without worrying about in-progress functions failing completely or panicking.
## Change management across versions
Given the above, there are a few strategies for change management:
- **Adding new steps to a function is generally safe.** New steps will be executed when the functions re-run (after a step completes). Imagine a function has steps `[A, B, C]`. When you add a new step `Z` in-between the first steps, the executor will run steps `[A, Z, B, C]` and log a warning. The caveat here is that you must take care to ensure that the new step can run out-of-order and doesn't reference undefined variables. Note that step `B` and `C` will *not* automatically re-run. Instead, a warning will be logged by default. You can change logging a warning and instead permanently fail by enabling strict mode. Failing runs permanently is acceptable, and you can use [Replay](/docs/platform/replay) to bulk-replay permanent failures.
- **Forcing steps to re-run by changing step IDs.** This changes the hash, which forces re-evaluation as the step's state is not found. Note that the SDK will log a warning by default as the order of step execution changes. If you change step `C`'s ID to `E`, your run's state will expect steps `[A, B, C]` to run and instead will see `[A, B, E]`.
- **For complete changes in logic, create a new function which subscribes to the same triggering event**. Update the existing function's trigger to include an [`if` expression](/docs/reference/functions/create#trigger) to only handle events before a certain [timestamp](/docs/events#event-payload-format) (for example: `event.ts < ${EPOCH_MS}`). Then create a new function with the updated logic, the same original event trigger, and a new `id` (for example: `process-upload-v2`). This allows you to safely transition to the new function without losing any data. A caveat is that this creates a new function in your app and therefore the Inngest dashboard.
## Conclusion
Understanding how determinism works should allow you to gracefully evolve functions over time. Consider these strategies when making changes to long-running functions to ensure that they can run successfully to completion over time.
# Local development
Source: https://www.inngest.com/docs/local-development
import {
RiFunctionLine,
RiQuestionLine,
RiTerminalBoxLine,
} from "@remixicon/react";
Inngest's tooling makes it easy to develop your functions locally with any framework using the Inngest Dev Server.
The [Inngest Dev Server](/docs/dev-server) is a fully-featured and [open-source](https://github.com/inngest/inngest) local version of the [Inngest Platform](/docs/platform/deployment) enabling a seamless transition from your local development to feature, staging and production environments.

Get started with your favorite setup:
} href={'/docs/dev-server'}>
Start Inngest locally with a single command.
} href={'/docs/guides/development-with-docker'}>
Run Inngest locally using Docker or Docker Compose.
## Development Flow with Inngest
The Inngest Dev Server provides all the features available in the Inngest Platform, guaranteeing a smooth transition from local dev to production environments.
Developing with Inngest looks as it follows:
1. [Configure the Inngest SDK in your application](/docs/sdk/overview)
2. [Connecting the Inngest Dev Server to your local application](/docs/learn/inngest-functions)
3. Develop your Inngest Functions with [Steps](/docs/learn/inngest-steps), [Flow Control](/docs/guides/flow-control) and [more](/docs/features/inngest-functions)
5. _(Optional) - Configure Preview environments with [our Vercel Integration](/docs/deploy/vercel)_
**Moving to production environments (preview envs, staging or production)**
Deploying your application to preview, staging and production environments does not require any code change:
6. [Create an Inngest App](/docs/apps) on the Inngest Platform and [configure its Event and Signing Keys on your Cloud](/docs/platform/deployment).
7. Leverage the Inngest Platform to manage and monitor Events and Function Runs
## CLI and SDKs
{/* } href={'/todo'}>
Explore the options to configure the Inngest Dev Server
*/}
} href={'/docs/reference/typescript'}>
Setup the Inngest SDK in your TypeScript application.
} href={'/docs/reference/python'}>
Setup the Inngest SDK in your Python application.
} href={'https://pkg.go.dev/github.com/inngest/inngestgo'}>
Setup the Inngest SDK in your Go application.
## FAQs
}>
The Inngest Dev Server is not designed to be run in production, but you can run it anywhere that you want including testing environments or CI/CD pipelines.
}>
Webhooks configured on the Platform [can be sent to the Dev Server](/docs/platform/webhooks#local-development).
}>
External webhooks from Stripe and Clerk must go through a tunnel solution (such as [ngrok](https://ngrok.com/) or [localtunnel](https://theboroer.github.io/localtunnel-www/)) to reach the Dev Server.
}>
Yes. You can also trigger a function at any time by [using the "Invoke" button from the Dev Server Functions list view](/docs/dev-server).
{/* }>
Please take a look at our [Dev Server Troubleshooting guide](#).
*/}
Find more answers in our [Discord community](/discord).
# Deployment
Source: https://www.inngest.com/docs/platform/deployment
import {
RiCloudLine,
} from "@remixicon/react";
Moving to production requires deploying your Inngest Functions on your favorite Cloud Provider and configuring it to allow the Inngest Platform to orchestrate runs:
} href={'/docs/apps/cloud#sync-a-new-app-in-inngest-cloud'}>
Inngest Functions can be deployed to any serverless cloud or container running on any server.
} href={'/docs/deploy/vercel'}>
Use our Vercel Integration to deploy your Inngest Functions.
} href={'/docs/deploy/cloudflare'}>
Deploy your Inngest Functions on Cloudflare Pages.
} href={'/docs/deploy/render'}>
Deploy your Inngest Functions on Render.
## How Inngest handles Function Runs
The Inngest Platform hosts the Inngest Durable Execution Engine, responsible for triggering and maintaining the state of **Function runs happening on your Cloud Provider**:
The Inngest Platform relies on [Event](/docs/events/creating-an-event-key) and [Signing Keys](/docs/platform/signing-keys), as well as [other security mechanisms](/docs/learn/security), to communicate securely and reliably with the Inngest SDK.
Learn more on Inngest's Durable Execution Engine in our ["How Inngest Functions are executed" guide](/docs/learn/how-functions-are-executed).
# Environments
Source: https://www.inngest.com/docs/platform/environments
Inngest accounts all have multiple environments that help support your entire software development lifecycle. Inngest has different types of environments:
- **Production Environment** for all of your production applications, functions and event data.
- [**Branch Environments**](#branch-environments) are sandbox environments that enables developers on your team to test your changes specific to current Git feature branch. These are designed to work with platforms that support branch-based deployment previews like Vercel or Netlify.
- [**Custom Environments**](#custom-environments) are used to create shared, non-production environments like staging, QA, or canary.
- [**Local Environment**](/docs/local-development) leverages the Inngest Dev Server (`npx inngest-cli@latest dev`) to test and debug functions on your own machine.
The key things that you need to know about environments:
- Data is isolated within each environment. Event types or functions may share the same name, but their data and logs are fully separated.
- Each environment uses [Event Keys](/docs/events/creating-an-event-key) and [Signing Keys](/docs/platform/signing-keys) to securely send data or sync apps within a given environment.
- You can sync multiple applications with each environment. {/*Learn more about using Inngest with multiple applications here.*/}
- You are billed for your usage across all environments, _except of course your local environment_.
## Branch Environments
Most developer workflows are centered around branching, whether feature branches or a variant of GitFlow. Inngest's Branch Environments are designed to give you and your team an isolated sandbox for every non-production branch that you deploy. For example,

Branch deployments:
- Are created on-demand when you send events or register your functions for a given environment
- Share Event Keys and Signing Keys to streamline your developer workflow (see: [Configuring Branch Environments](#configuring-branch-environments))
It can be helpful to visualize the typical Inngest developer workflow using Branch environments and your platform's deploy previews:

## Configuring Branch Environments
As Branch Environments are created on-demand, all of your Branch Environments share the same Event Keys and Signing Key. This enables you to use the same environment variables in each of your application's deployment preview environments and set the environment dynamically using the `env` option with the `Inngest` client:
```ts {{ title: "TypeScript" }}
new Inngest({
id: "my-app",
env: process.env.BRANCH,
});
// Alternatively, you can set the INNGEST_ENV environment variable in your app
// Pass the client to the serve handler to complete the setup
serve({ client: inngest, functions: [myFirstFunction, mySecondFunction] });
```
```python {{ title: "Python" }}
import inngest
inngest_client = inngest.Inngest(
app_id="flask_example",
env=os.getenv("BRANCH"),
)
```
### Automatically Supported Platforms
The Inngest SDK tries to automatically detect your application's branch and use it to set the `env` option when deploying to certain supported platforms. Here are the platforms that are automatically supported and what environment variable is _automatically_ used:
- **Vercel** - `VERCEL_GIT_COMMIT_REF` - This works perfectly with our Vercel integration.
You can always override this using [`INNGEST_ENV`](/docs/sdk/environment-variables#inngest-env) or by manually passing `env` to the `Inngest` client.
### Other Platforms
Some platforms only pass an environment variable at build time. This means you'll have to explicitly set `env` to the platform's specific environment variable. For example, here's how you would set it on Netlify:
```ts {{ title: "TypeScript" }}
new Inngest({
id: "my-app",
env: process.env.BRANCH,
});
```
```python {{ title: "Python" }}
import inngest
inngest_client = inngest.Inngest(
app_id="flask_example",
env=os.getenv("BRANCH"),
)
```
- **Netlify** - `BRANCH` ([docs](https://docs.netlify.com/configure-builds/environment-variables/#git-metadata))
- **Cloudflare Pages** - `CF_PAGES_BRANCH` ([docs](https://developers.cloudflare.com/pages/platform/build-configuration/#environment-variables))
- **Railway** - `RAILWAY_GIT_BRANCH` ([docs](https://docs.railway.app/develop/variables#railway-provided-variables))
- **Render** - `RENDER_GIT_BRANCH` ([docs](https://render.com/docs/environment-variables#all-services))
### Sending Events to Branch Environments
As all branch environments share Event Keys, all you need to do to send events to your branch environment is set the `env` option with the SDK. This will configure the SDK's `send()` method to automatically route events to the correct environment.
If you are sending events without an Inngest SDK, you'll need to pass the `x-inngest-env` header along with your request. For more information about this and sending events from any environment with **the Event API**, [read the `send()` reference](/docs/reference/events/send#send-events-via-http-event-api).
### Archiving Branch Environments
By default, branch environments are archived 3 days after their latest deploy. Each time you deploy, the auto archive date is extended by 3 days. Archiving a branch environment doesn't delete anything; it only prevents the environment's functions from triggering.
If you'd like to disable auto archive on a branch environment, click the toggle in the [environments page](https://app.inngest.com/env). There's also a button that lets you manually archive/unarchive branch environments at any time.
### Disabling Branch Environments in Vercel
The recommended way to disable branch environments is through the Vercel UI. Delete the "Preview" Inngest environment variables:
## Custom Environments
Many teams have shared environments that are used for non-production purposes like staging, QA, or canary. Inngest's Custom Environments are designed to give you and your team an isolated sandbox for every non-production environment that you deploy.
You can create an environment from the [environments page](https://app.inngest.com/env) in the Inngest dashboard.
Some key things to know about custom environments:
* Each environment has its own keys, event history, and functions. All data is isolated within each environment.
* You can deploy multiple apps to the same environment to fully simulate your production environment.
* You can create as many environments as you need.
[Create an environment in the dashboard](https://app.inngest.com/create-environment)
## Viewing and Switching Environments
In the Inngest dashboard you can quickly switch between environments in the environment switcher dropdown in the top navigation. You can click “[View All Environments](https://app.inngest.com/env)” for a high level view of all of your environments.
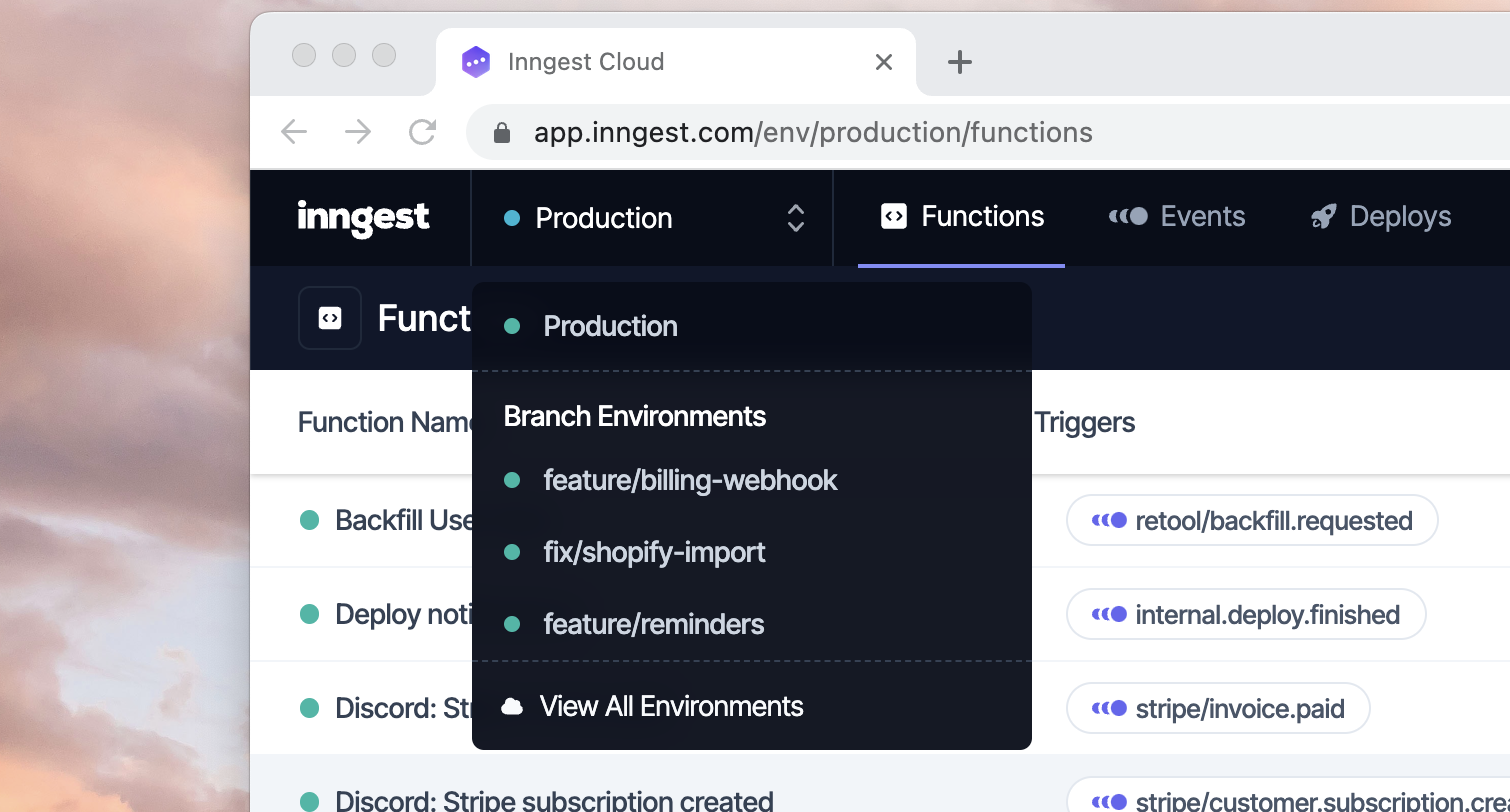
# Platform Guides
Source: https://www.inngest.com/docs/platform/index
hidePageSidebar = true;
Learn how to use the Inngest platform
# Apps
Source: https://www.inngest.com/docs/platform/manage/apps
Inngest enables you to manage your Inngest Functions deployments via [Inngest Environments and Apps](/docs/apps). Inngest Environments (ex, production, testing) can contain multiple Apps that can be managed using:
- [The Apps Overview](#apps-overview) - A quick access to all apps, including the unattached syncs
- [Syncs management](#syncs) - Run App diagnostics and access all syncs history
- [Archiving](#archive-an-app) - Archive inactive Apps
## Apps Overview
The Apps Overview is the main entry page of the Inngest Platform, listing the Apps of the active Environment, visible in the top left Environment selector:

The Apps Overview provides all the essential information to assess the healthy sync status of your active Apps: Functions identified, Inngest SDK version. You can switch to “Archived Apps” using the top left selector.
### Unattached Syncs
Automatic syncs or an App misconfiguration can result in syncs failing to attach to an existing app.
These unsuccessful syncs are listed in the “Unattached Syncs” section where detailed information are available, helping in resolving the issue:

Please read our [Syncs Troubleshooting section](/docs/apps/cloud#troubleshooting) for more information on how to deal with failed sync.
## App management
### Overview
Navigating to an App provides more detailed information (SDK version and language, deployment URL) that can be helpful when interacting with our Support.
You will also find quick access to all active functions and their associated triggers:

### Syncs
Triggering a Manual Sync from the Inngest Platform sends requests to your app to fetch the up-to-date configuration of your applications's functions. At any time, access the history of all syncs from the App page:

If a sync fails, try running an App Diagnostic before reaching out to Support:

### Archive an app
Apps can be archived and unarchived at any time. Once an app is archived, all of its functions are archived.
When the app is archived:
- New function runs will not be triggered.
- Existing function runs will continue until completion.
- Functions will be marked as archived, but will still be visible, including their run history.
If you need to cancel all runs prior to completion, read our [cancellation guide](/docs/guides/cancel-running-functions).
**How to archive an app**
1. Navigate to the app you want to archive. You will find an “Archive” button at the top-right corner of the page.

2. Confirm that you want to archive the app by clicking "Yes".

3. Your app is now archived. 🎉

In the image below, you can see how archived apps look like in Inngest Cloud:

# Function runs Bulk Cancellation
Source: https://www.inngest.com/docs/platform/manage/bulk-cancellation
In addition to providing [SDK Cancellation features](/docs/features/inngest-functions/cancellation/cancel-on-events) and a [dedicated REST API endpoint](/docs/guides/cancel-running-functions), the Inngest Platform also features a Bulk Cancellation UI.
This feature comes in handy to quickly stop unwanted runs directly from your browser.
## Cancelling Function runs
To cancel multiple Function runs, navigate to the Function's page on the Inngest Platform and open the “All actions” top right menu:
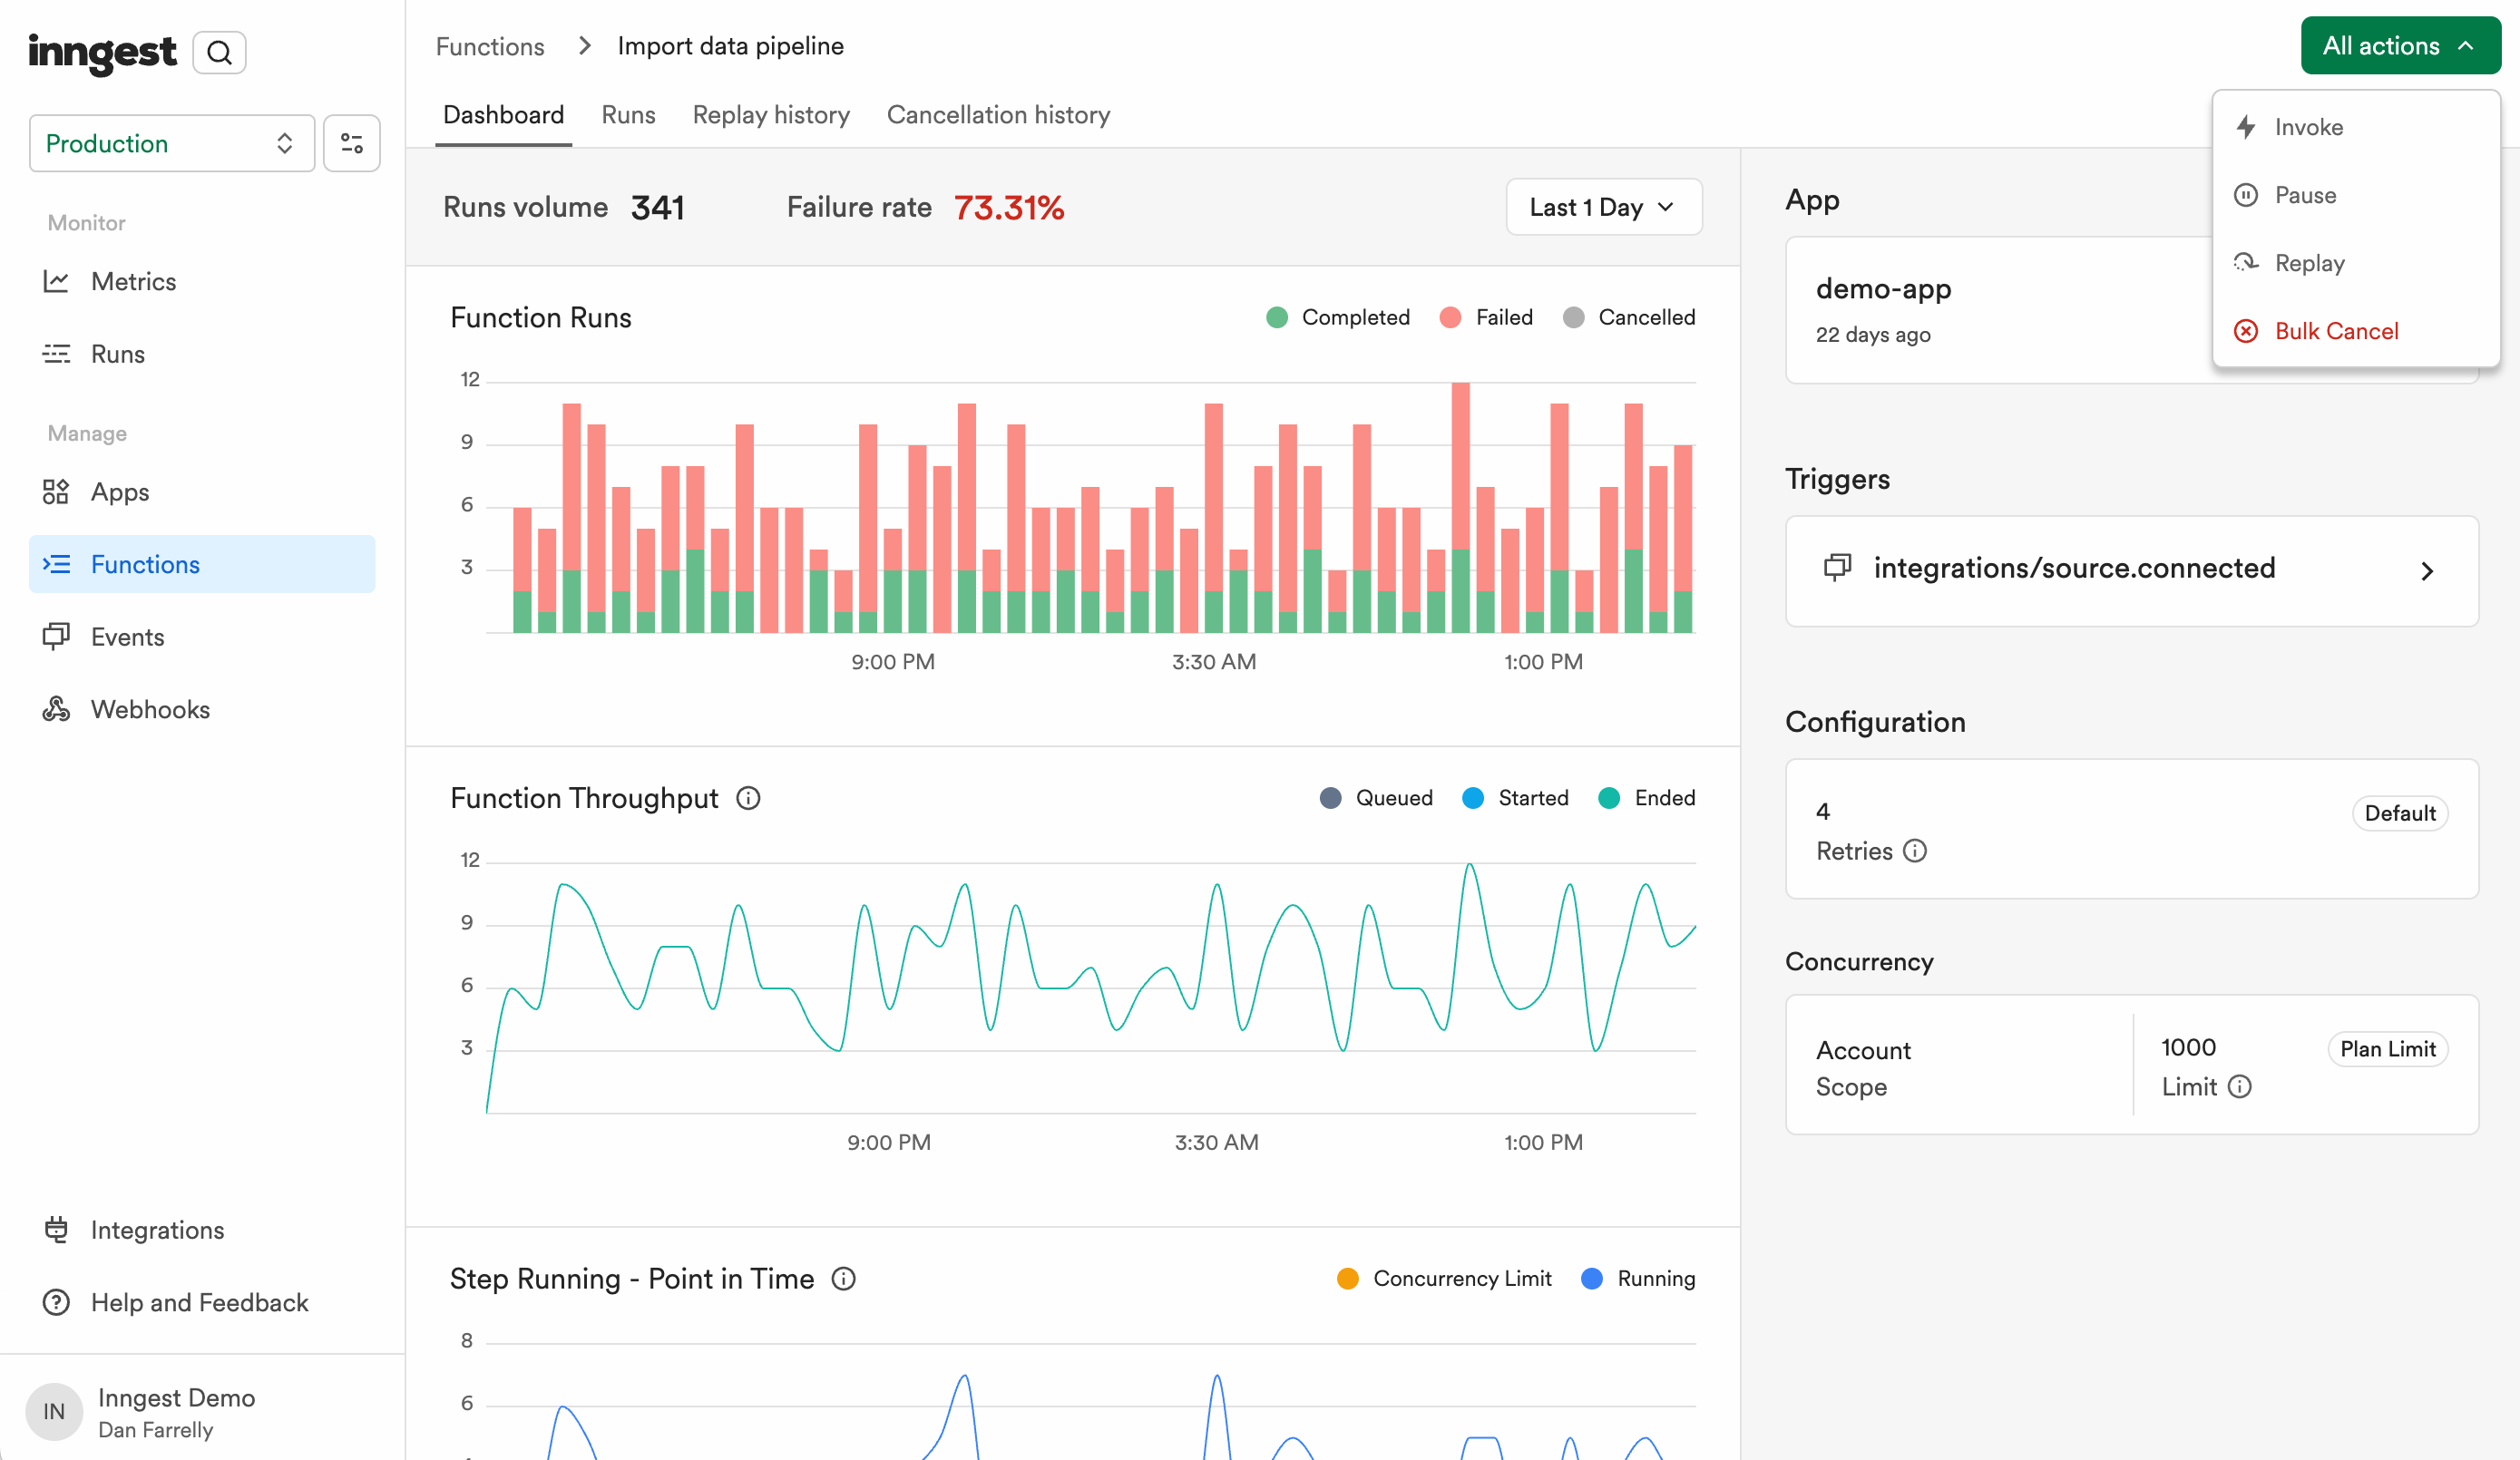
Clicking the “Bulk cancel” menu will open the following modal, asking you to select the date range that will be used to select and cancel Function runs:

The Bulk Cancellation will start cancelling the matching Function runs immediately; the Function runs list will update progressively, showing runs as cancelled:

You can access the history of running or completed Bulk Cancellation processes via the "Cancellation history" tab:

**Considerations**
Cancellation is useful to stop running Functions or cancel scheduled ones; however, keep in mind that:
- Steps currently running on your Cloud Provider won't be forced to stop; the Function will cancel upon the current step's completion.
- Cancelling a Function run does not prevent new runs from being enqueued. If you are looking to mitigate an unwanted loop or to cope with an abnormal number of executions, consider using [Function Pausing](/docs/guides/pause-functions).
# Datadog integration
Source: https://www.inngest.com/docs/platform/monitor/datadog-integration
Description: Inngest supports exporting metrics to Datadog. This enables you to monitor your Ingest functions from your existing Datadog or Datadog-compatible monitoring tools like Grafana, New Relic, or similar.
Inngest has a native Datadog integration which publishes metrics from your Inngest environment to your Datadog account. This enables you to monitor your Inngest functions and configure alerts based on your Inngest metrics. No Datadog agent configuration is required.

The Datadog integration comes with a default dashboard that you can use to monitor your Inngest functions.
## Setup
Navigate to the Inngest integration's page in the Datadog dashboard:
{/* This button is on one line to ensure there is no nested p tag adding margin */}
Button: Open Datadog integration
If you have multiple Inngest organizations, please use the "[Switch organization](https://app.inngest.com/organization-list)" button located in the user menu in the Inngest dashboard to ensure that you have the correct organization selected.
Click the "**Install integration**" button at the top right.

Now click "**Connect Accounts**" to connect your Inngest account to Datadog. This will open an authentication flow. You will be asked to authorize Inngest to access your Datadog account.

Once you have connected your Inngest account to Datadog, you will be redirected to [the Datadog integration page in the Inngest dashboard](https://app.inngest.com/settings/integrations/datadog). The connected Inngest environment will begin setup which may take up to 60 seconds to complete.
Here you can connect additional Inngest environments to connect to Datadog as well as add add additional Datadog accounts to send metrics to.
You will see the granularity and delay of the metrics that will be sent to Datadog based on your Inngest [billing plan](/pricing).

The setup process may take up to 60 seconds to complete. You can refresh the page to see the status of the setup.
Once the setup is complete, you can navigate to [the Dashboards tab in the Datadog dashboard](https://app.datadoghq.com/dashboard/lists?q=Inngest) and located the newly installed "Inngest" dashboard.
This dashboard (pictured at the top of this page), gives some default visualizations to help you get started. You can also create your own custom dashboards to monitor your Inngest functions using the `inngest.*` metrics.
## Metrics
The integration publishes several metrics including the metrics below. You can also view a full list of metrics available from the integration's "Data Collected" tab:
| **Metric Name** | **Description** |
|---|---|
| **inngest.function_run.scheduled.total**
(count) | Function runs scheduled during the time interval
*Unit: run* | environment, function |
| **inngest.function_run.started.total**
(count) | Function runs that started during the time interval
*Unit: run* | environment, function |
| **inngest.function_run.ended.total**
(count) | Function runs that ended during the time interval
*Unit: run* | status, environment, function |
| **inngest.function_run.rate_limited.total**
(count) | Function runs that did not execute due to rate limiting during the time interval
*Unit: run* | environment, function |
| **inngest.step.output_bytes.total**
(count) | Bytes used by step outputs during the time interval
*Unit: byte* | environment, function |
| **inngest.sdk.req_scheduled.total**
(count) | Step executions scheduled during the time interval
*Unit: step* | environment, function |
| **inngest.sdk.req_started.total**
(count) | Step executions started during the time interval
*Unit: step* | environment, function |
| **inngest.sdk.req_ended.total**
(count) | Step executions that ended during the time interval
*Unit: step* | environment, function, status |
| **inngest.steps.scheduled**
(gauge) | Steps currently scheduled
*Unit: step* | environment, function |
| **inngest.steps.running**
(gauge) | Steps currently running
*Unit: step* | environment, function |
| **inngest.steps.sleeping**
(gauge) | Steps currently sleeping
*Unit: step* | environment, function |
| **inngest.metric_export_integration_healthy**
(gauge) | Indicates the Inngest integration successfully sent metrics to Datadog
*Unit: success* |
## Granularity and delay
The Datadog integration is available to all paid plans and is subject to the following limits.
| Plan | Granularity | Delay |
|---|---|---|
| Basic | 15 minutes | 15 minutes |
| Pro | 5 minutes | 5 minutes |
| Enterprise | 1 minute | Immediate |
# Inspecting a Function run
Source: https://www.inngest.com/docs/platform/monitor/inspecting-function-runs
You identified a failed Function run and want to identify the root cause? Or simply want to dig into a run's timings?
The Function run details will provide all the information to understand how this run ran and the tools to reproduce it locally.
## Accessing Function runs
Functions runs across all application of the currently [selected environment](/docs/platform/environments) are accessible via the "Runs" page in the left side navigation.

_Runs can be filtered using a Status, Queued or Started at and Application filters._
Accessing the runs of a specific Function is achieved via the "Functions" menu, as described in [the function run details section](/docs/platform/monitor/inspecting-function-runs#the-function-run-details).
## Searching Function runs
Advanced filters are available using a [CEL expression](/docs/guides/writing-expressions). The search feature is available by clicking on the "Show search" button next to the other run filters.

### Searchable properties
Only basic search operators and `event` and `output` variables are available for now:
|Field name|Type|Operators|
|-----------|-----------|-----------|
event.id| `string`| `==`, `!=`
event.name| `string`| `==`, `!=`
event.ts| `int64`| `==`, `!=`, `>`, `>=`, `<`, `<=`
event.v| `string`| `==`, `!=`
event.data| `map[string]any`| `==`, `!=`, `>`, `>=`, `<`, `<=`
output| `any`| `==`, `!=`, `>`, `>=`, `<`, `<=`
A few examples of valid search queries are `event.data.hello == "world"` and `output.success != true`. [Learn more about how expressions are used in Inngest.](/docs/guides/writing-expressions)
You can combine multiple search queries using the `&&` operator or `||` operator. Adding a new line is the equivalent of using the `&&` operator.
### Searching for errors
Errors are serialized as JSON on the `output` object. When supported by the language SDK, errors are deserialized into a structured object. Here is an example of a error in TypeScript:
```typescript {{ title: "Example TypeScript code" }}
throw new NonRetriableError("Failed to import data");
```
```json {{ title: "Example TypeScript error" }}
{
"name": "NonRetriableError",
"message": "Failed to import data",
"stack": "NonRetriableError: Failed to import data\n at V1InngestExecution.userFnToRun (/opt/render/project/src/build/inngest/ai.js:143:15) ..."
}
```
This error can be searched using the following CEL expression:
```
output.name == "NonRetriableError" && output.message == "Failed to import data"
```
Using custom error types in TypeScript can make it easier to search by the type of error:
Example TypeScript code
```typescript
class UserNotFoundError extends NonRetriableError {
constructor(message: string) {
super(message);
this.name = "UserNotFoundError";
}
}
inngest.createFunction(
{ id: "my-fn" },
{ event: "user" },
async ({ step, event }) => {
await step.run("get-user", async () => {
await getUser(event.data.userId);
if (!user) {
throw new UserNotFoundError(`User not found (${event.data.userId})`);
}
// ...
});
}
);
```
``` {{ title: "Example search query" }}
event.data.userId == "12345" && output.name == "UserNotFoundError"
```
## The Function run details
A _Handle failed payments_ function failed after retrying 5 times:

Clicking on the failed Function Runs expands the run detail view:

The Function run details panel is divided in 3 parts:
- On the top right: the **Trigger details** helpful when exchanging with Support
- On the right: the **Event payload** that triggered the Function run
- On the bottom right: the **Run details** with its timeline, a clear with of the Function's steps execution
The Function run details informs us that our Function run failed because of an `Error: Failed to downgrade user` error.
This is a first clue, let's have a closer look at the Timeline to identify the root cause:
We can now spot that the `downgrade-account-billing-plan` failed.
Let's expand this step to look at the retries and errors.
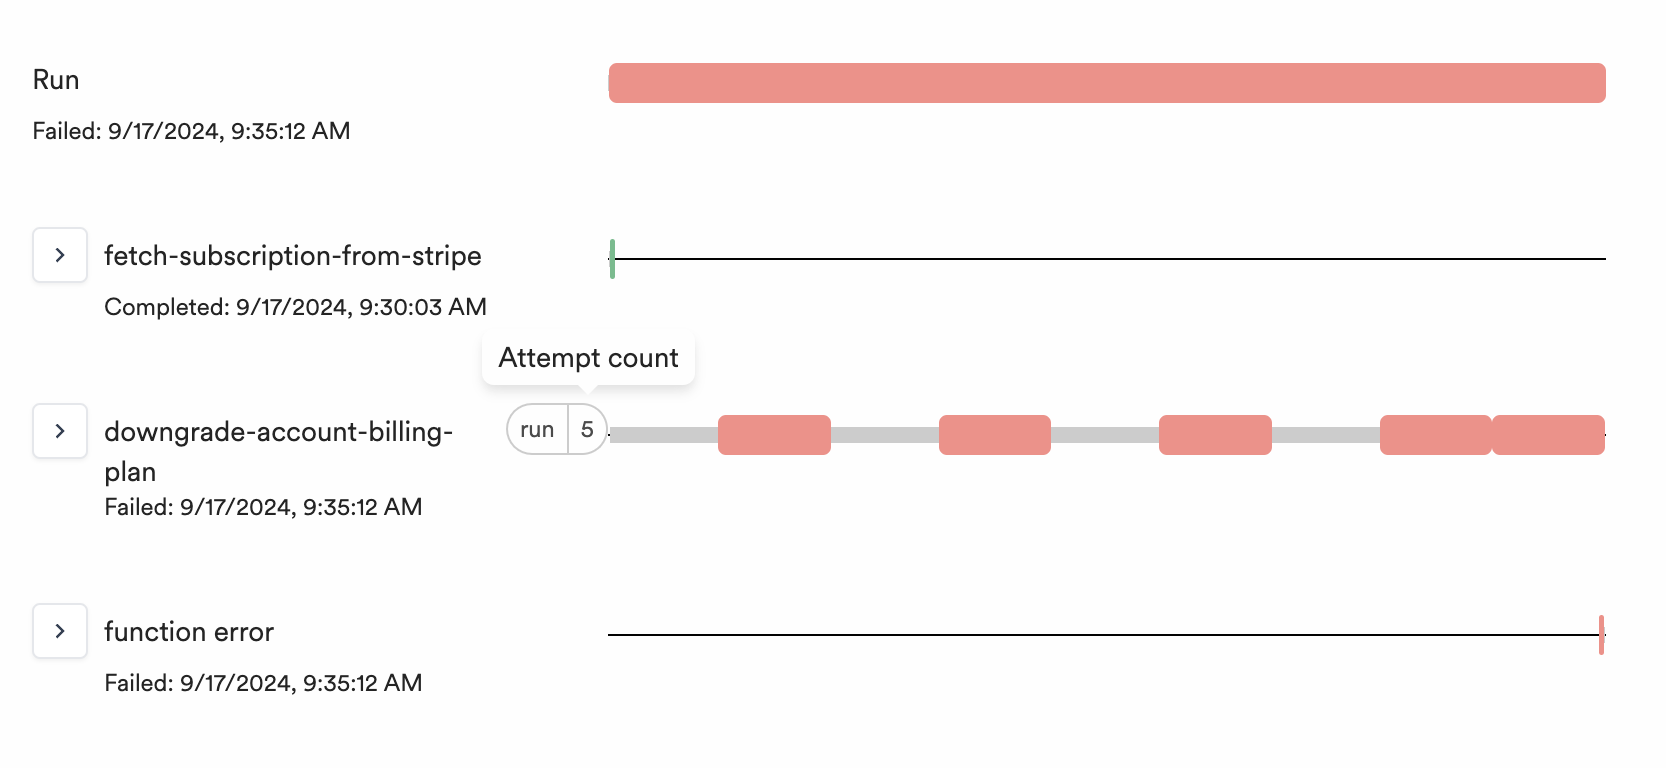

Expanding a step provides the same level of details (the error message and timings) along with retries information.
It seems that our `downgrade-account-billing-plan` step raised the same error during the following 5 retries, we might have to perform a fix in the database.
💡 **Tips**
Clicking on the
icon next to "Run details" open it in a new tab with a full-page layout.

It is useful for Function having a lot of steps or retries!
## Performing actions from the Function run details
The Function run details provides two main actions: replay the Function Run or sending the trigger event to your local Inngest Dev Server.
Sending the trigger Event to your local Inngest Dev Server provides a quick way to reproduce issues that are not linked to external factors (ex: new function version recently deployed, data issues).
After looking at the Function run details, the failure is judged temporary or fixed by a recent deployment, you can replay the Function run by using the "Rerun" button at the top right of the screen.

# Observability & Metrics
Source: https://www.inngest.com/docs/platform/monitor/observability-metrics
With hundreds to thousands of events going through your Inngest Apps, triggering multiple Function runs, getting a clear view of what is happening at any time is crucial.
The Inngest Platform provides observability features for both Events and Function runs, coupled with Event logs and [a detailed Function Run details to inspect arguments and steps timings](/docs/platform/monitor/inspecting-function-runs).
## Function runs observability
The Functions list page provides the first round of essential information in one place with:
- **Triggers**: Events or Cron schedule
- **Failure rate**: enabling you to quickly identify a surge of errors
- **Volume**: helping in identifying possible drops in processing
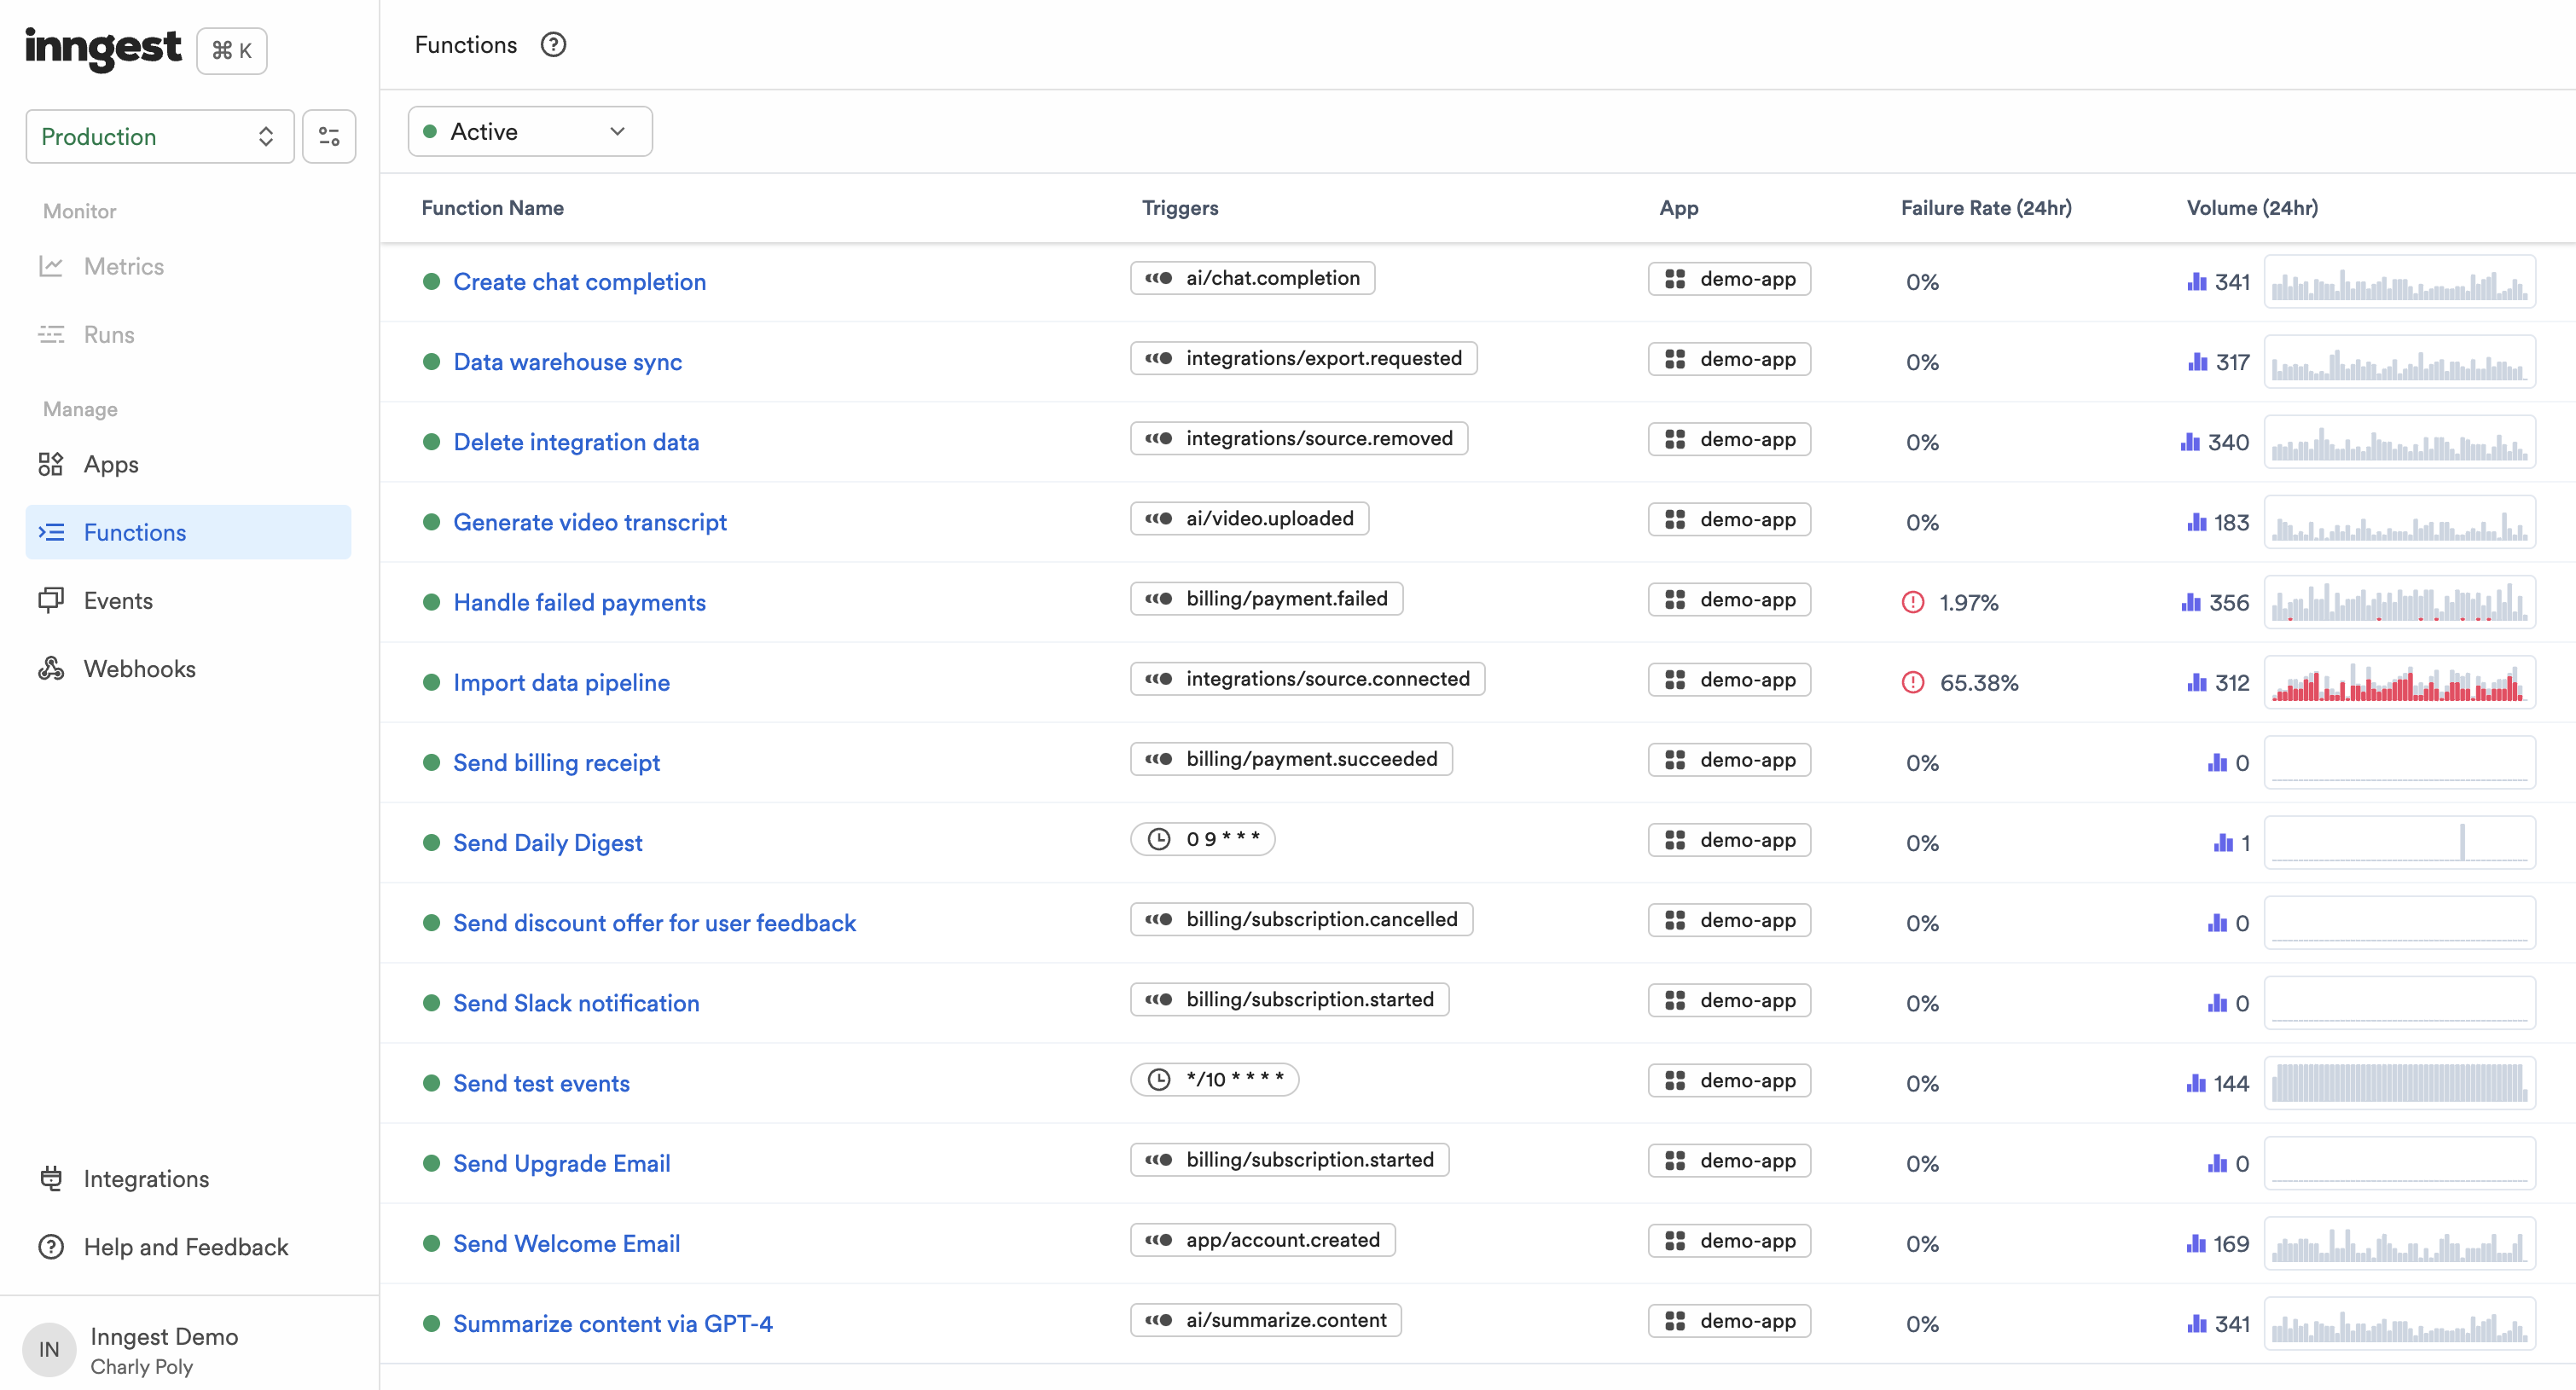
## Function metrics
Navigating to a Function displays the Function metrics page, composed of 7 charts:
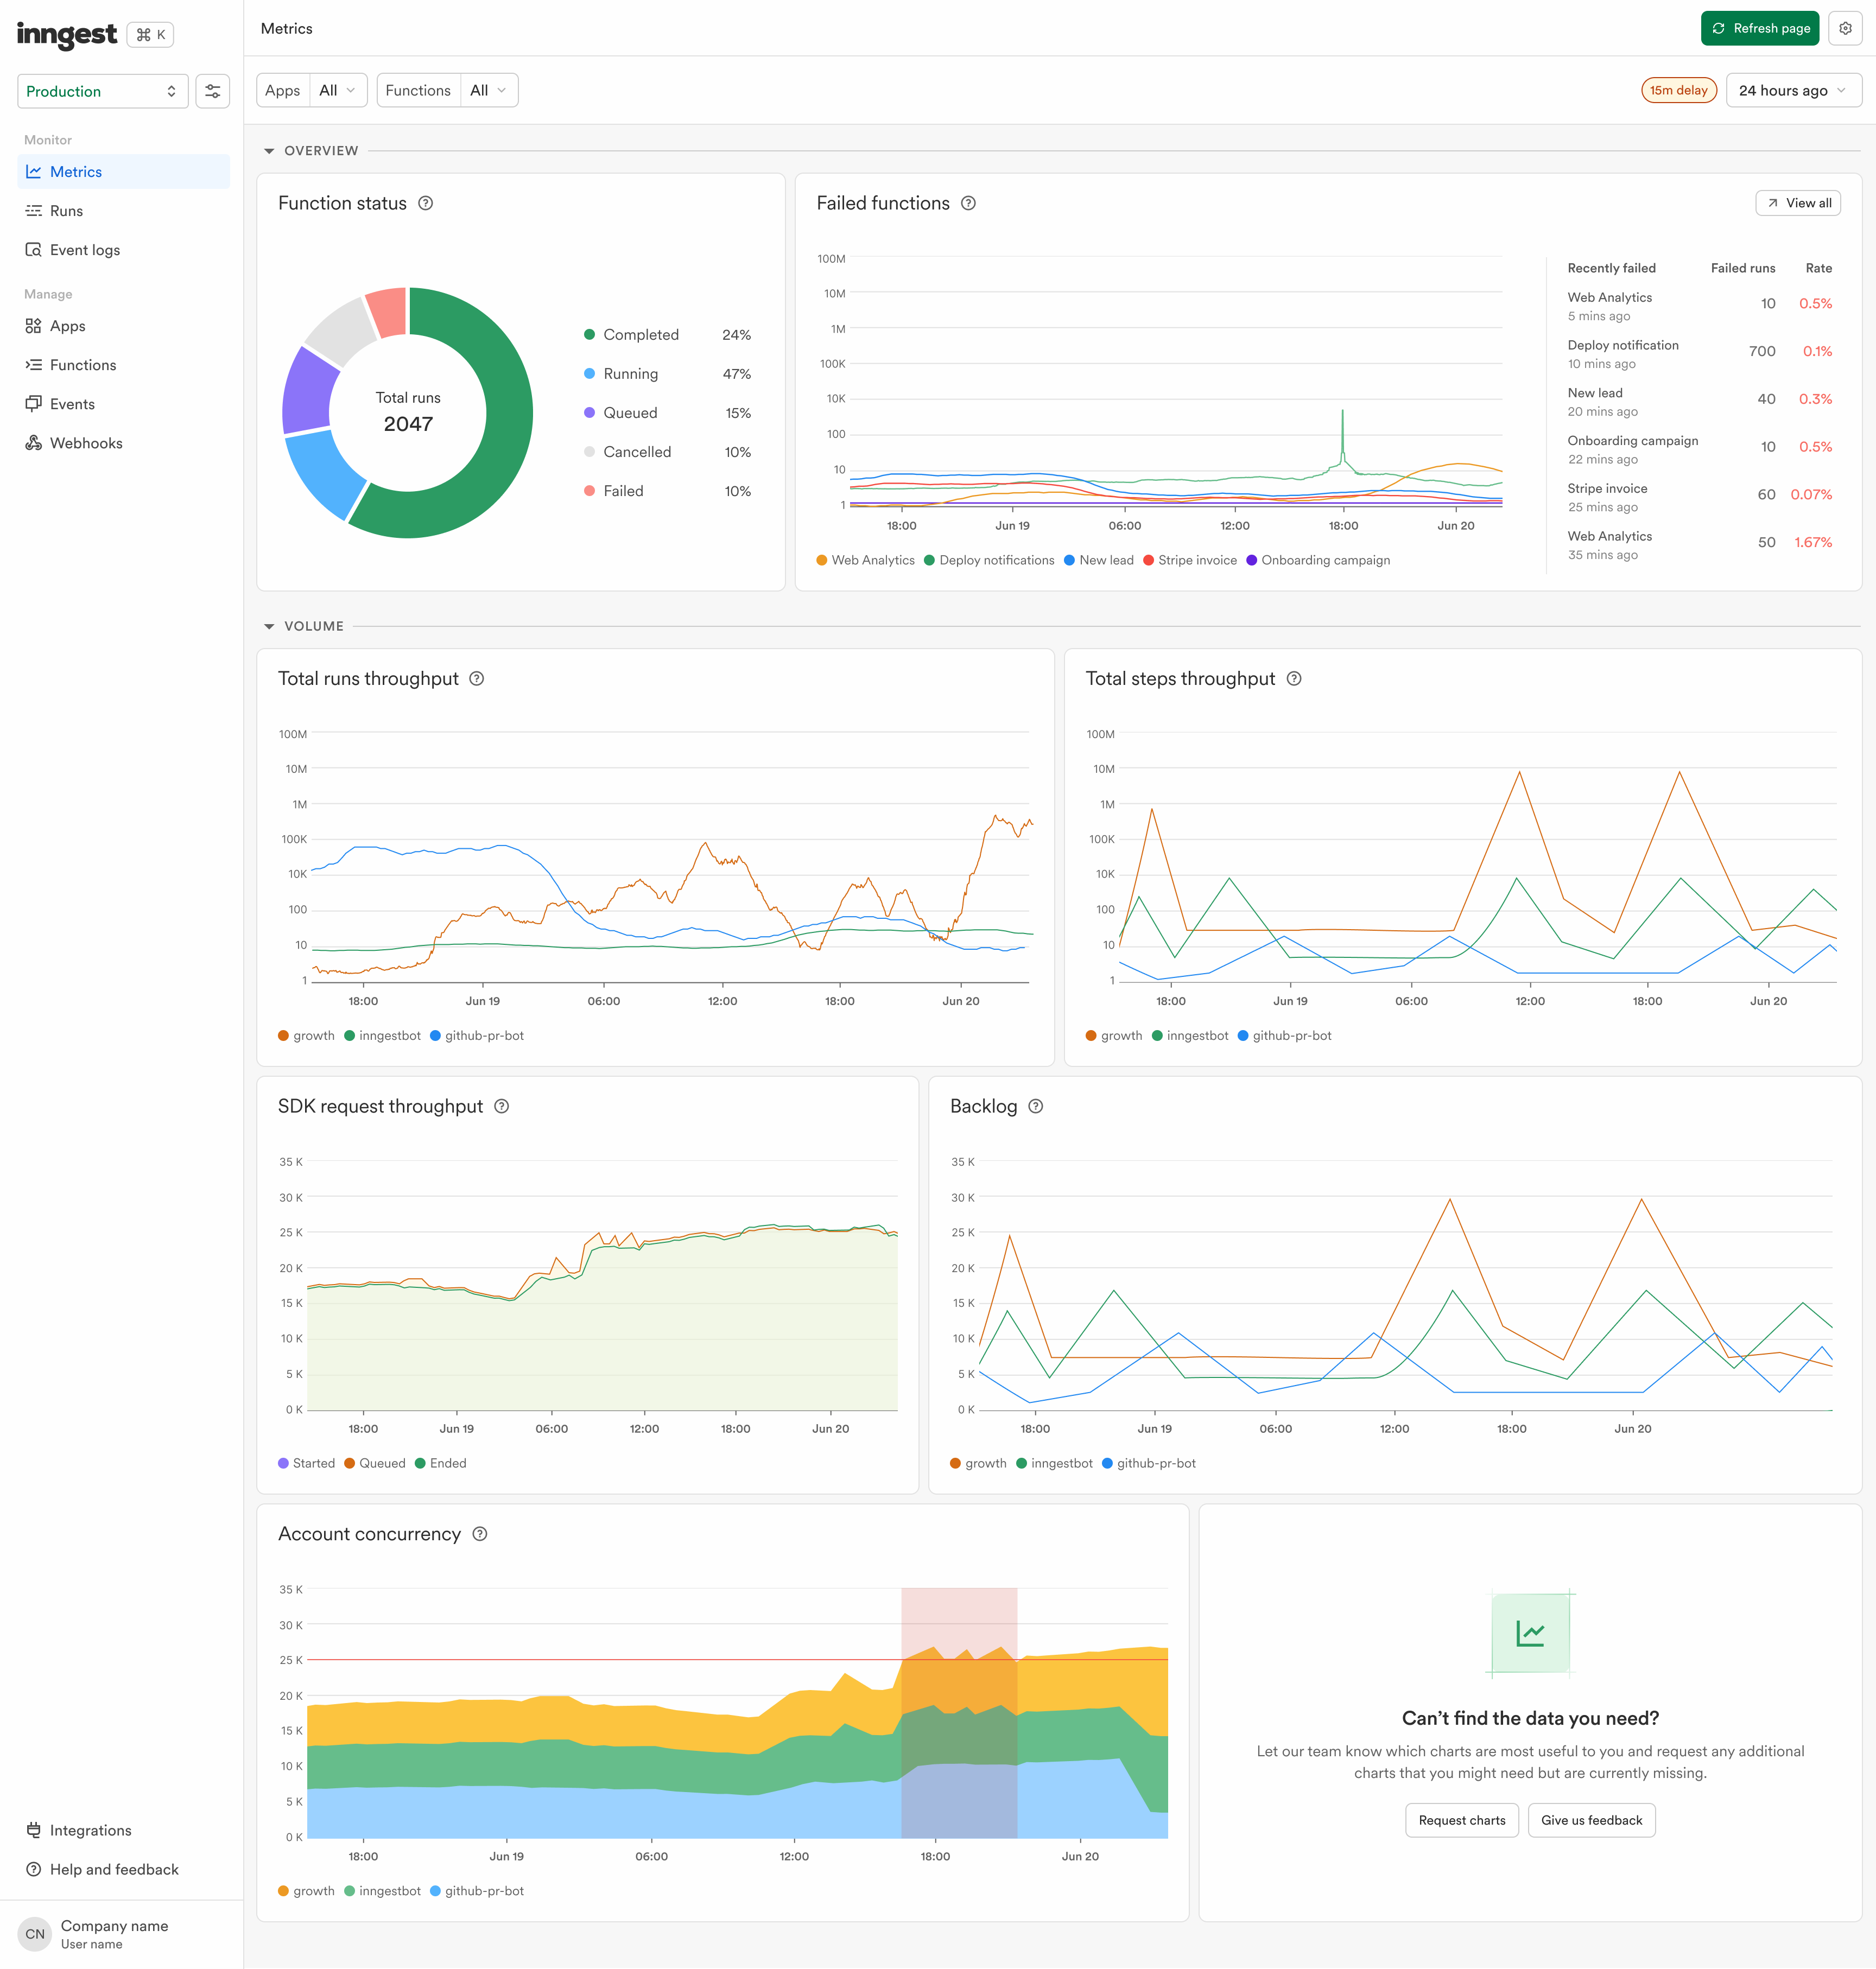
All the above charts can be filtered based on a time range (ex: last 24 hours), a specific Function or [App](/docs/platform/manage/apps).
Let's go over each chart in detail:
### Function Status
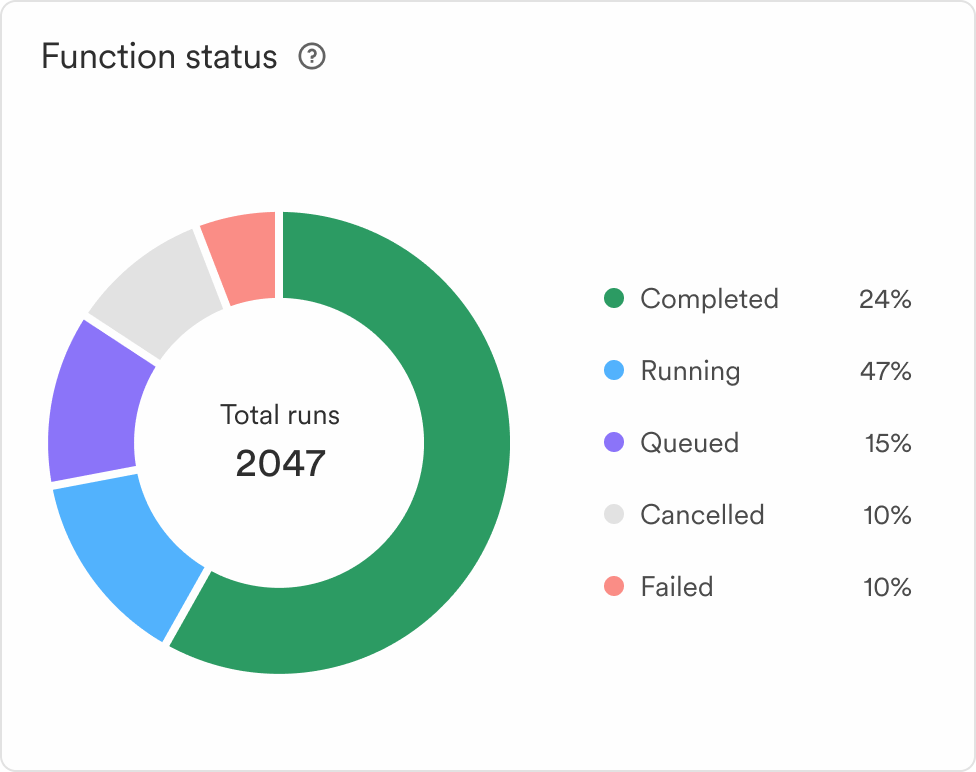
The Function Status chart provides a snapshot of the number of Function runs grouped by status.
**How to use this chart?**
This chart is the quickest way to identify an unwanted rate of failures at a given moment.
### Failed Functions
The _Failed Functions_ chart displays the top 6 failing functions with the frequency of failures.
**How to use this chart?**
You can leverage this chart to identify a possible elevated rate of failures and quickly access the Function runs details from the "View all" button.
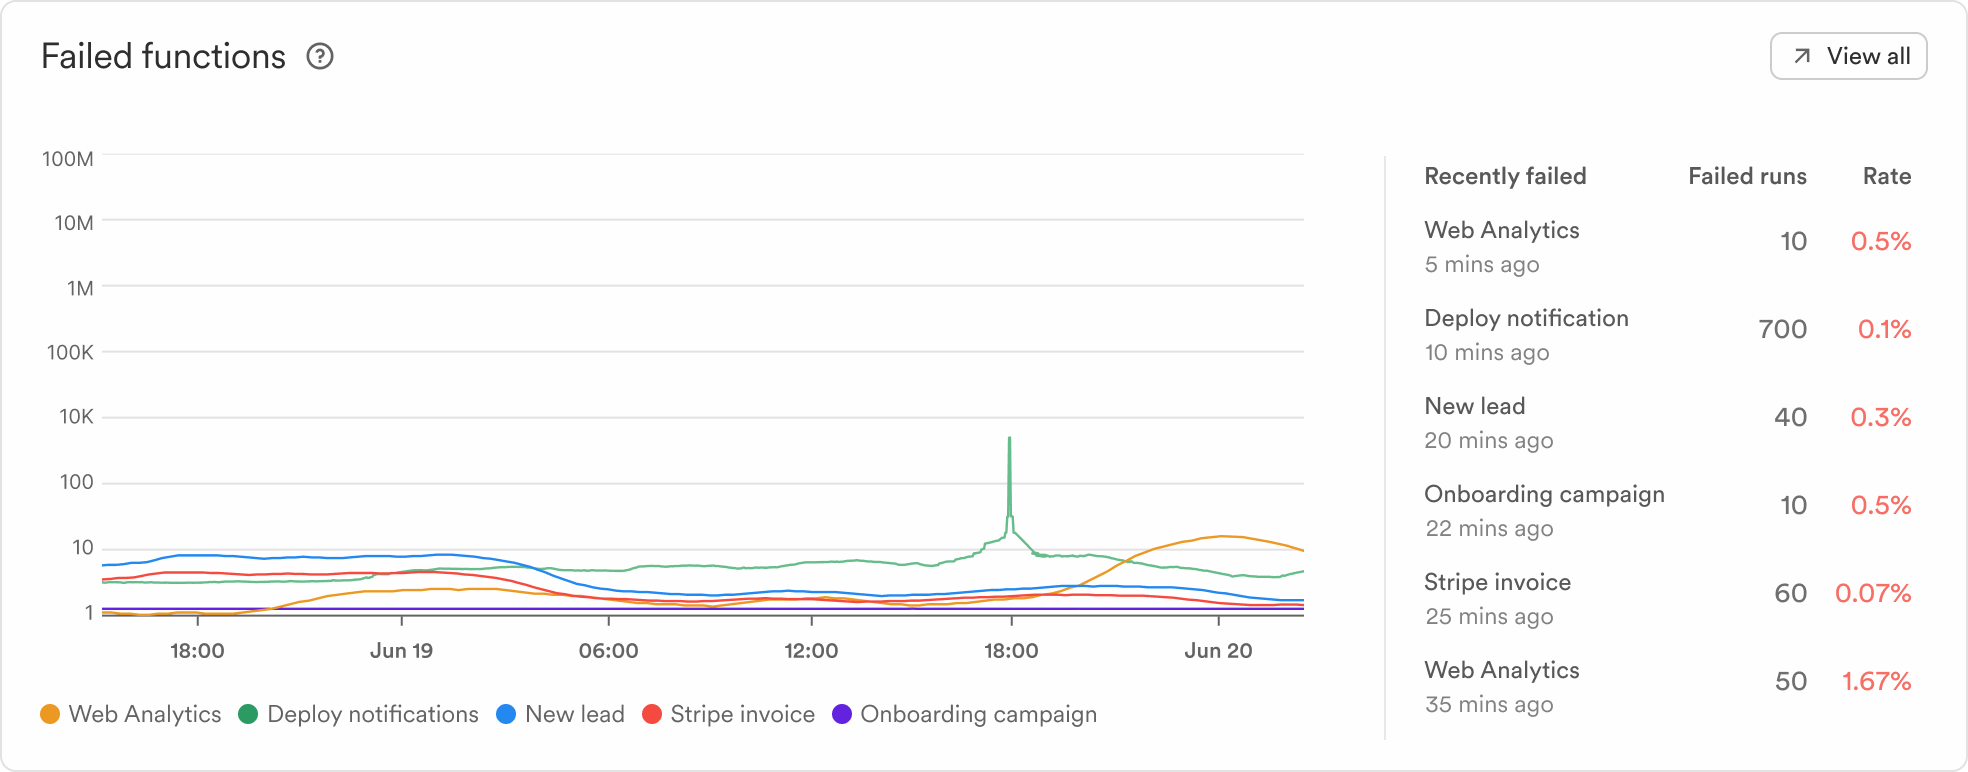
### Total runs throughput
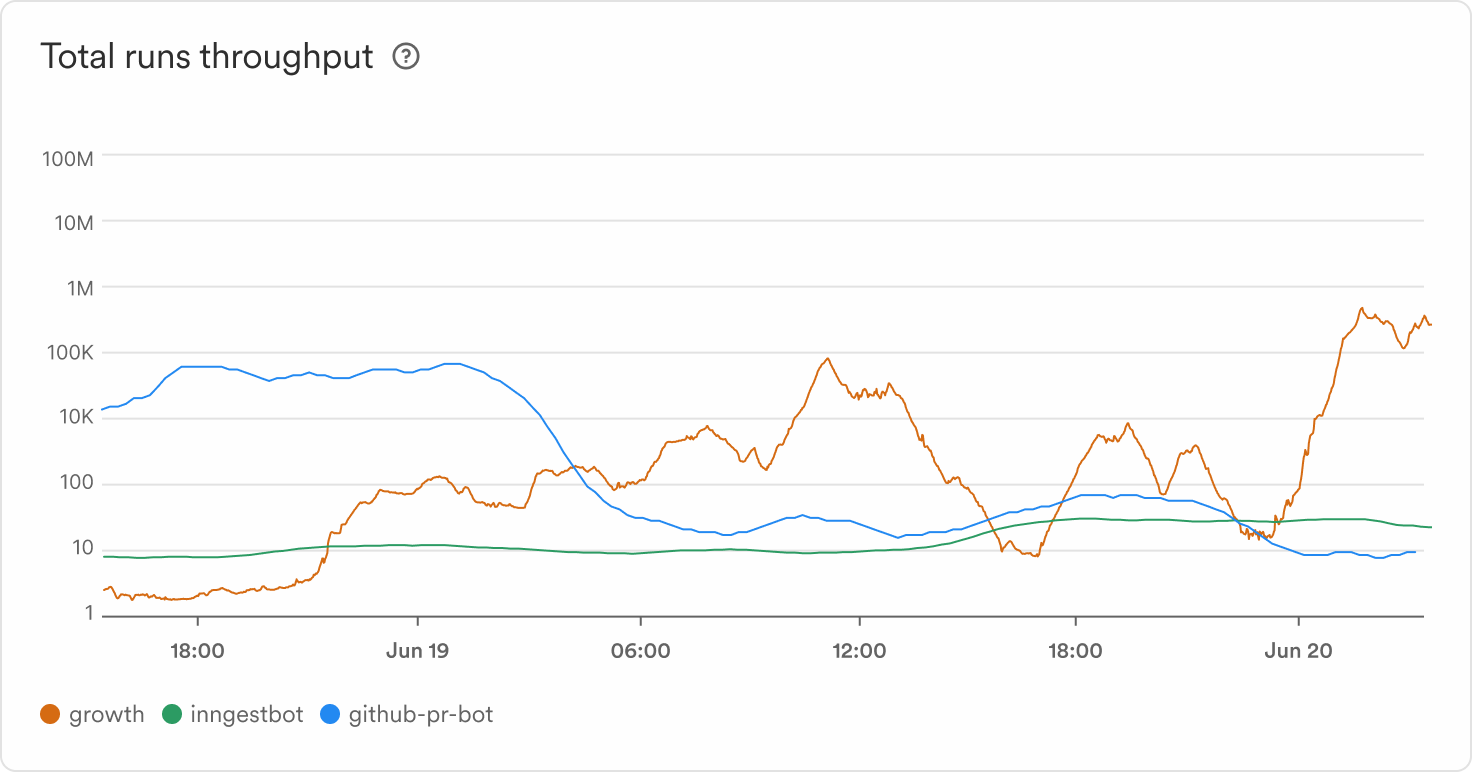
The _Total runs throughput_ is a line chart featuring the **rate of Function runs started per app**. This shows the performance of the system of how fast new runs are created and are being handled.
**How to use this chart?**
Flow control might intentionally limit throughput, this chart is a great way to visualize it.
### Total steps throughput
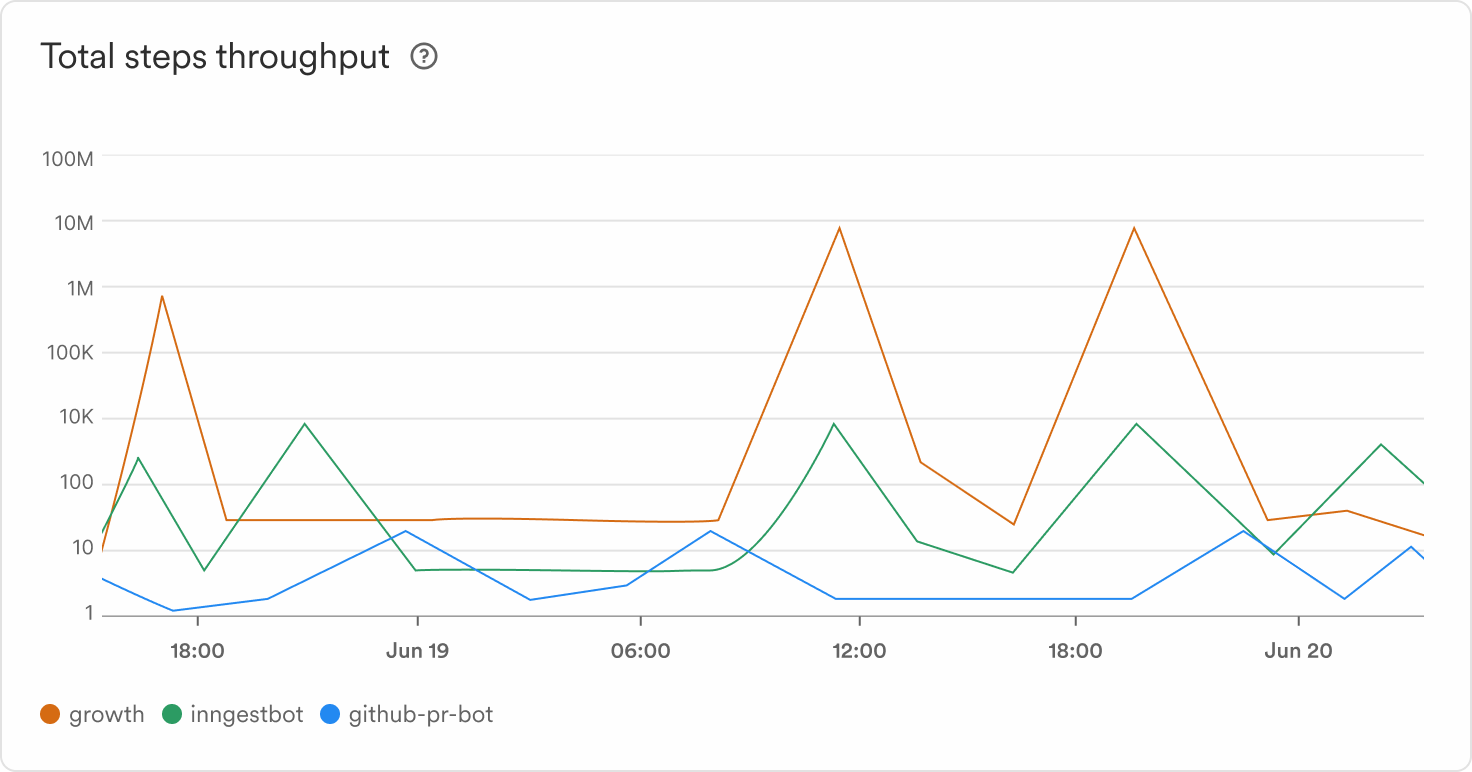
The _Total steps throughput_ chart represents **the rate of which steps are executed, grouped by the selected Apps**.
**How to use these charts?**
The _Total steps throughput_ chart is helpful to assess the configuration of your Inngest Functions.
For example, a low _Total steps throughput_ might be linked to a high number of concurrent steps combined with a restrictive concurrency configuration.
{/*
### SDK request throughput
The _SDK request throughput_ chart indicates the throughput at which SDK requests (or steps) are queued and executed, **across all selected Apps**.
**How to use this chart?**
This chart is a useful tool to evaluate in the requests sent by the Inngest Platform matches the number of steps created by Functions runs.
The _SDK request throughput_ chart is also useful to evaluate the number of requests sent to your application over time.
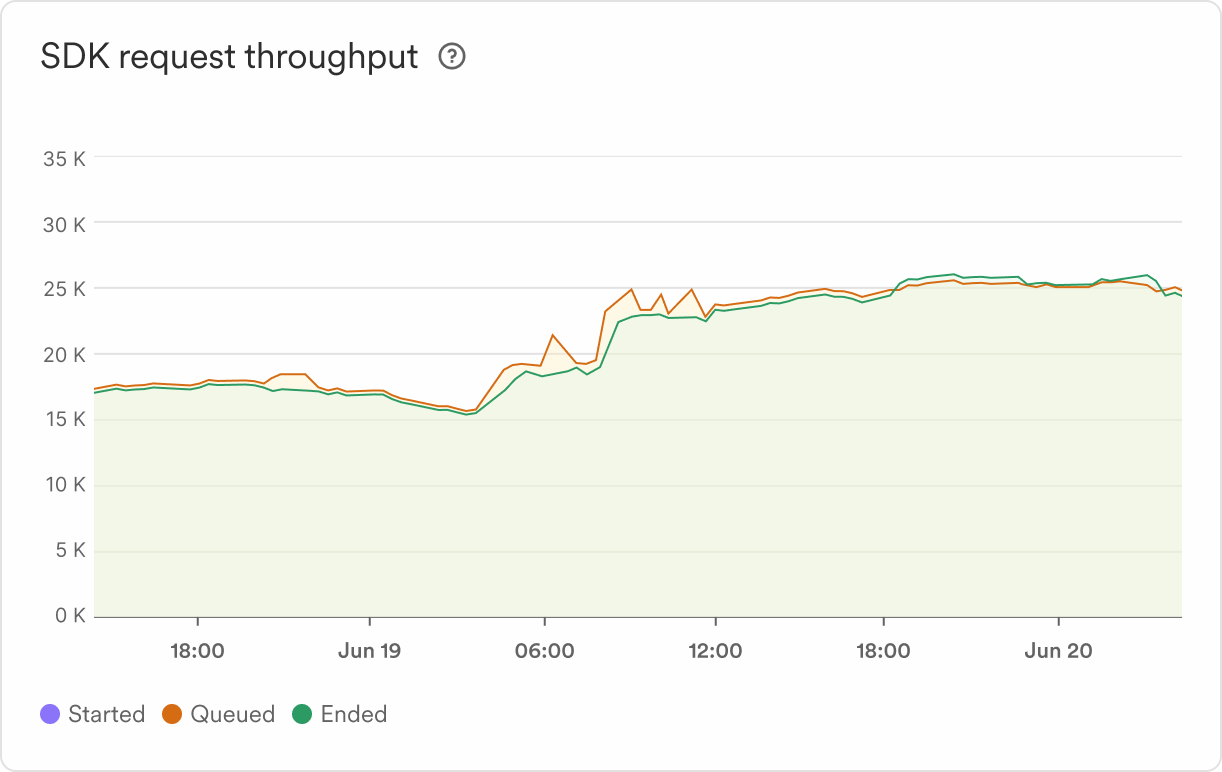
*/}
### Backlog
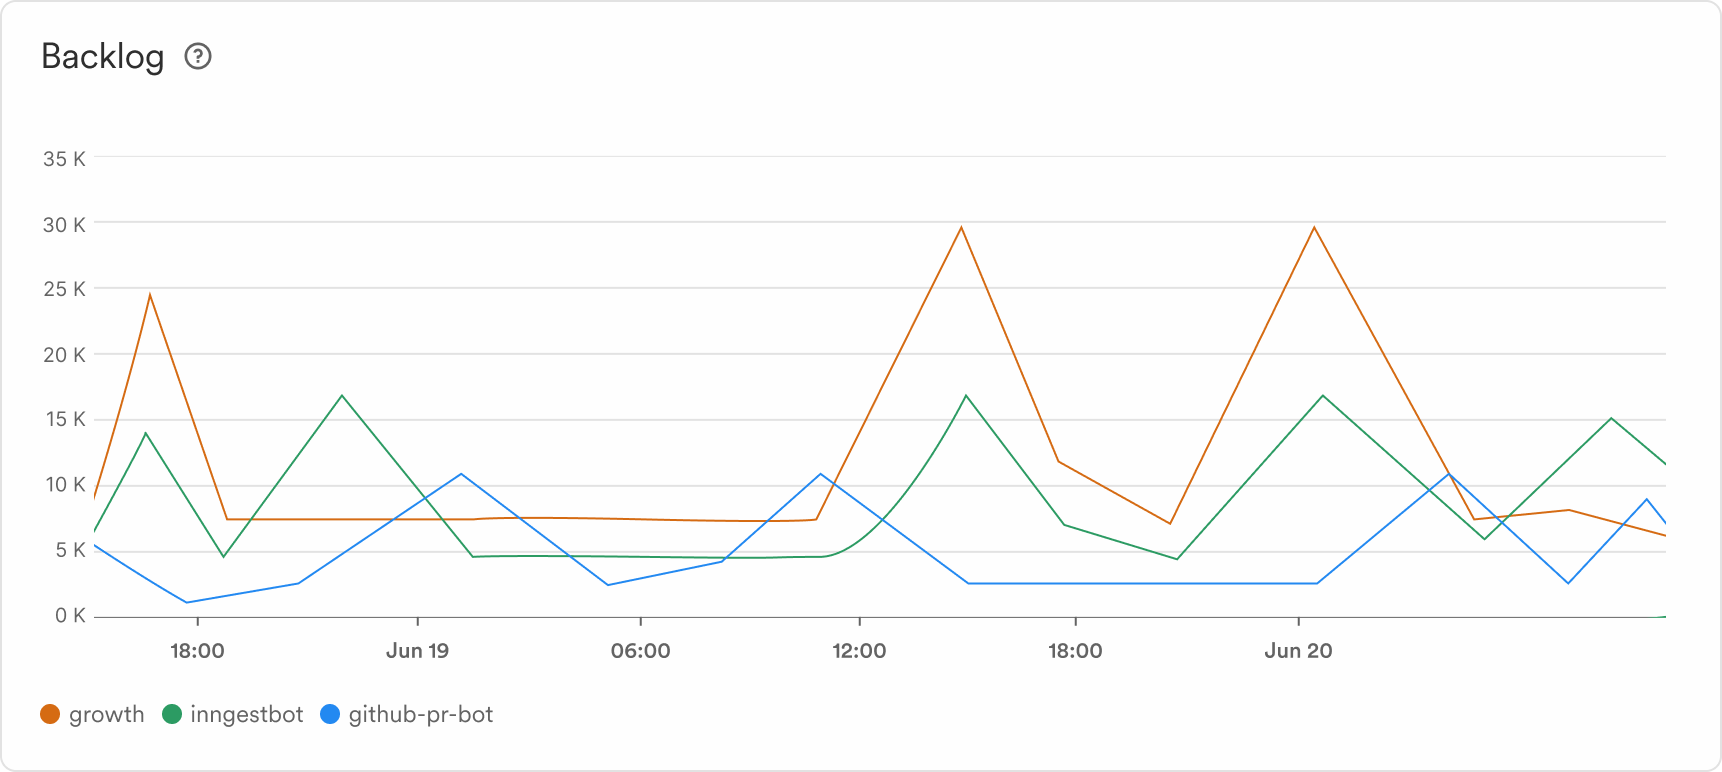
The _Backlog_ highlights the number of **Function runs waiting to processed at a given time bucket, grouped by the selected Apps**.
**How to use this chart?**
This chart is useful to assess the _Account Concurrency_ capacity of your account and to identify potential spikes of activity.
{/*
### Account concurrency
The _Account concurrency_ displays the **[concurrency](/docs/guides/concurrency) usage in time, at the account level**.
The red line illustrates the maximum concurrency capacity of the account.
**How to use this chart?**
This chart is useful to quickly identify is some increase in _Backlog_ or drop in _Total run throughput_ is linked to your account's [concurrency capacity](/docs/guides/concurrency).
Each account gets a maximum concurrency capacity, computed by adding the total number of running steps across all applications.
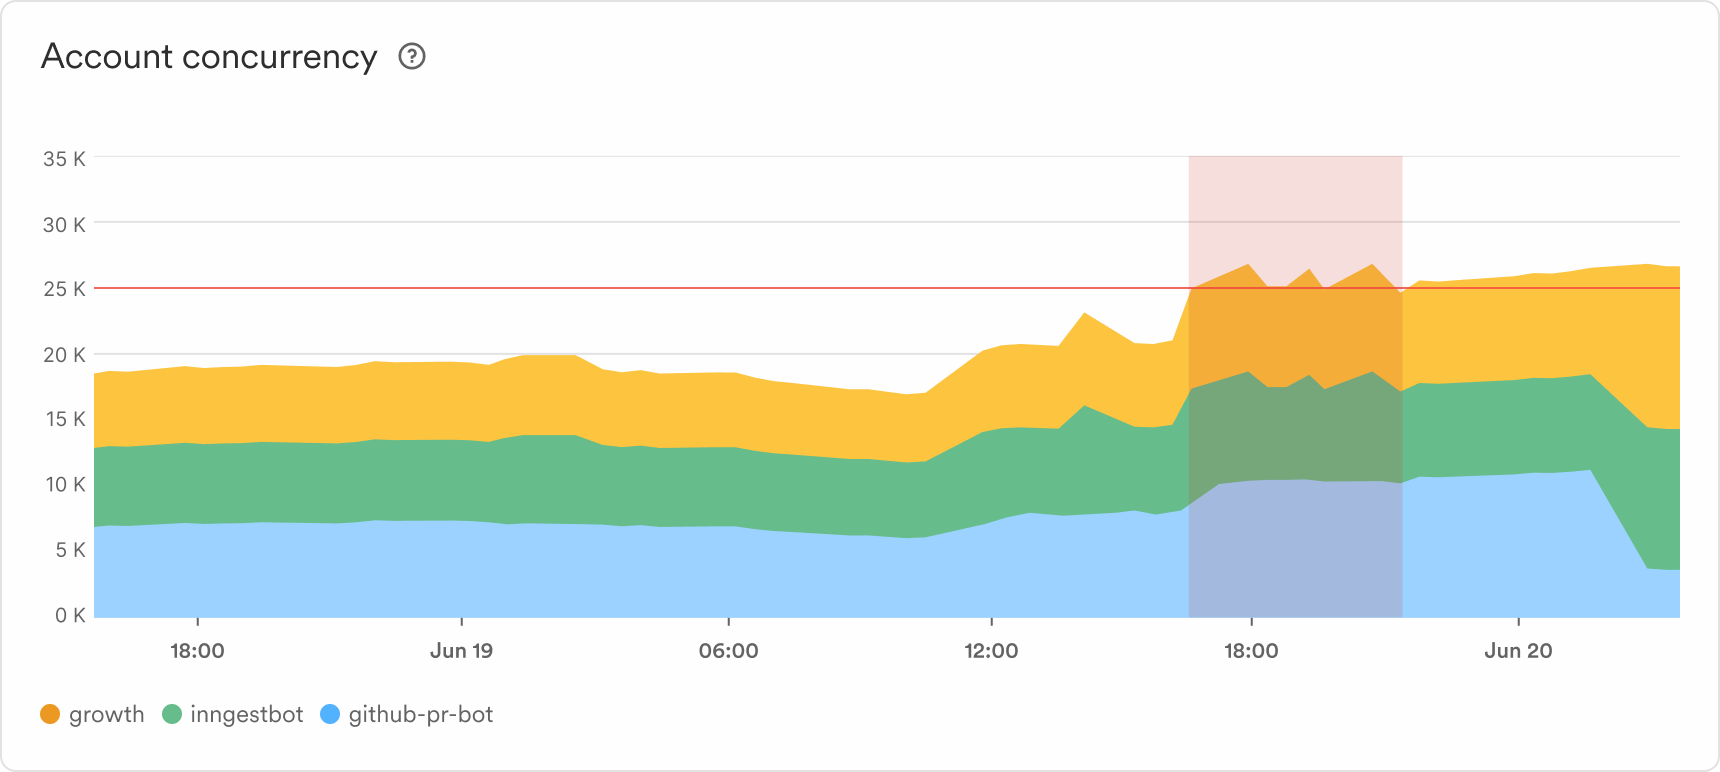
*/}
## Events observability
Events volume and which functions they trigger can become hard to visualize.
Thankfully, the Events page gives you a quick overview of the volume of Events being sent to your Inngest account:
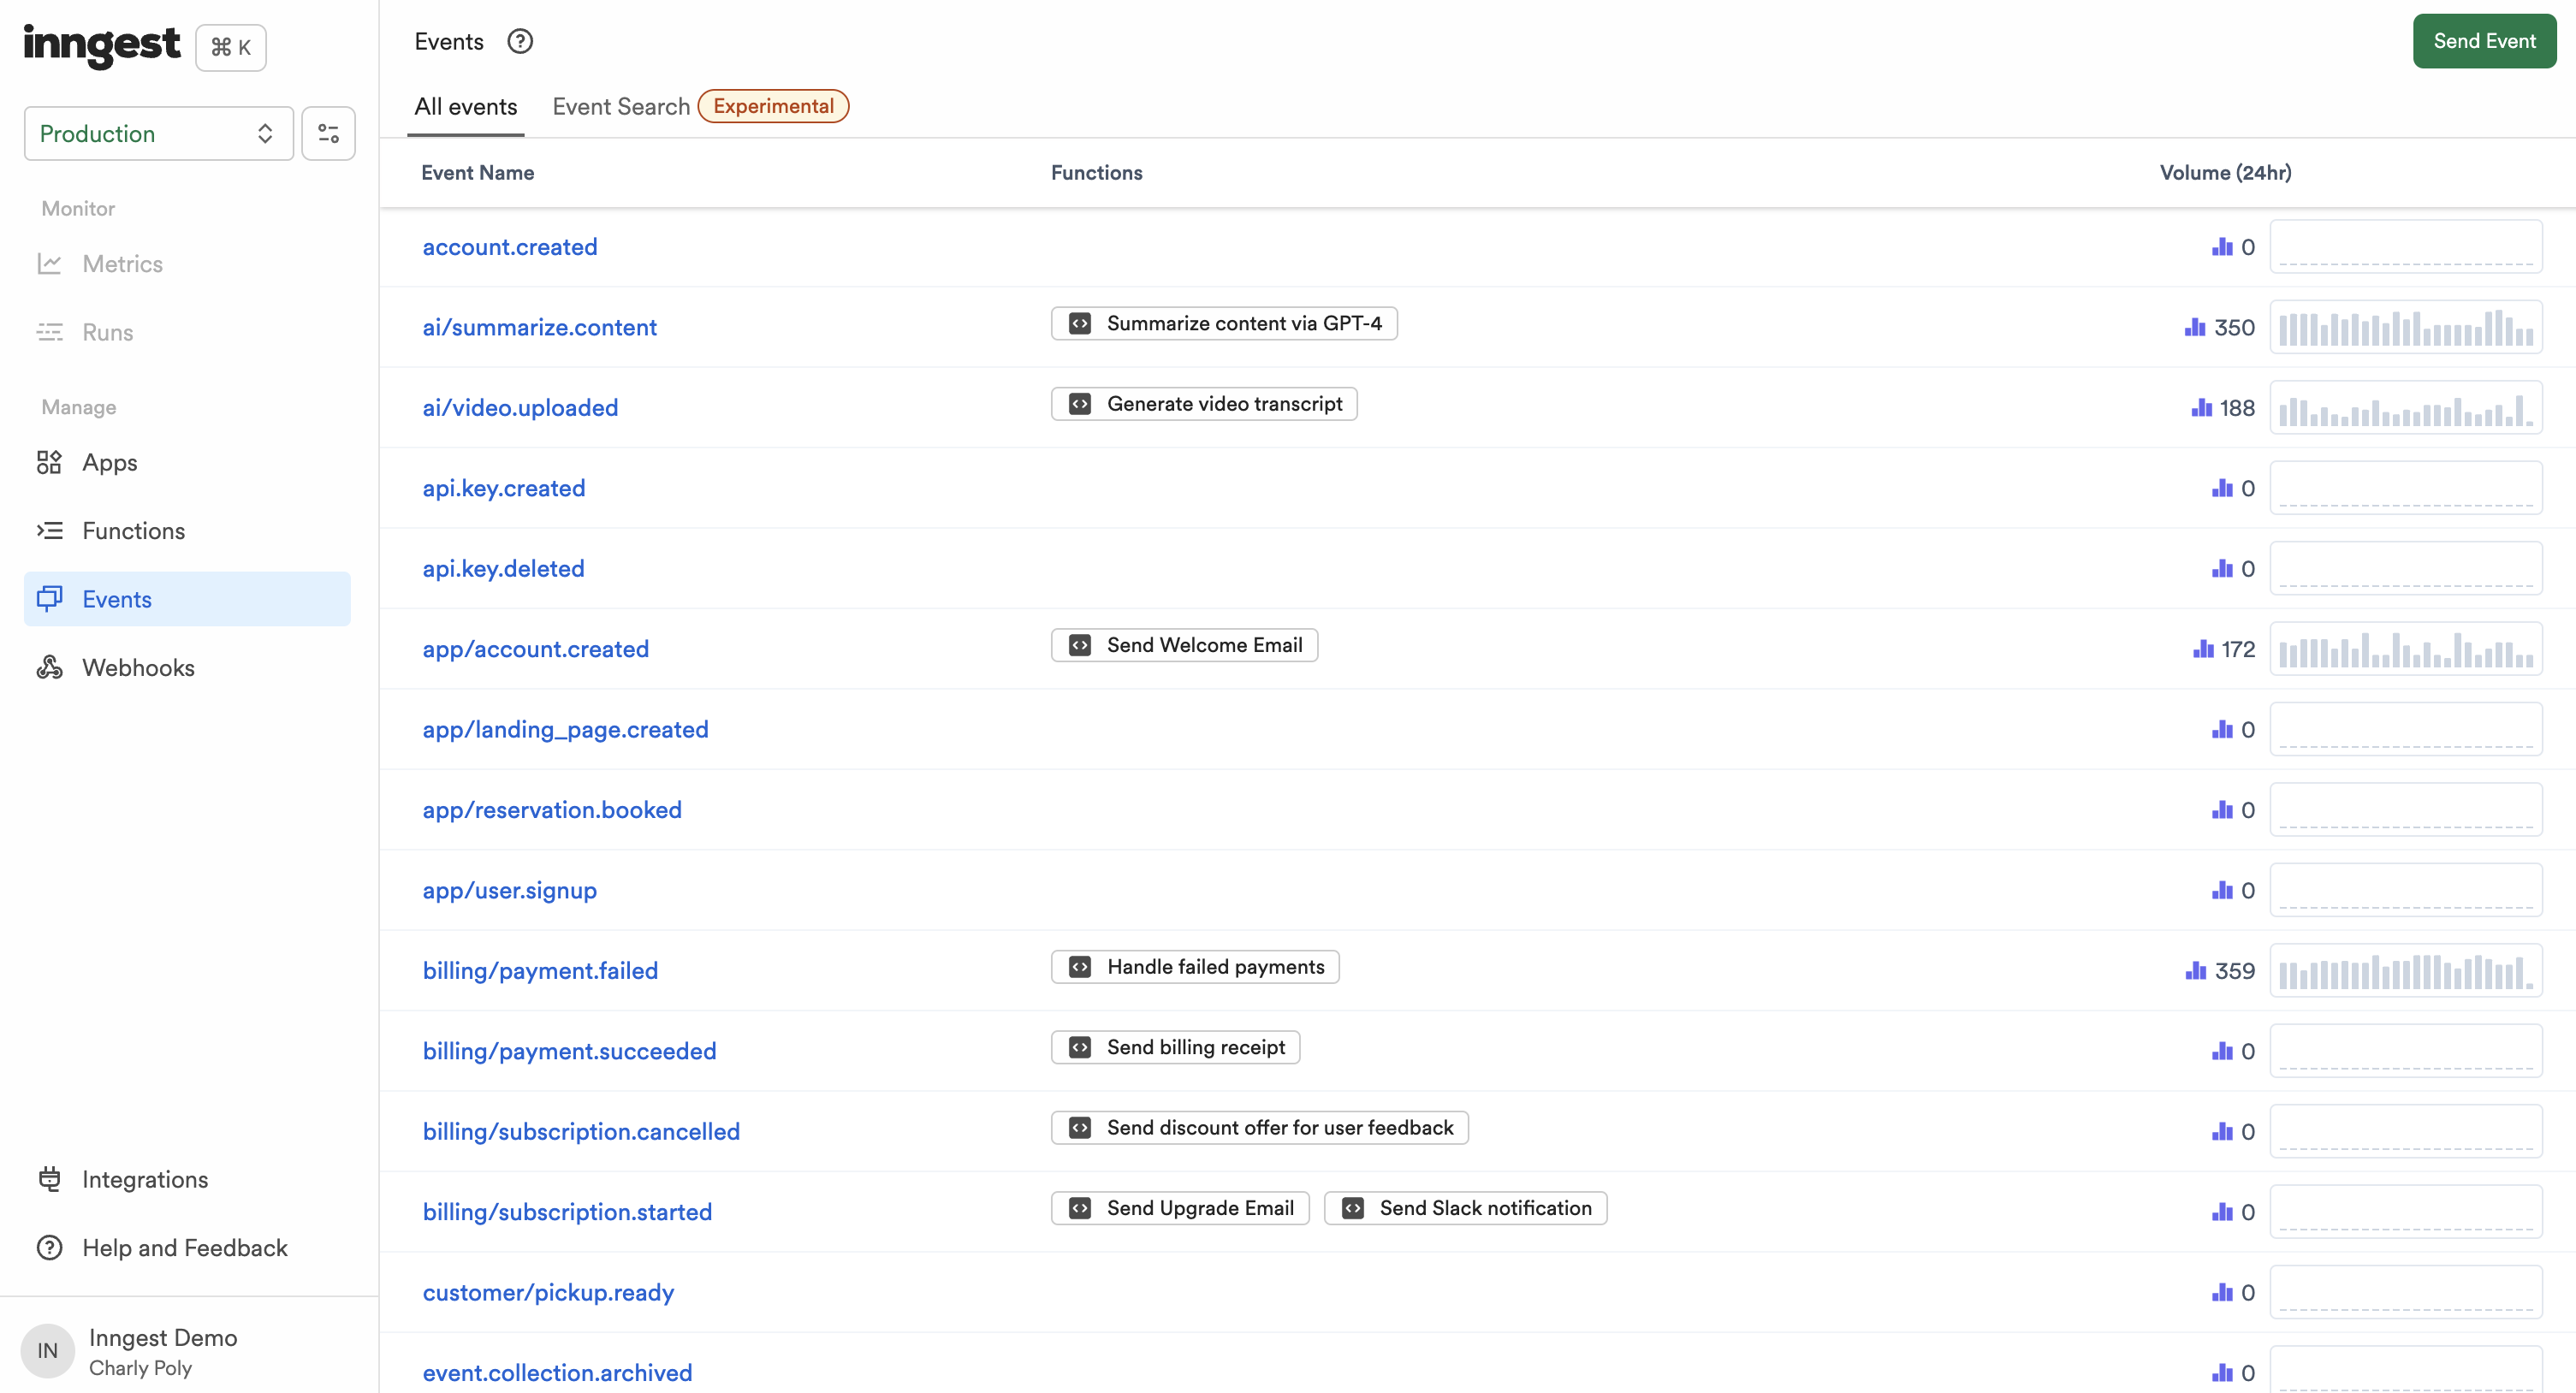
Get more detailed metrics for a dedicated event by navigating to it from the list:
## Events metrics and logs
The Event page helps quickly visualize the throughput (the rate of event over time) and functions associated with this event.
The event occurrences feature a “Source” column, which is helpful when an event is triggered from multiple Apps (ex, using different languages):
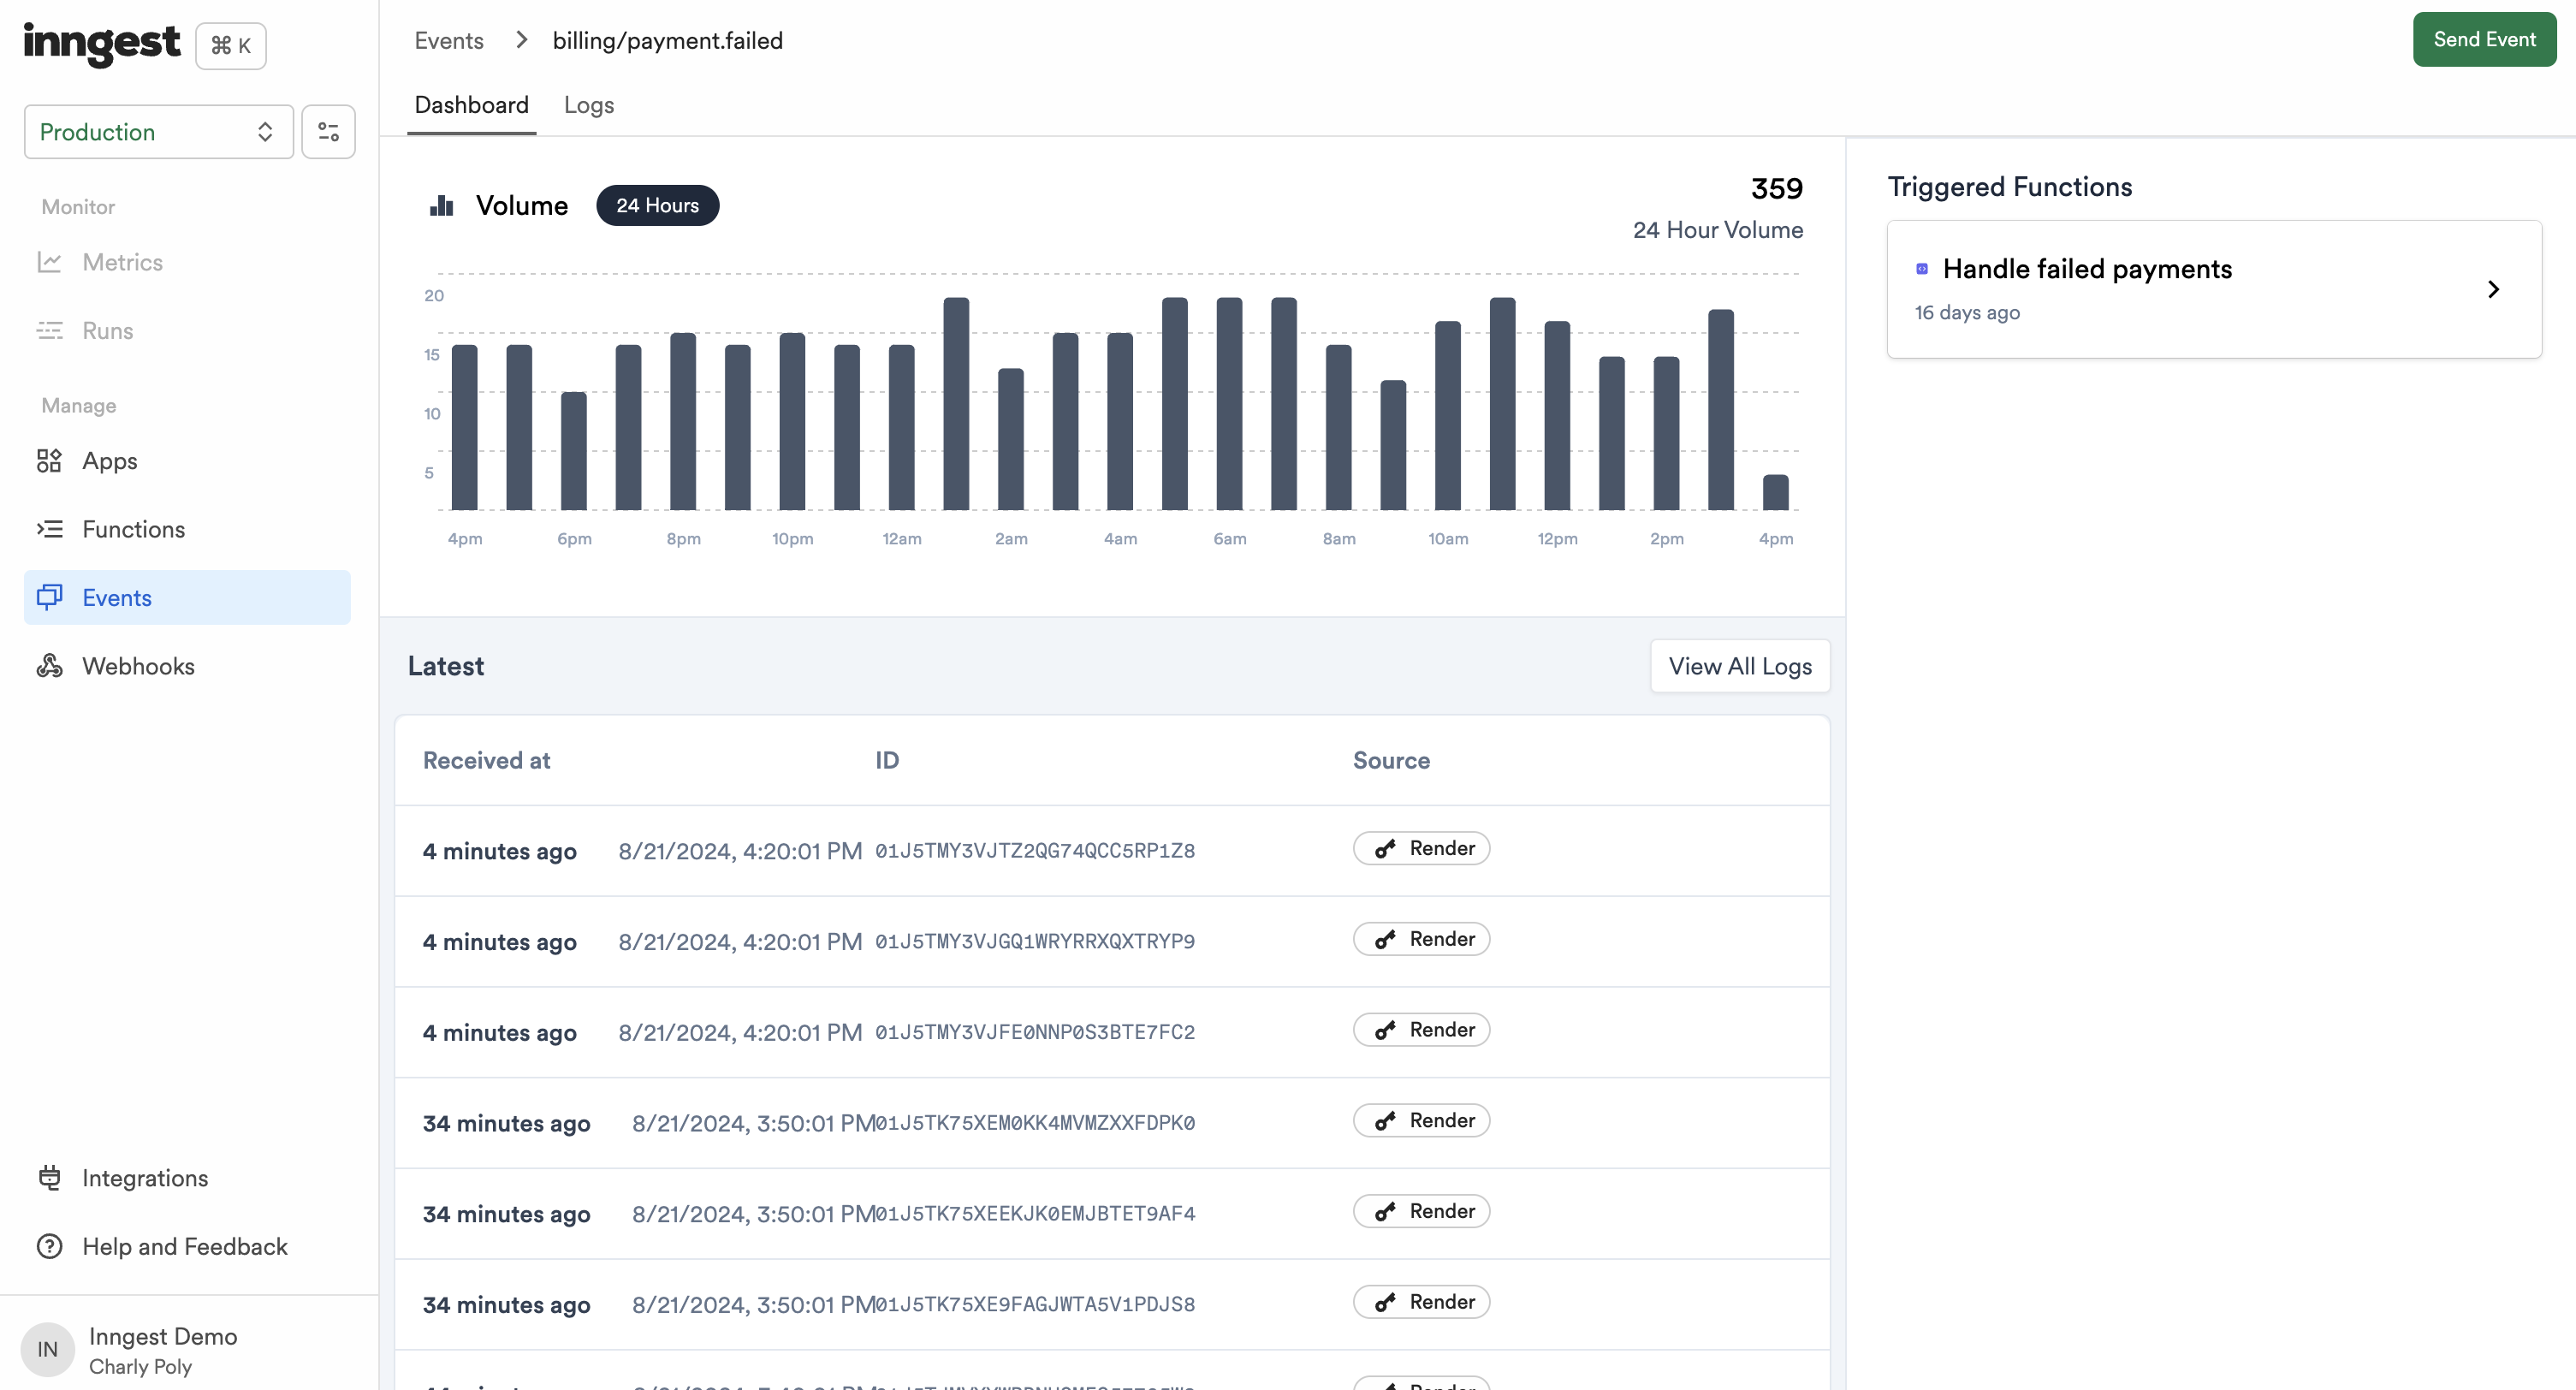
Clicking on a specific event will redirect you to its Logs.
The Event Logs view provides the most precise information, with the linked Function run and raw event data.
Such information, combined with the ability to forward the event to your Local Dev Server instance, makes debugging events much quicker:
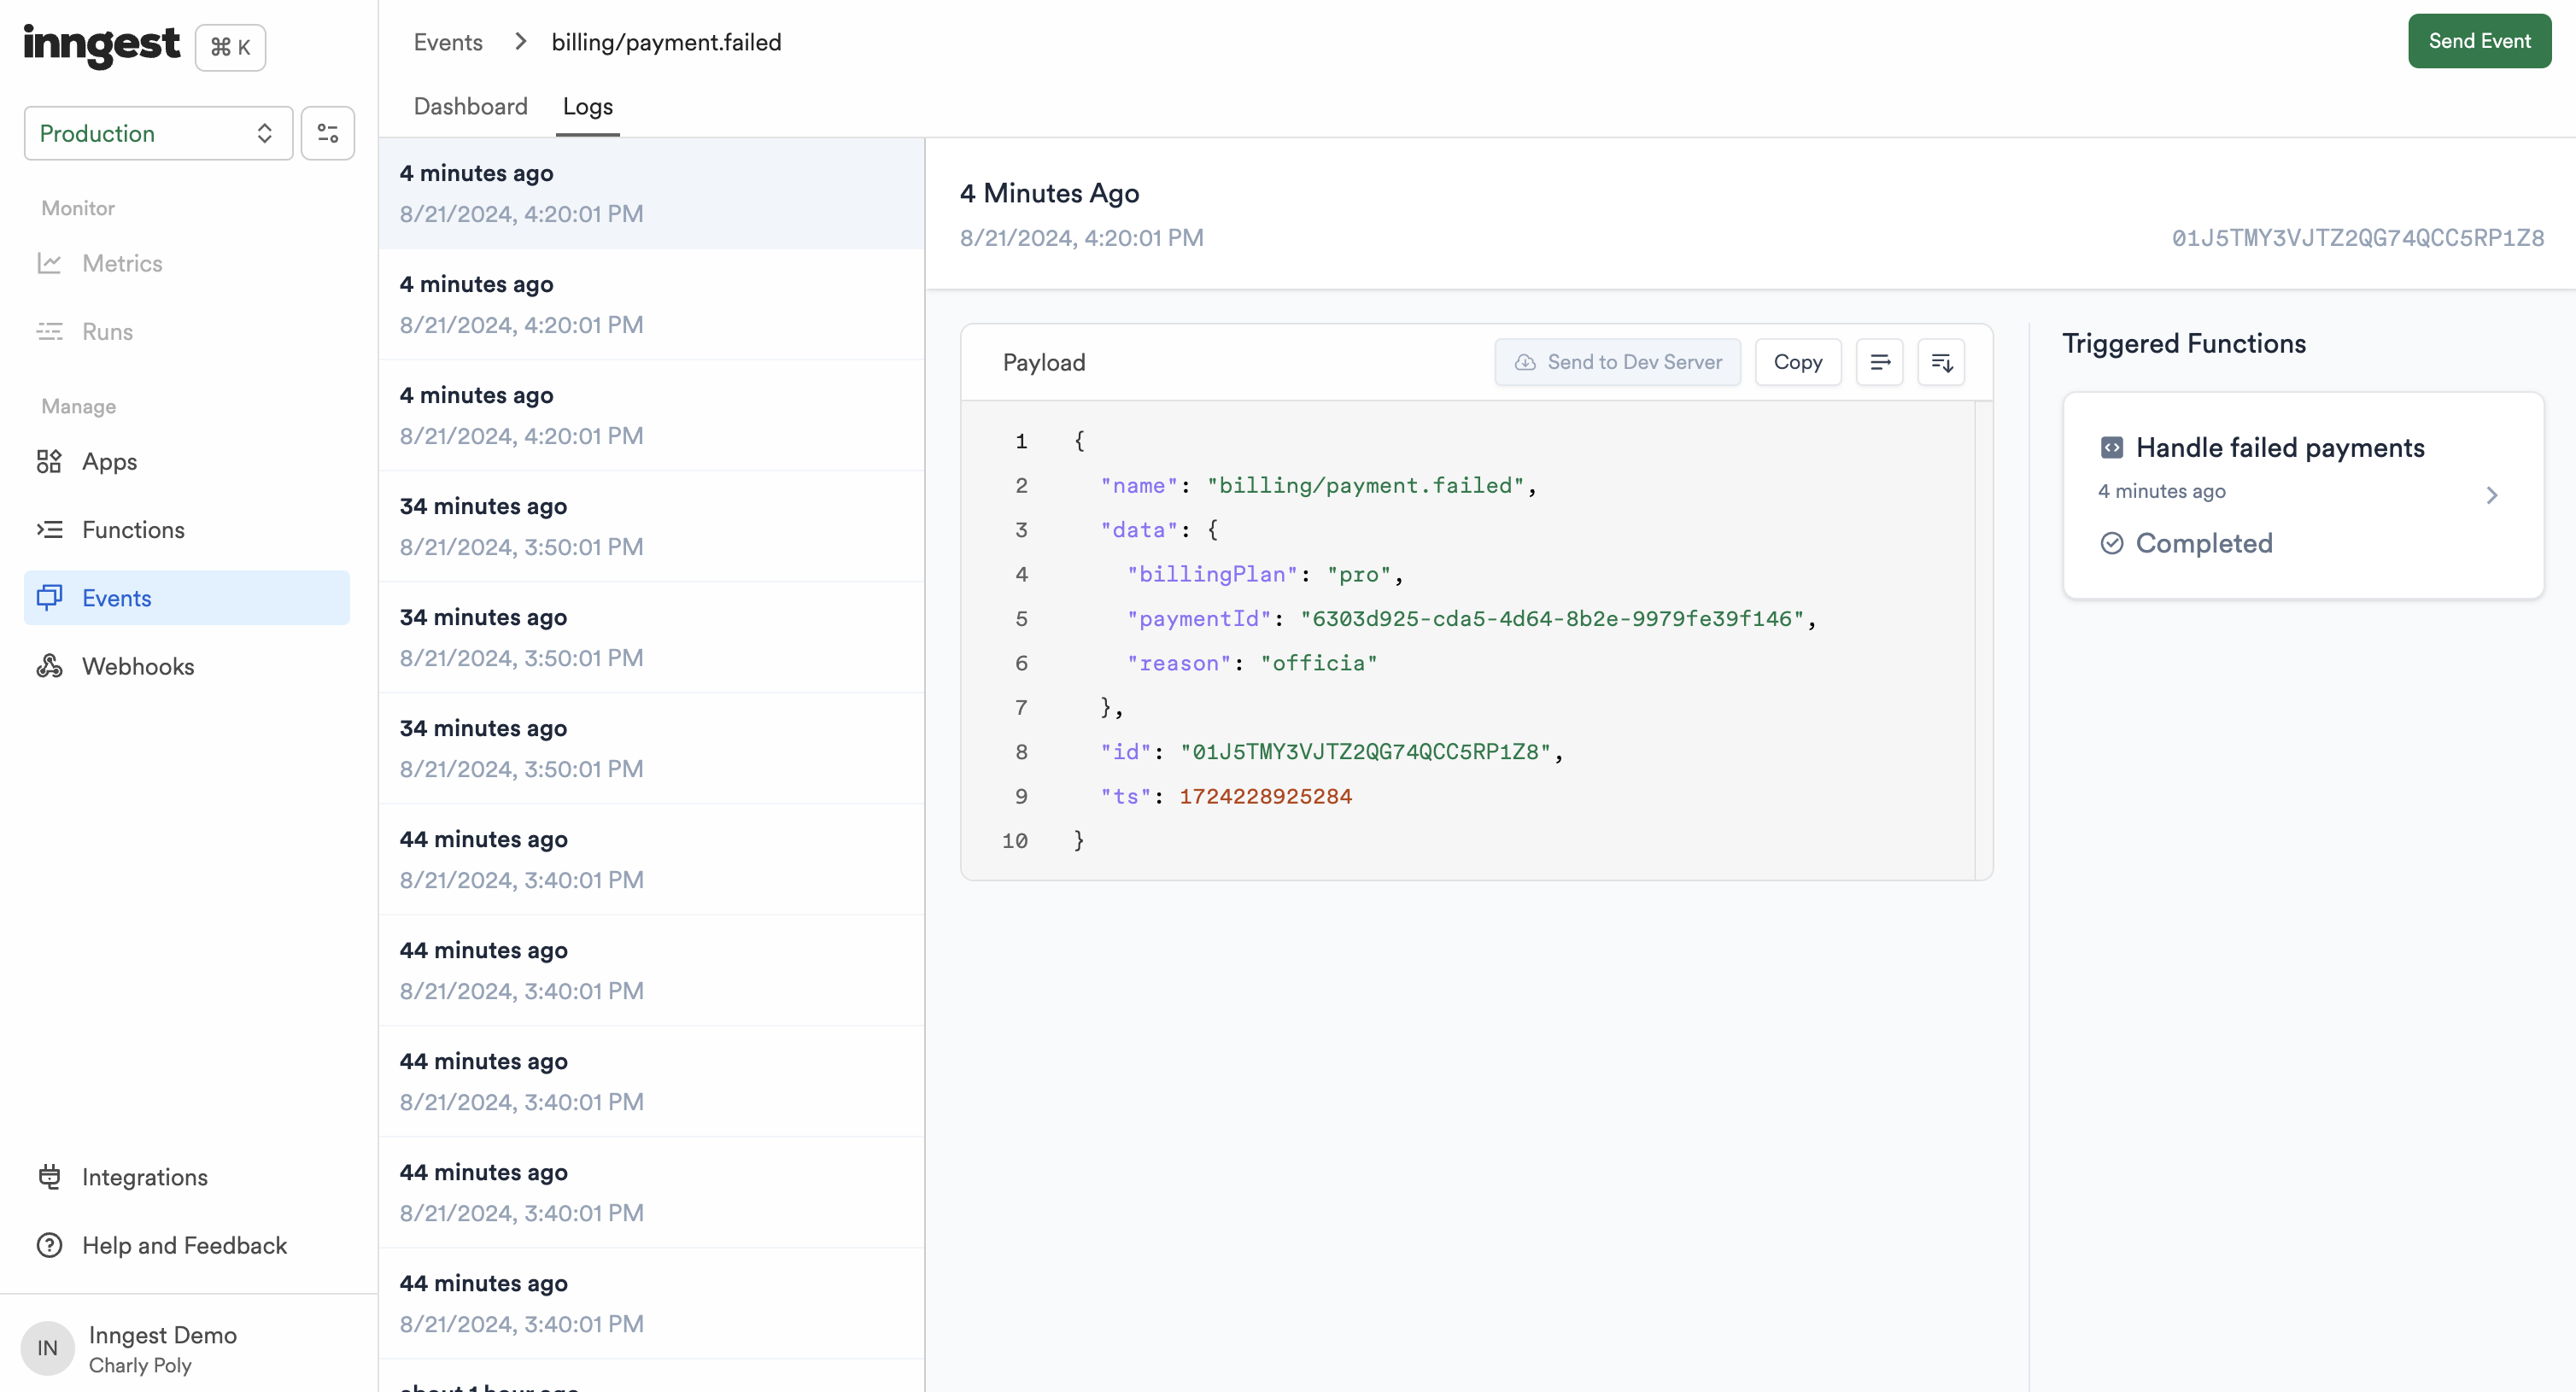
## Global Search
The global search feature helps you quickly find apps, functions, and events in your account using their names or **IDs**. It’s more than a search tool — you can also use it to navigate around the environment and take quick actions or access helpful resources.
To open global search, press **Command (⌘) / Ctrl + K** on your keyboard, or click the search icon in the top-left corner.
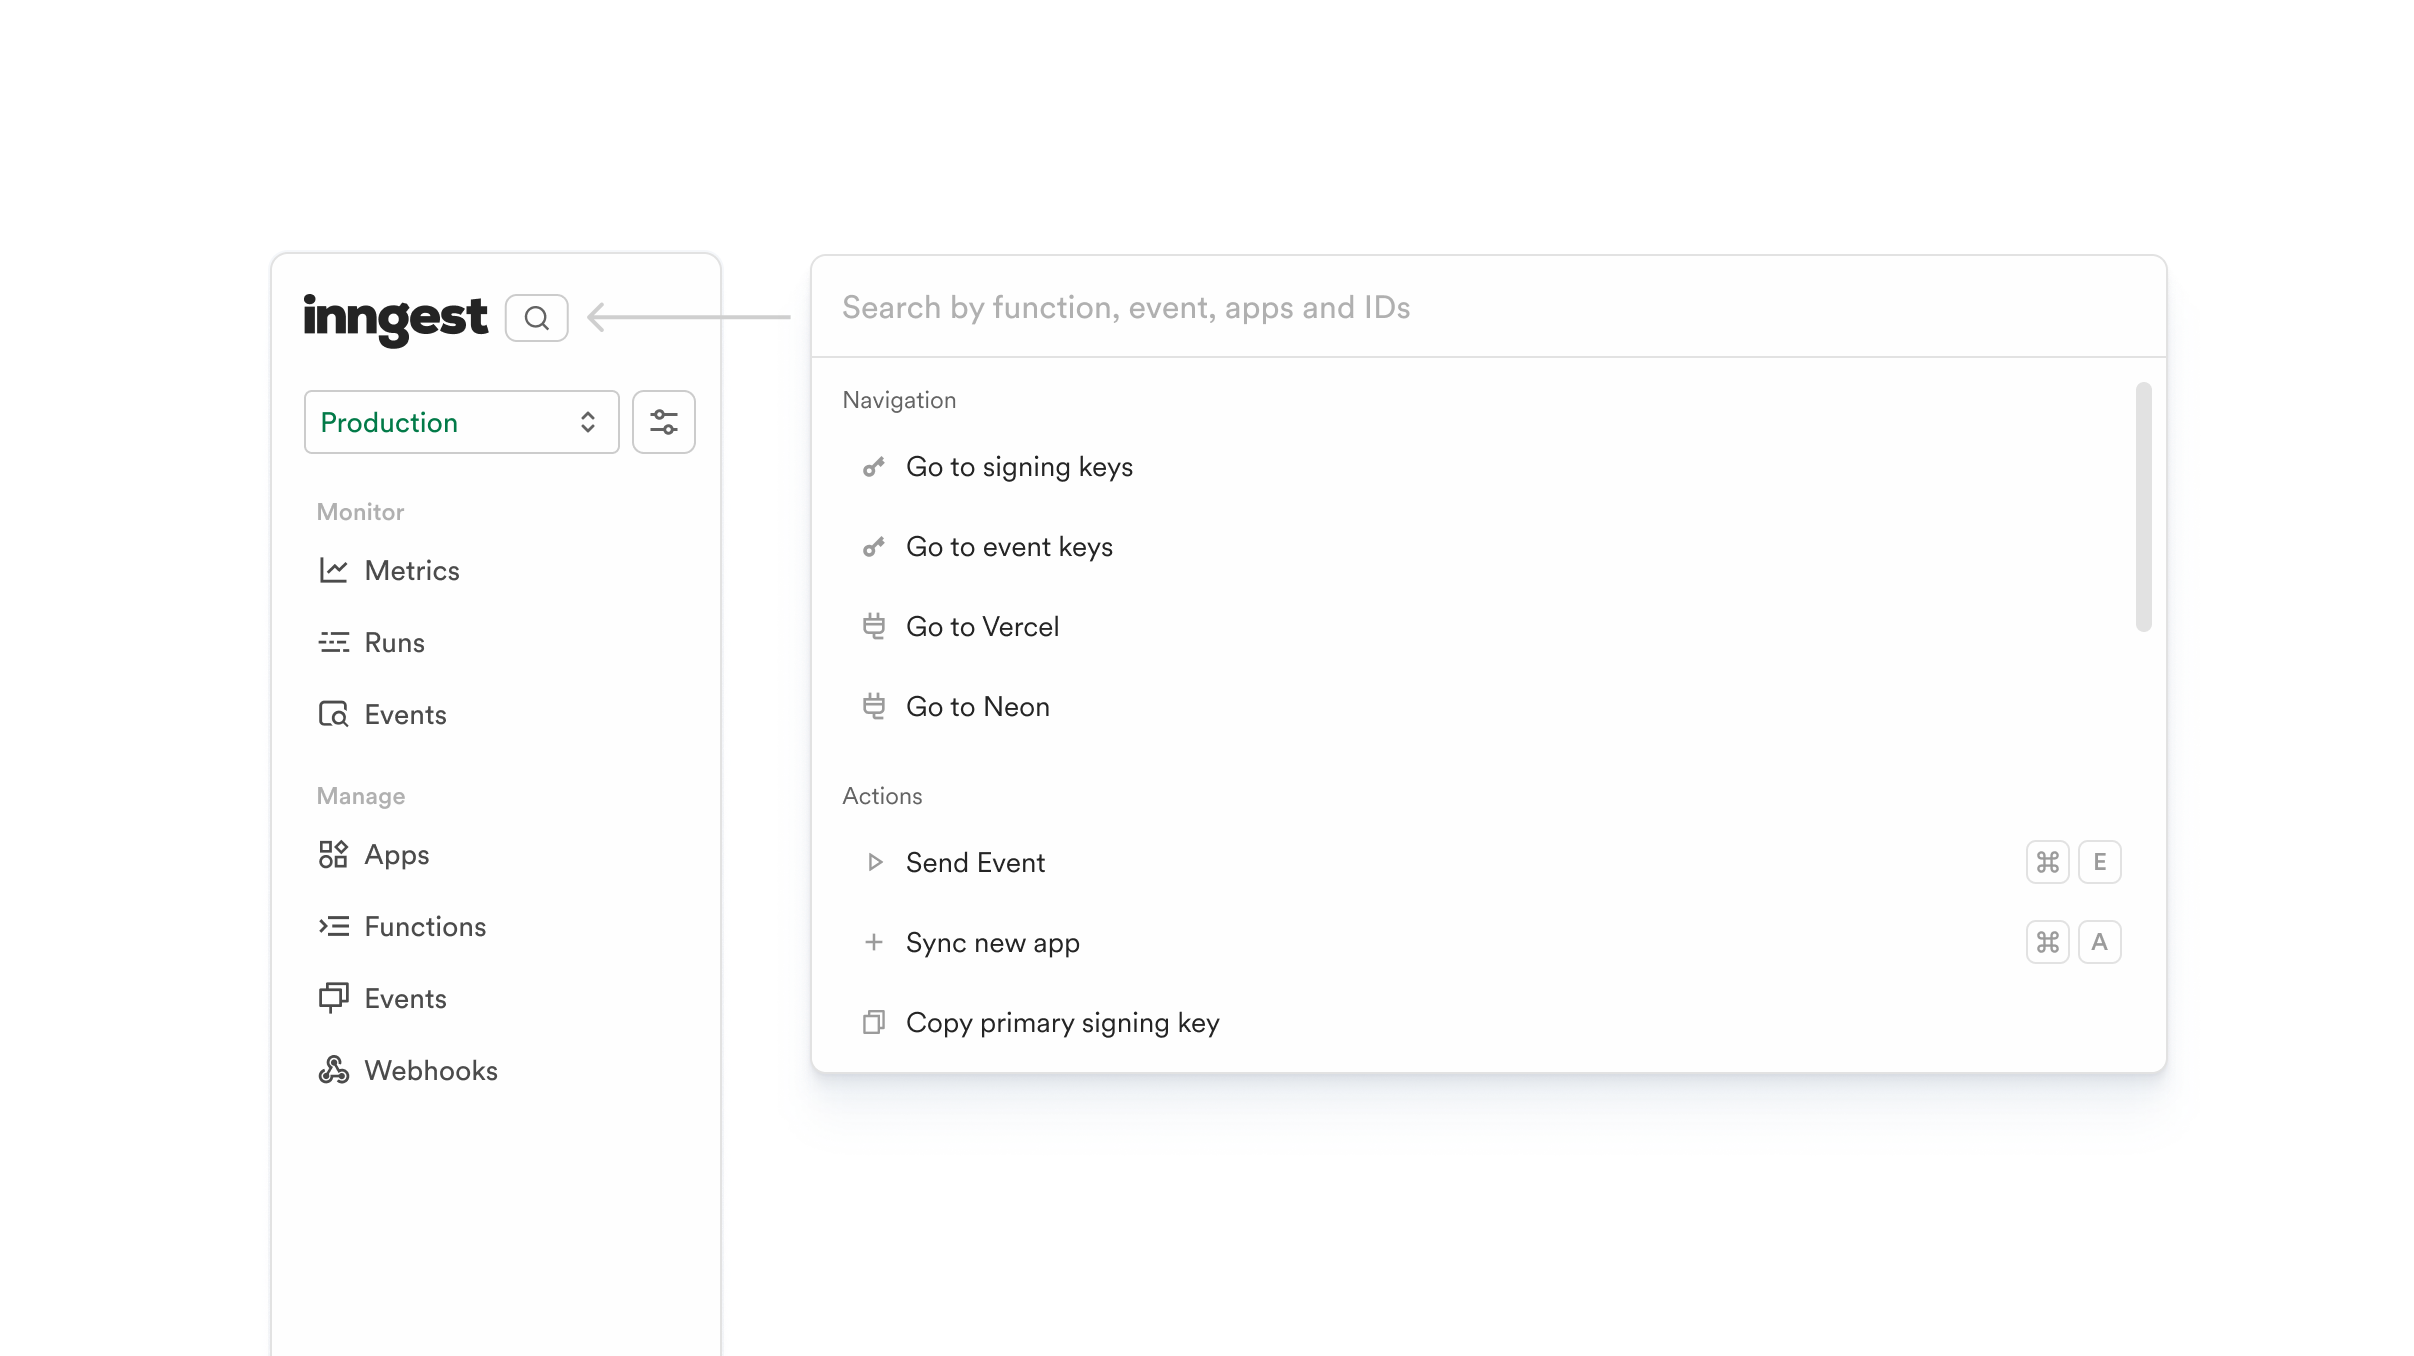
# Prometheus metrics export integration
Source: https://www.inngest.com/docs/platform/monitor/prometheus-metrics-export-integration
Inngest supports exporting [Prometheus](https://prometheus.io/) metrics via scrape endpoints. This enables you to monitor your Inngest functions from your existing Prometheus or Prometheus-compatible monitoring tools like [Grafana](https://prometheus.io/docs/visualization/grafana/), [New Relic](https://docs.newrelic.com/docs/infrastructure/prometheus-integrations/get-started/send-prometheus-metric-data-new-relic/), or similar.
## Setup
To get started, navigate to the Prometheus integration page in the Inngest dashboard's "Integrations" section.
Select the Inngest environment you want to export metrics from. The scrape config will be automatically generated including your Inngest API key required to authenticate with the scrape endpoint. You can use this configuration in your Prometheus instance or similar tool that supports scraping from a URL.
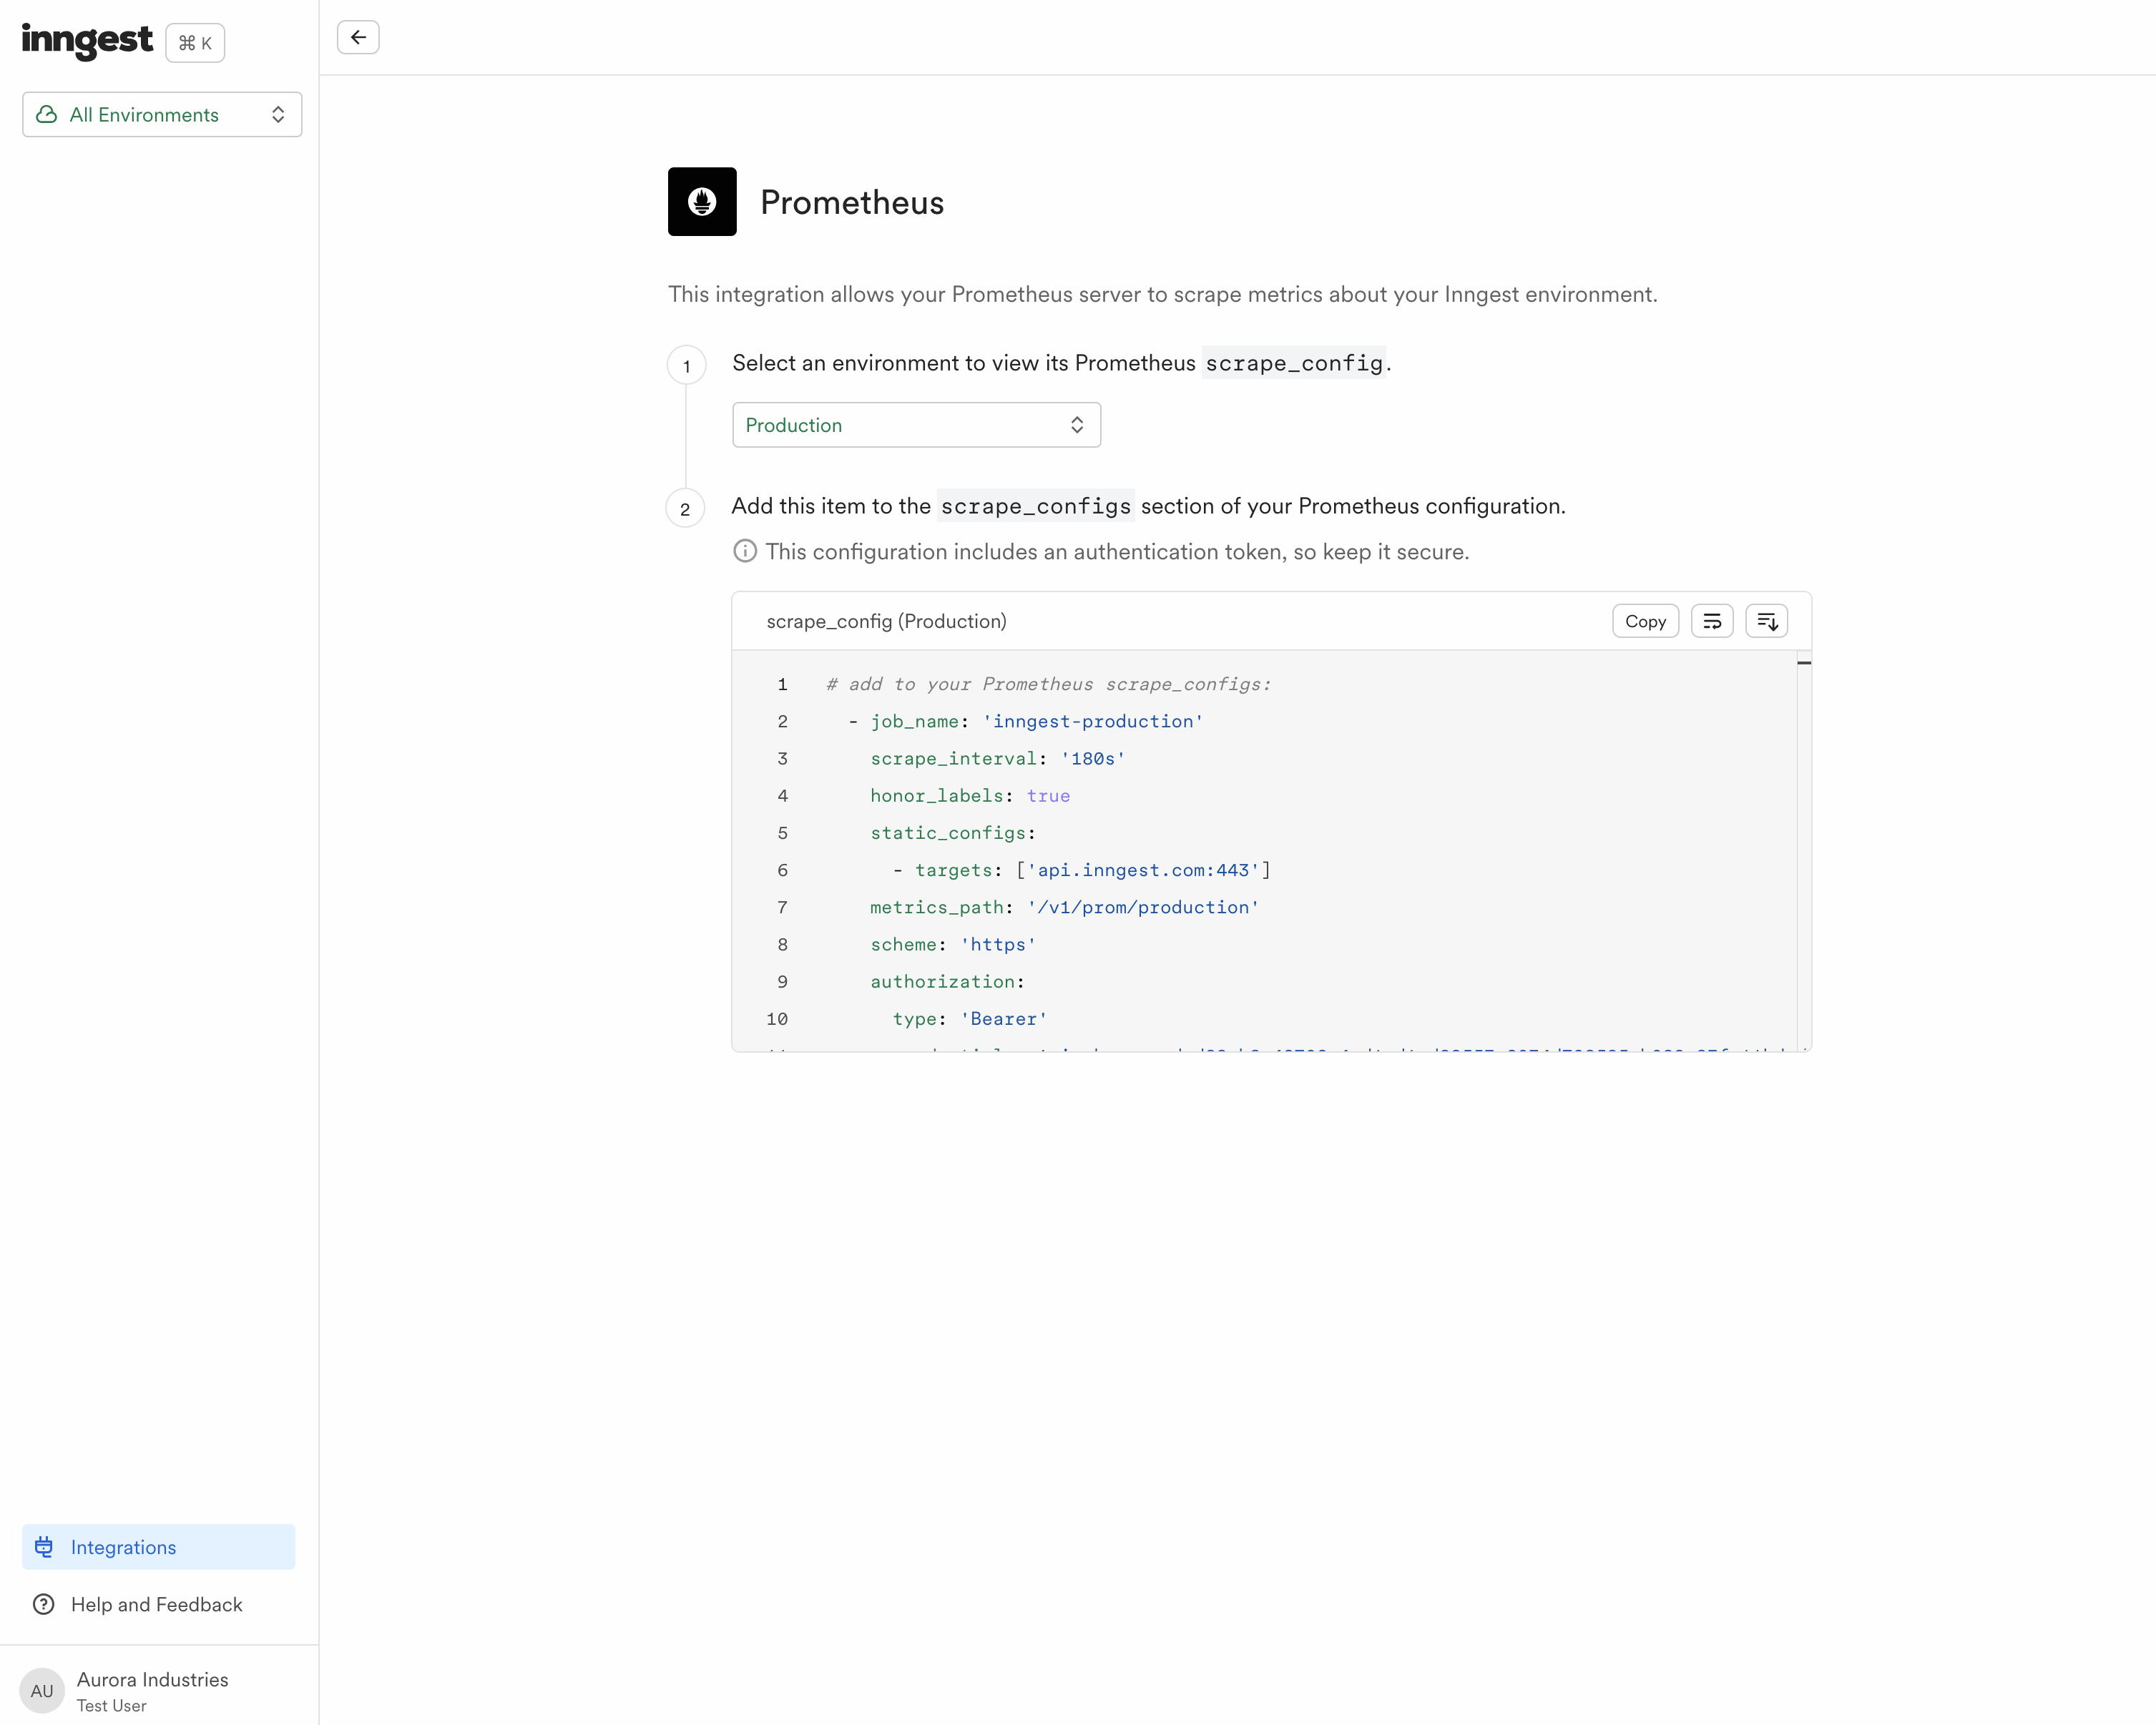
## Metrics
The following metrics are exported:
| Metric | Type | Tags |
|---|---|---|
| `inngest_function_run_scheduled_total`| counter | `fn`, `date` |
| `inngest_function_run_started_total`| counter | `fn`, `date` |
| `inngest_function_run_ended_total`| counter | `fn`, `date`, `status` |
| `inngest_sdk_req_scheduled_total`| counter | `fn`, `date` |
| `inngest_sdk_req_started_total`| counter | `fn`, `date` |
| `inngest_sdk_req_ended_total`| counter | `fn`, `date`, `status` |
| `inngest_step_output_bytes_total`| counter | `fn`, `date` |
| `inngest_steps_scheduled`| gauge | `fn` |
| `inngest_steps_running`| gauge | `fn` |
Example output:
```yaml
# HELP inngest_function_run_ended_total The total number of function runs ended
# TYPE inngest_function_run_ended_total counter
inngest_function_run_ended_total{date="2025-02-12",fn="my-app-my-function",status="Completed"} 480
inngest_function_run_ended_total{date="2025-02-12",fn="my-app-my-function",status="Failed"} 20
# HELP inngest_function_run_scheduled_total The total number of function runs scheduled
# TYPE inngest_function_run_scheduled_total counter
inngest_function_run_scheduled_total{date="2025-02-12",fn="my-app-my-function"} 500
# HELP inngest_function_run_started_total The total number of function runs started
# TYPE inngest_function_run_started_total counter
inngest_function_run_started_total{date="2025-02-12",fn="my-app-my-function"} 500
# HELP inngest_sdk_req_ended_total The total number of SDK invocation/step execution ended
# TYPE inngest_sdk_req_ended_total counter
inngest_sdk_req_ended_total{date="2025-02-12",fn="my-app-my-function",status="errored"} 17
inngest_sdk_req_ended_total{date="2025-02-12",fn="my-app-my-function",status="failed"} 15
inngest_sdk_req_ended_total{date="2025-02-12",fn="my-app-my-function",status="success"} 740
# HELP inngest_sdk_req_scheduled_total The total number of SDK invocation/step execution scheduled
# TYPE inngest_sdk_req_scheduled_total counter
inngest_sdk_req_scheduled_total{date="2025-02-12",fn="my-app-my-function"} 772
# HELP inngest_sdk_req_started_total The total number of SDK invocation/step execution started
# TYPE inngest_sdk_req_started_total counter
inngest_sdk_req_started_total{date="2025-02-12",fn="my-app-my-function"} 772
# HELP inngest_step_output_bytes_total The total number of bytes used by step outputs
# TYPE inngest_step_output_bytes_total counter
inngest_step_output_bytes_total{date="2025-02-12",fn="my-app-my-function"} 2804
# HELP inngest_steps_running The number of steps currently running
# TYPE inngest_steps_running gauge
inngest_steps_running{fn="my-app-my-function"} 7
# HELP inngest_steps_scheduled The number of steps scheduled
# TYPE inngest_steps_scheduled gauge
inngest_steps_scheduled{fn="my-app-my-function"} 30
```
## Limits
The Prometheus integration is available to all paid plans and is subject to the following limits.
| Plan | Granularity | Delay |
|---|---|---|
| Basic | 15 minutes | 15 minutes |
| Pro | 5 minutes | 5 minutes |
| Enterprise | 1 minute | Immediate |
All plans are subject to a rate limit of 30 requests per minute.
# Function Replay
Source: https://www.inngest.com/docs/platform/replay
Functions will fail. It's unavoidable. When they do, you need to recover from the failure quickly.
When a large number of functions fail, you can easily _replay_ them in bulk from the Inngest dashboard.
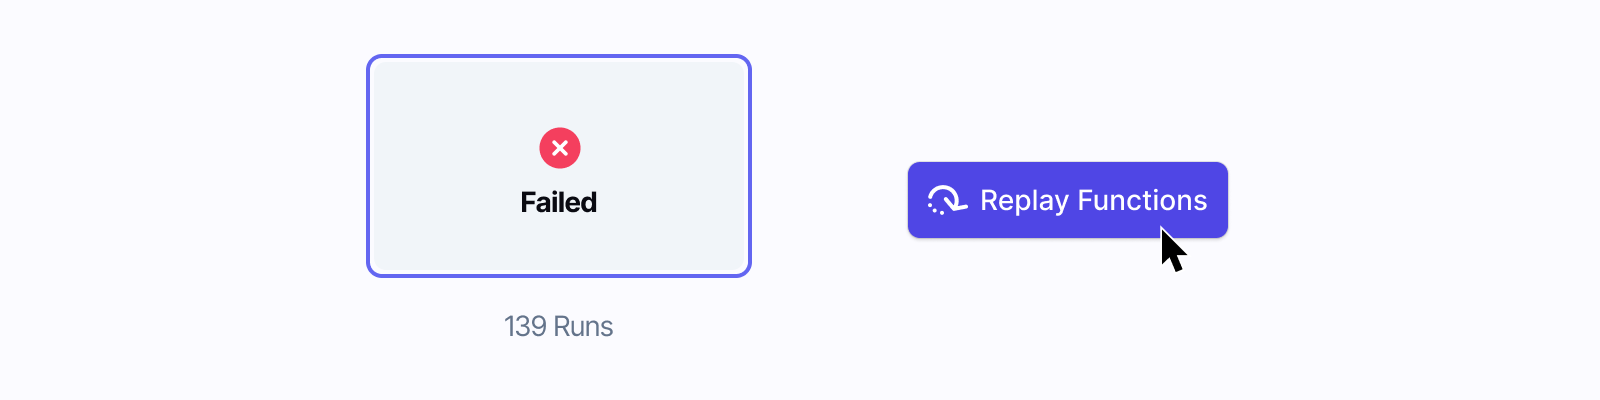
The recovery flow in other systems may require dead-letter queues or some other form of manual intervention.
With Replay, you can replay functions in bulk from the Inngest dashboard:
1. You detect an issue with your functions (e.g. a failure due to a bug or external system)
2. You fix the issue and push to production
3. You use Replay to replay the functions from the time range when the issues occurred
Let's learn how you can use Replay to recover from function failures:
## How to create a new Replay
To replay a function, select the "Replay" option in the "All actions" menu from a function's dashboard. This will open a modal where you can select the runs you want to replay.

Each replay requires a name, a time range and status(es) to filter the runs to be replayed.
We recommend using a name that describes the incident that you're resolving so your team can
understand this later, or maybe just mention the bug tracker issue: e.g. "Bug fix from PR #958",
"API-395: Networking blip."
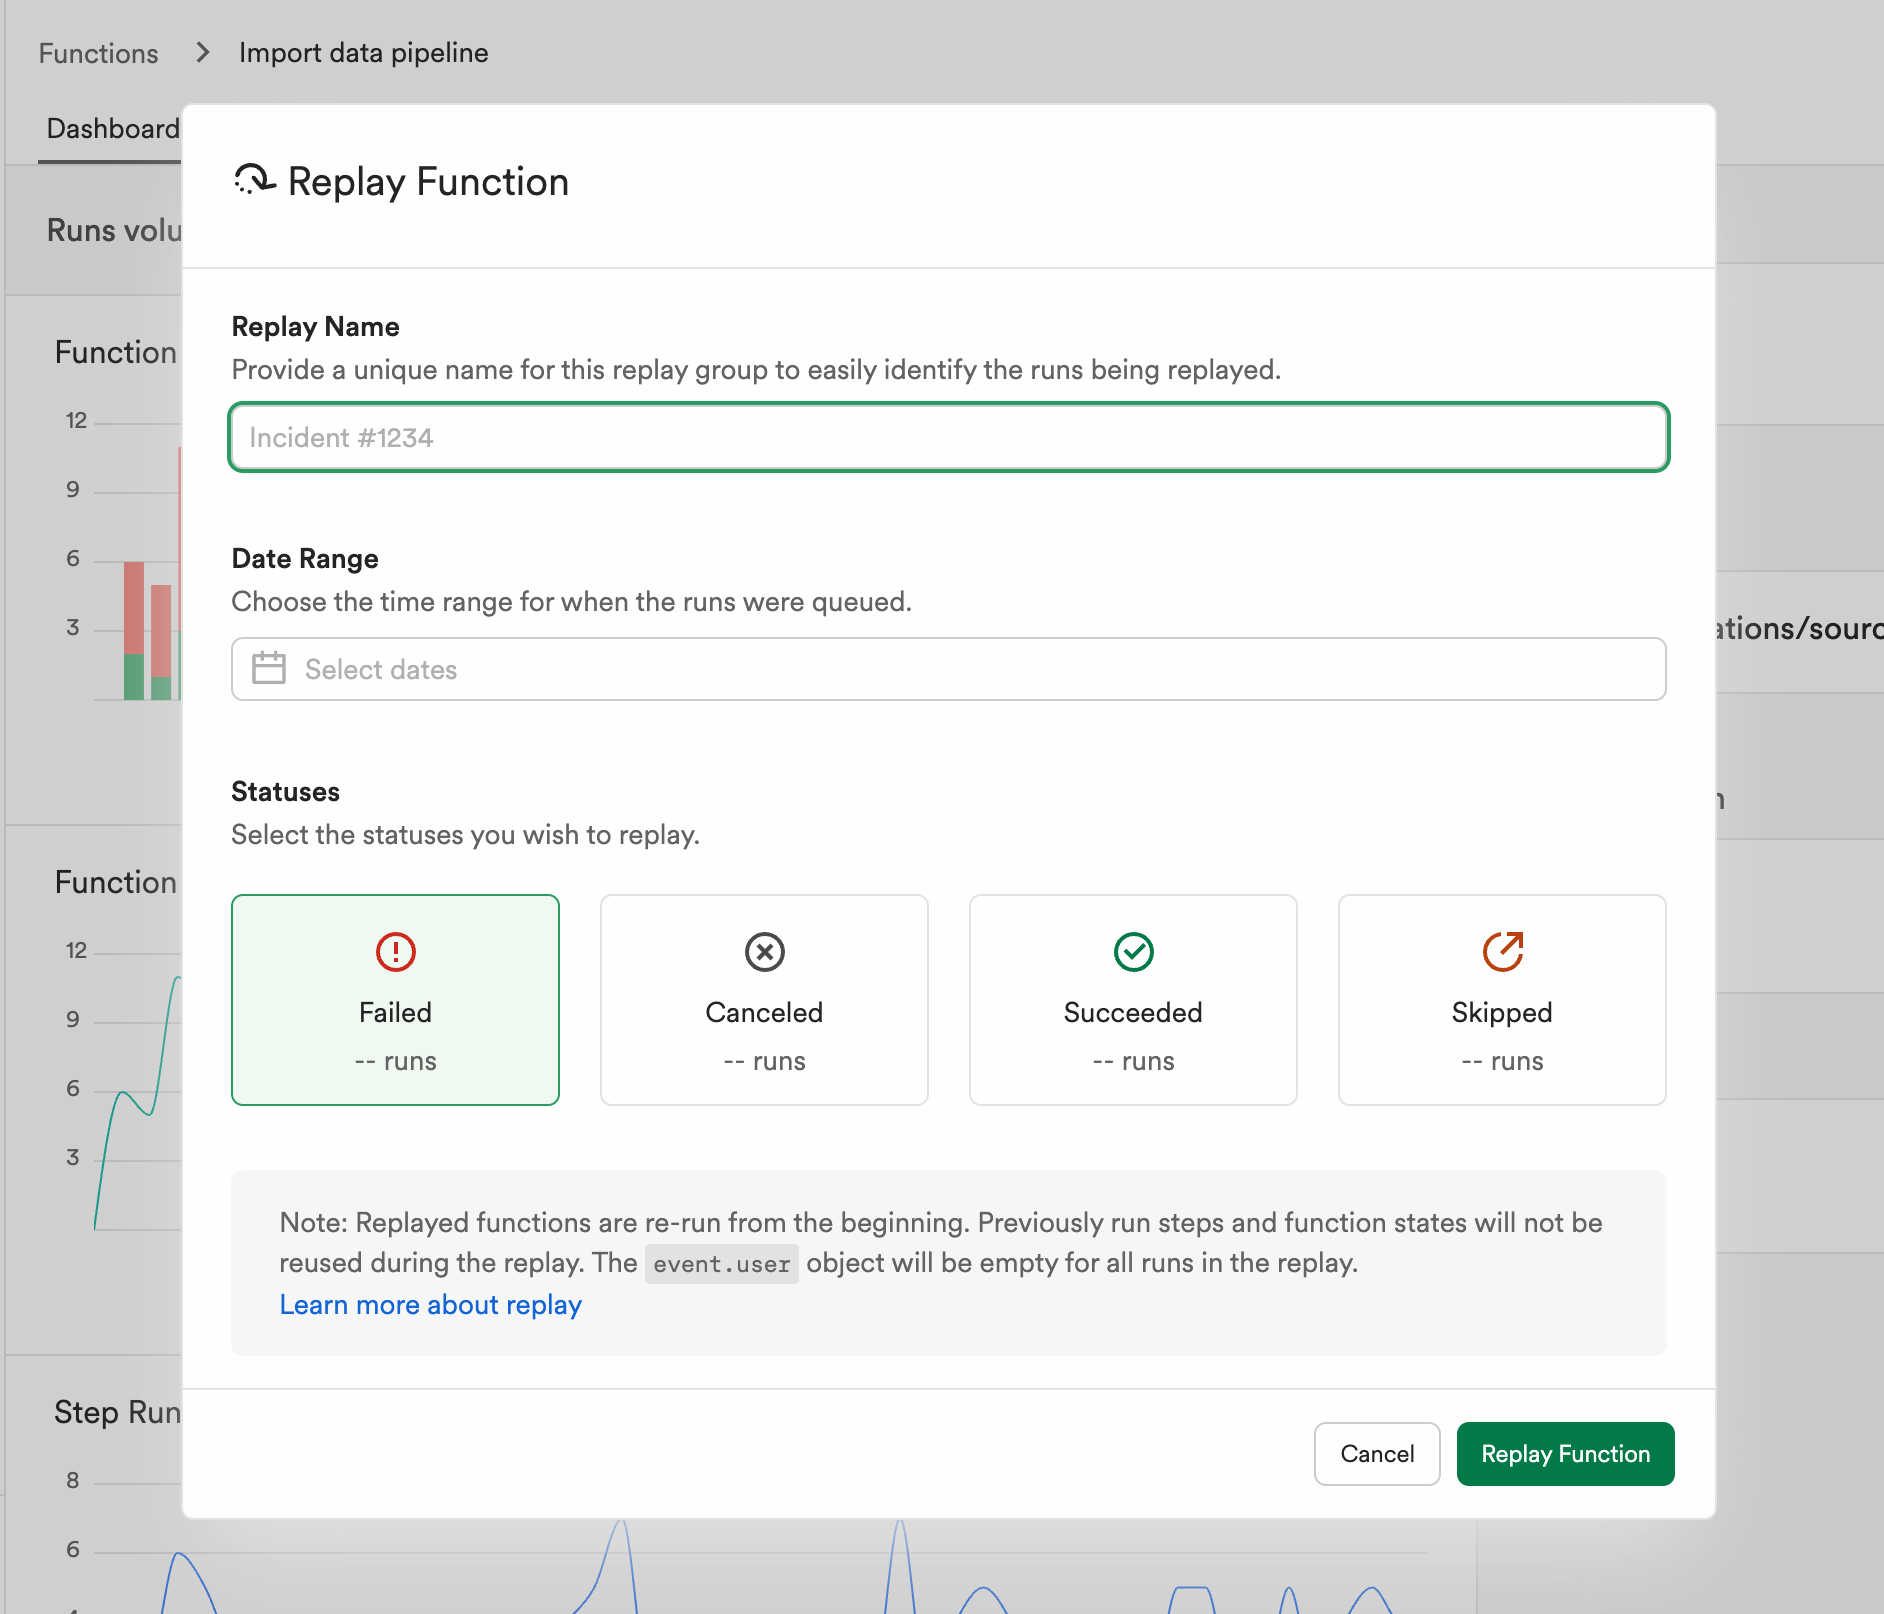
Here's an example of a Replay that fixed a bug triggered by daylight savings time between the given timestamp.
For this issue, we only want to target the "Failed" function runs statuses. You can select multiple run
statuses in case your function might have had a bug that failed silently, so you want to replay anything
previously marked as "Succeeded" as well.
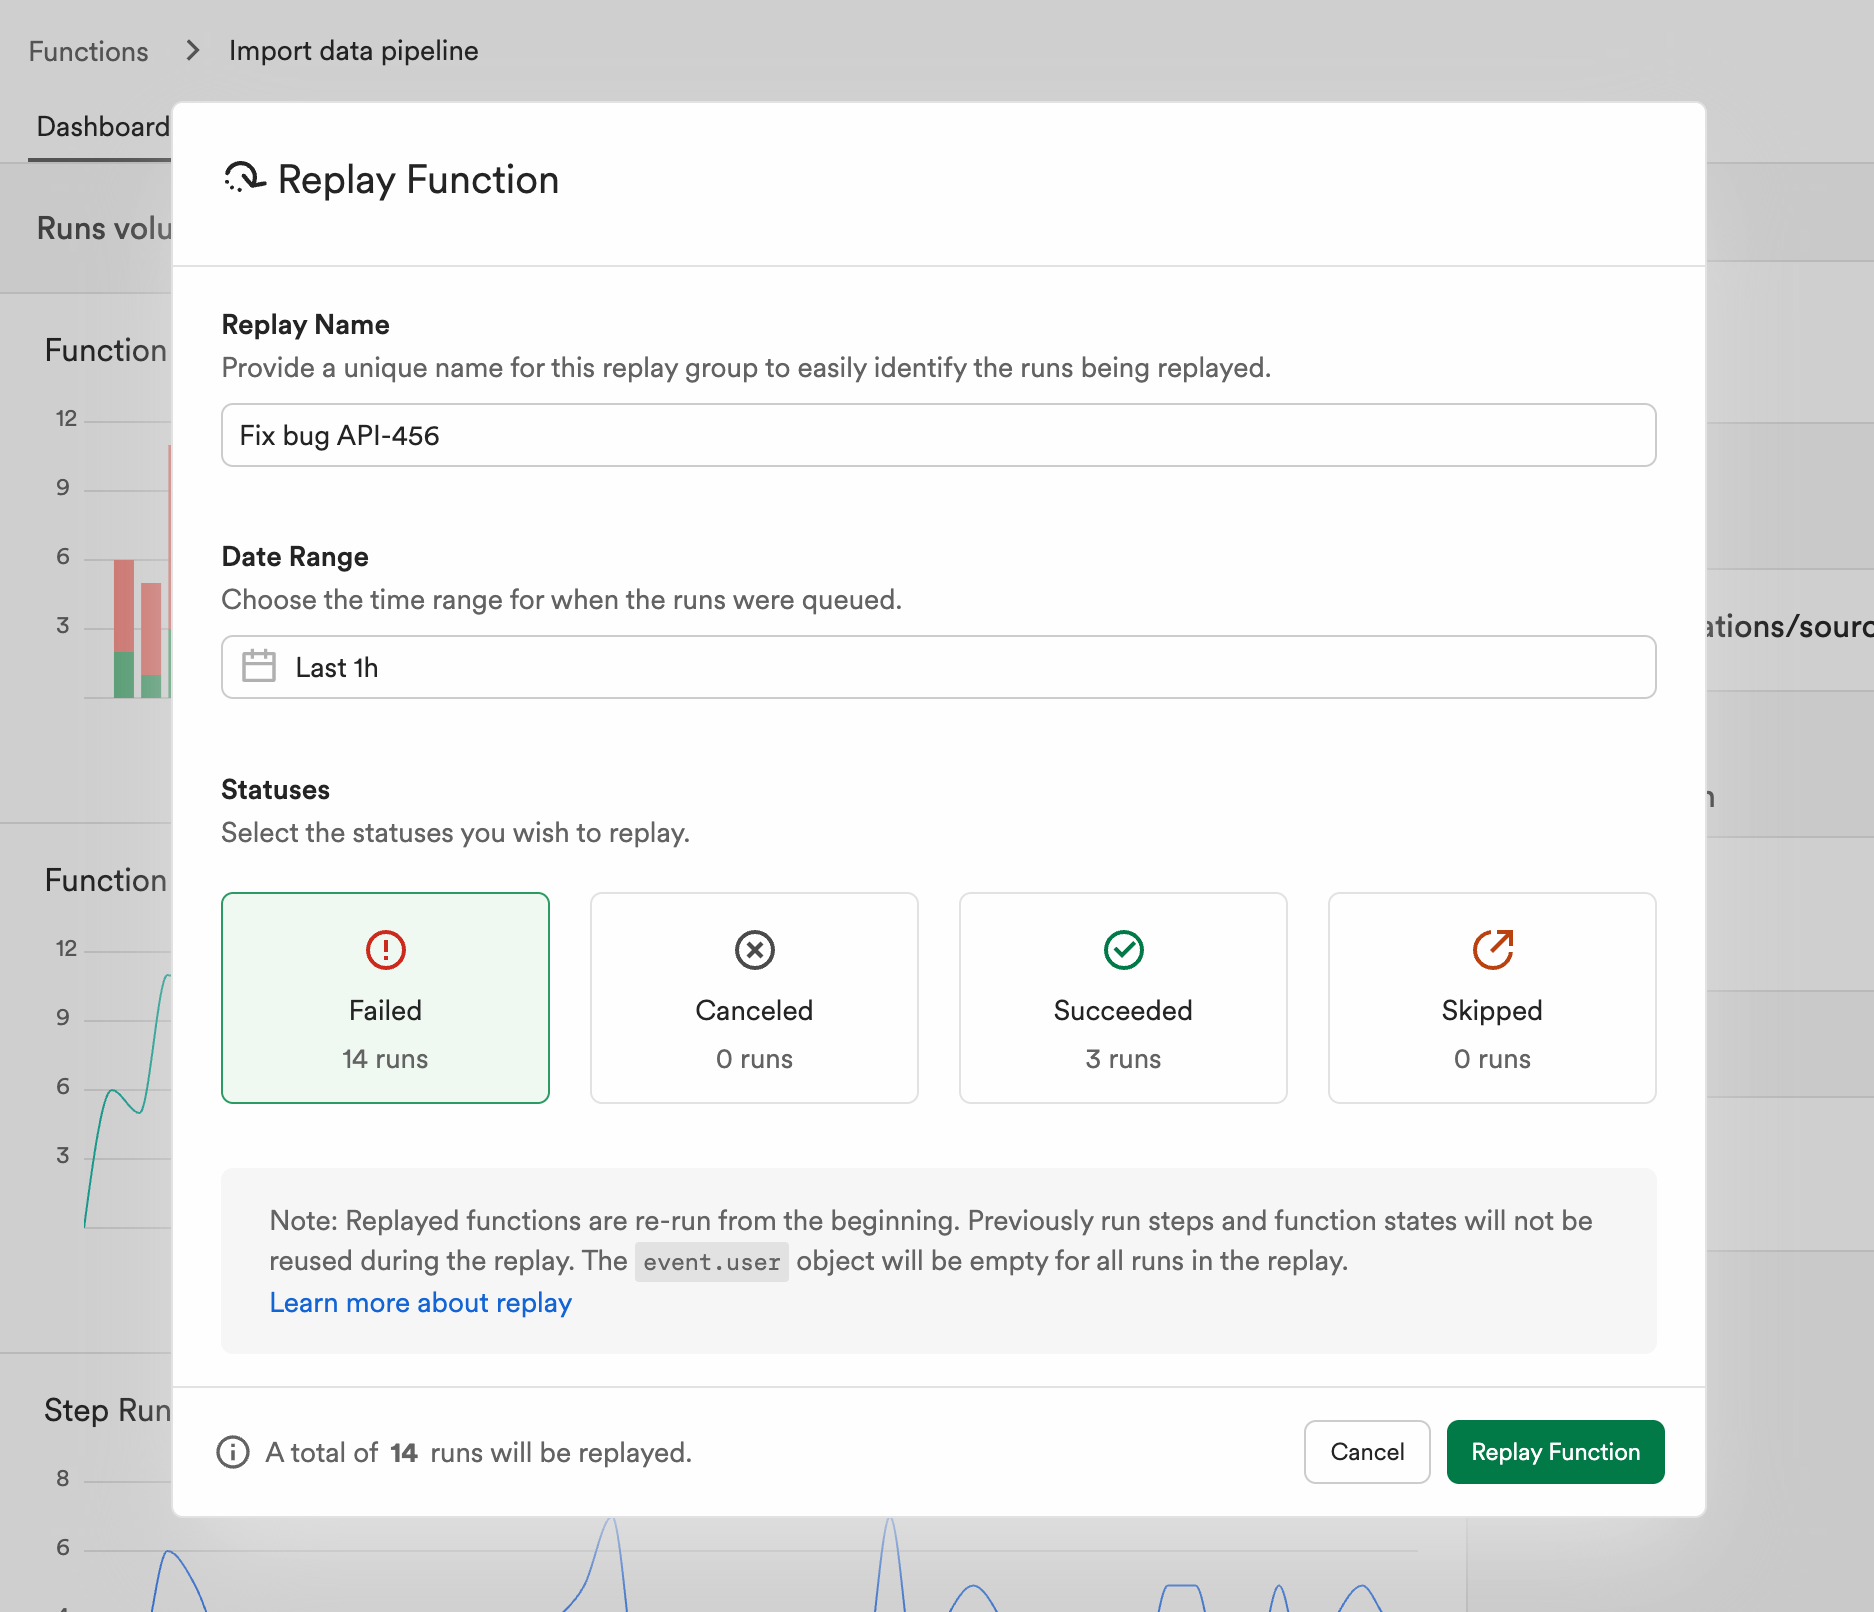
Once you have selected the runs you want to replay, click the replay button to start the replay. You
will be redirected to the replay page where you can see the progress of the replay.
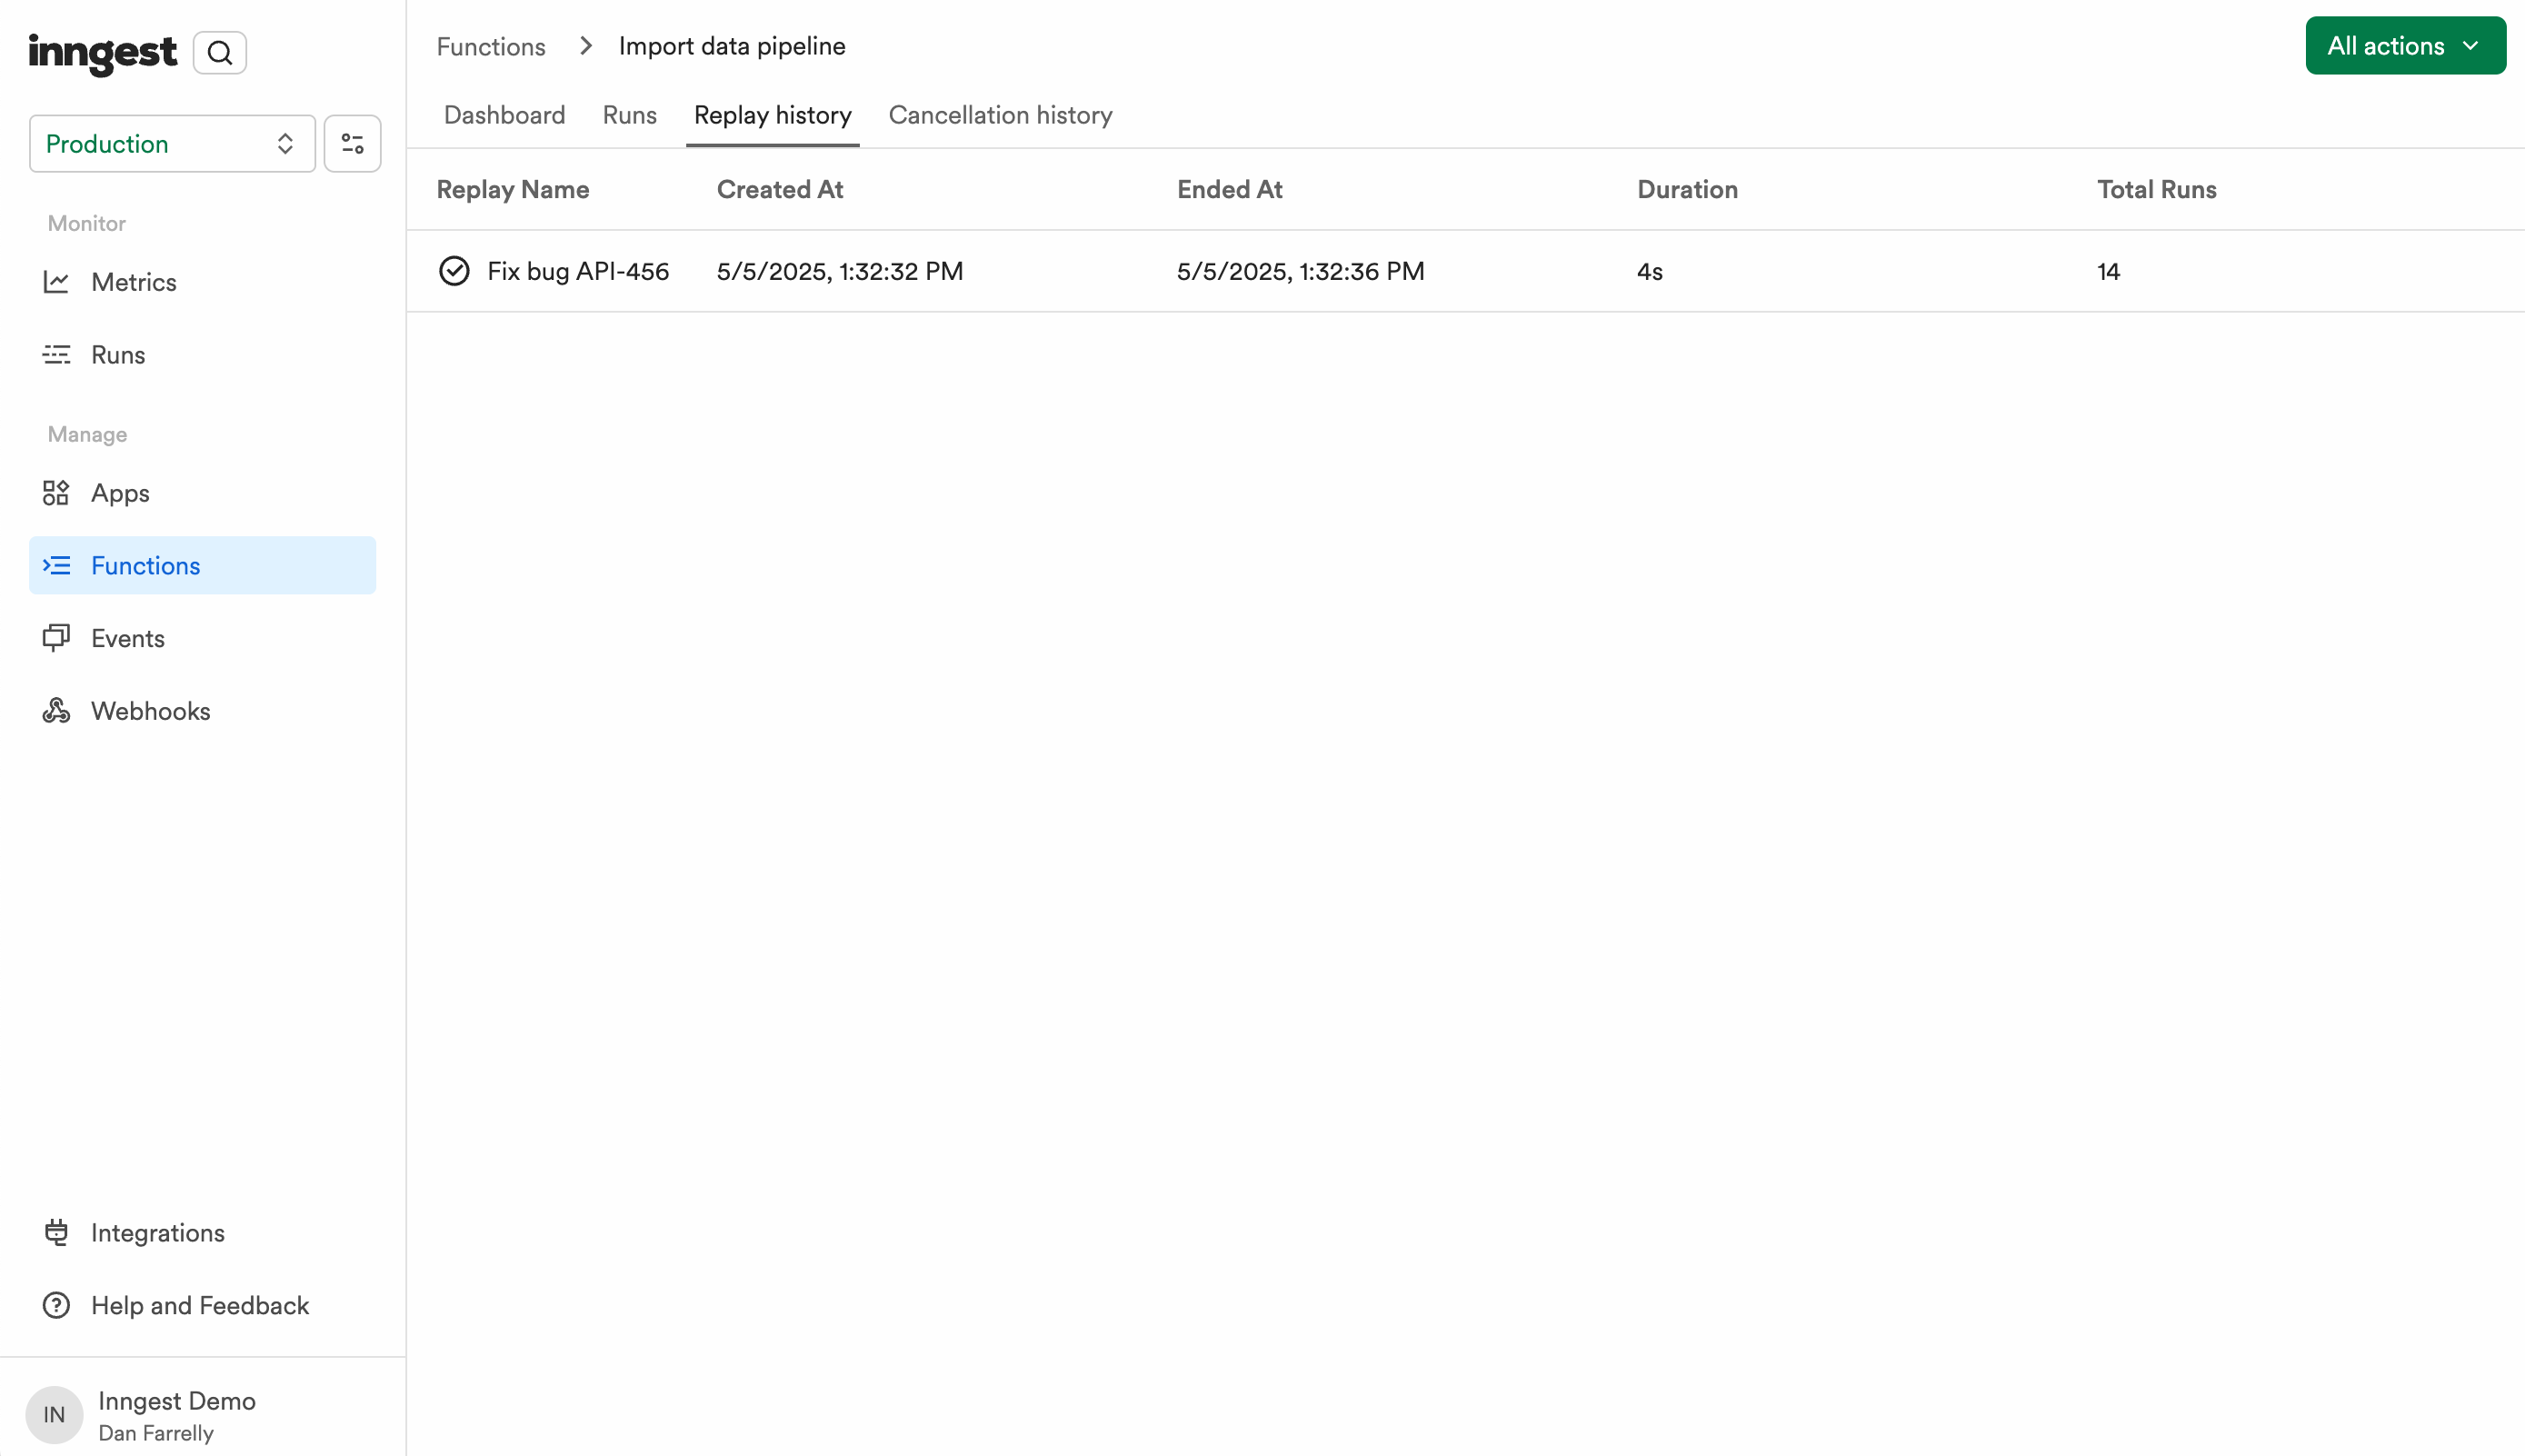
The replay will spread out the runs over time as to not overwhelm your application with requests.
Depending on the number of runs to be replayed, this could take seconds or minutes to complete.
When all the runs have been replayed, the replay will be marked as "Completed."
# Signing keys
Source: https://www.inngest.com/docs/platform/signing-keys
Description: Learn about how signing keys are used to secure communication between Inngest and your servers, how to rotate them, and how to set them in your SDK.'
# Signing keys
Inngest uses signing keys to secure communication between Inngest and your servers. The signing key is a _secret_ pre-shared key unique to each [environment](/docs/platform/environments). The signing key adds the following security features:
* **Serve endpoint authentication** - All requests sent to your server are signed with the signing key, ensuring that they originate from Inngest. Inngest SDKs reject all requests that are not authenticated with the signing key.
* **API authentication** - Requests sent to the Inngest API are signed with the signing key, ensuring that they originate from your server. The Inngest API rejects all requests that are not authenticated with the signing key. For example, when syncing functions with Inngest, the SDK sends function configuration to Inngest's API with the signing key as a bearer token.
* **Replay attack prevention** - Requests are signed with a timestamp embedded, and old requests are rejected, even if the requests are authenticated correctly.
🔐 **Signing keys are secrets and you should take precautions to ensure that they are kept secure**. Avoid storing them in source control.
You can find your signing key within each environment's [Signing Key tab](https://app.inngest.com/env/production/manage/signing-key).
#
You can set the signing key in your SDK by setting the `INNGEST_SIGNING_KEY` environment variable. Alternatively, you can pass the signing key as an argument when creating the SDK client, but we recommend never hardcoding the signing key in your code.
Additionally, you'll set the `INNGEST_SIGNING_KEY_FALLBACK` environment variable to ensure zero downtime when rotating your signing key. Read more about that [below](#rotation).
## Local development
Signing keys should be omitted when using the Inngest [Dev Server](/docs/local-development). To simplify local development and testing, the Dev Server doesn't require a signing key.
Each language SDK attempts to detect if your application is running in production or development mode. If you're running in development mode, the SDK will automatically disable signature verification. To force development mode, set `INNGEST_DEV=1` in your environment. This is useful when running in an automated testing environment.
## Rotation
Signing keys can be rotated to mitigate the risk of a compromised key. We recommend rotating your signing keys periodically or whenever you believe they may have been exposed.
Inngest supports zero downtime signing key rotation if your SDK version meets the minimum version:
| Language | Minimum Version |
| ----------- | --------------- |
| Go | `0.7.2` |
| Python | `0.3.9` |
| TypeScript | `3.18.0` |
You can still rotate your signing key if you use an older SDK version, but you will experience downtime.
To begin the rotation process, navigate to the [Signing Key tab](https://app.inngest.com/env/production/manage/signing-key) in the Inngest dashboard. Click the "Create new signing key" button and then follow the instructions in the **Rotate key** section.
🤔 **Why do I need a "fallback" signing key?**
As requests are signed with the current signing key, your code must have both the current and the new signing key available to verify requests during the rotation. To ensure there is zero downtime, the SDKs will retry authentication failures with the fallback key.
### Vercel integration
To rotate signing keys for Vercel projects, you must manually update the `INNGEST_SIGNING_KEY` environment variable in your Vercel project.
During initial setup, the Vercel integration automatically sets this key, but the integration **_will not_** automatically rotate the key for you. You must follow the manual process as guided within the Inngest dashboard.
## Signing keys and branch environments
All [branch environments](/docs/platform/environments#configuring-branch-environments) within your account share a signing key. This enables you to set a single environment variable for preview environments in platforms like [Vercel](/docs/deploy/vercel) or [Netlify](/docs/deploy/netlify) and each platform can dynamically specify the correct branch environment through secondary environment variables.
## Further reading
* [TypeScript SDK serve reference](/docs/reference/serve#signingKey)
* [Python SDK client reference](/docs/reference/python/client/overview#signing_key)
# Consuming webhook events
Source: https://www.inngest.com/docs/platform/webhooks
import {
RiTerminalLine,
RiGithubFill
} from "@remixicon/react";
At its core, Inngest is centered around functions that are triggered by events. Webhooks are one of the most ubiquitous sources for events for developers. Inngest was designed to support webhook events.
This guide will show you how to use Inngest to consume your webhook events and trigger functions.
When talking about webhooks, it's useful to define some terminology:
- **Producer** - The service sending the webhook events as HTTP post requests.
- **Consumer** - The URL endpoint which receives the HTTP post requests.
Inngest enables you to create any number of unique URLs which act as webhook consumers. You can create a webhook for each third party service that you use (e.g. Stripe, Github, Clerk) along with custom rules on how to handle that webhook.
## Creating a webhook
First, you'll need to head to the **Manage** tab in the Inngest dashboard and then click **Webhooks**. From there, click **Create Webhook**.
Now you'll have a uniquely generated URL that you can provide to any Producer service to start sending events. These URLs are configured in different ways for different producer services. For example, with Stripe, you need to enter "developer mode" and configure your webhook URLs.
Give your webhook a name and save it. Next we'll explore how to turn the request payload into Inngest events.
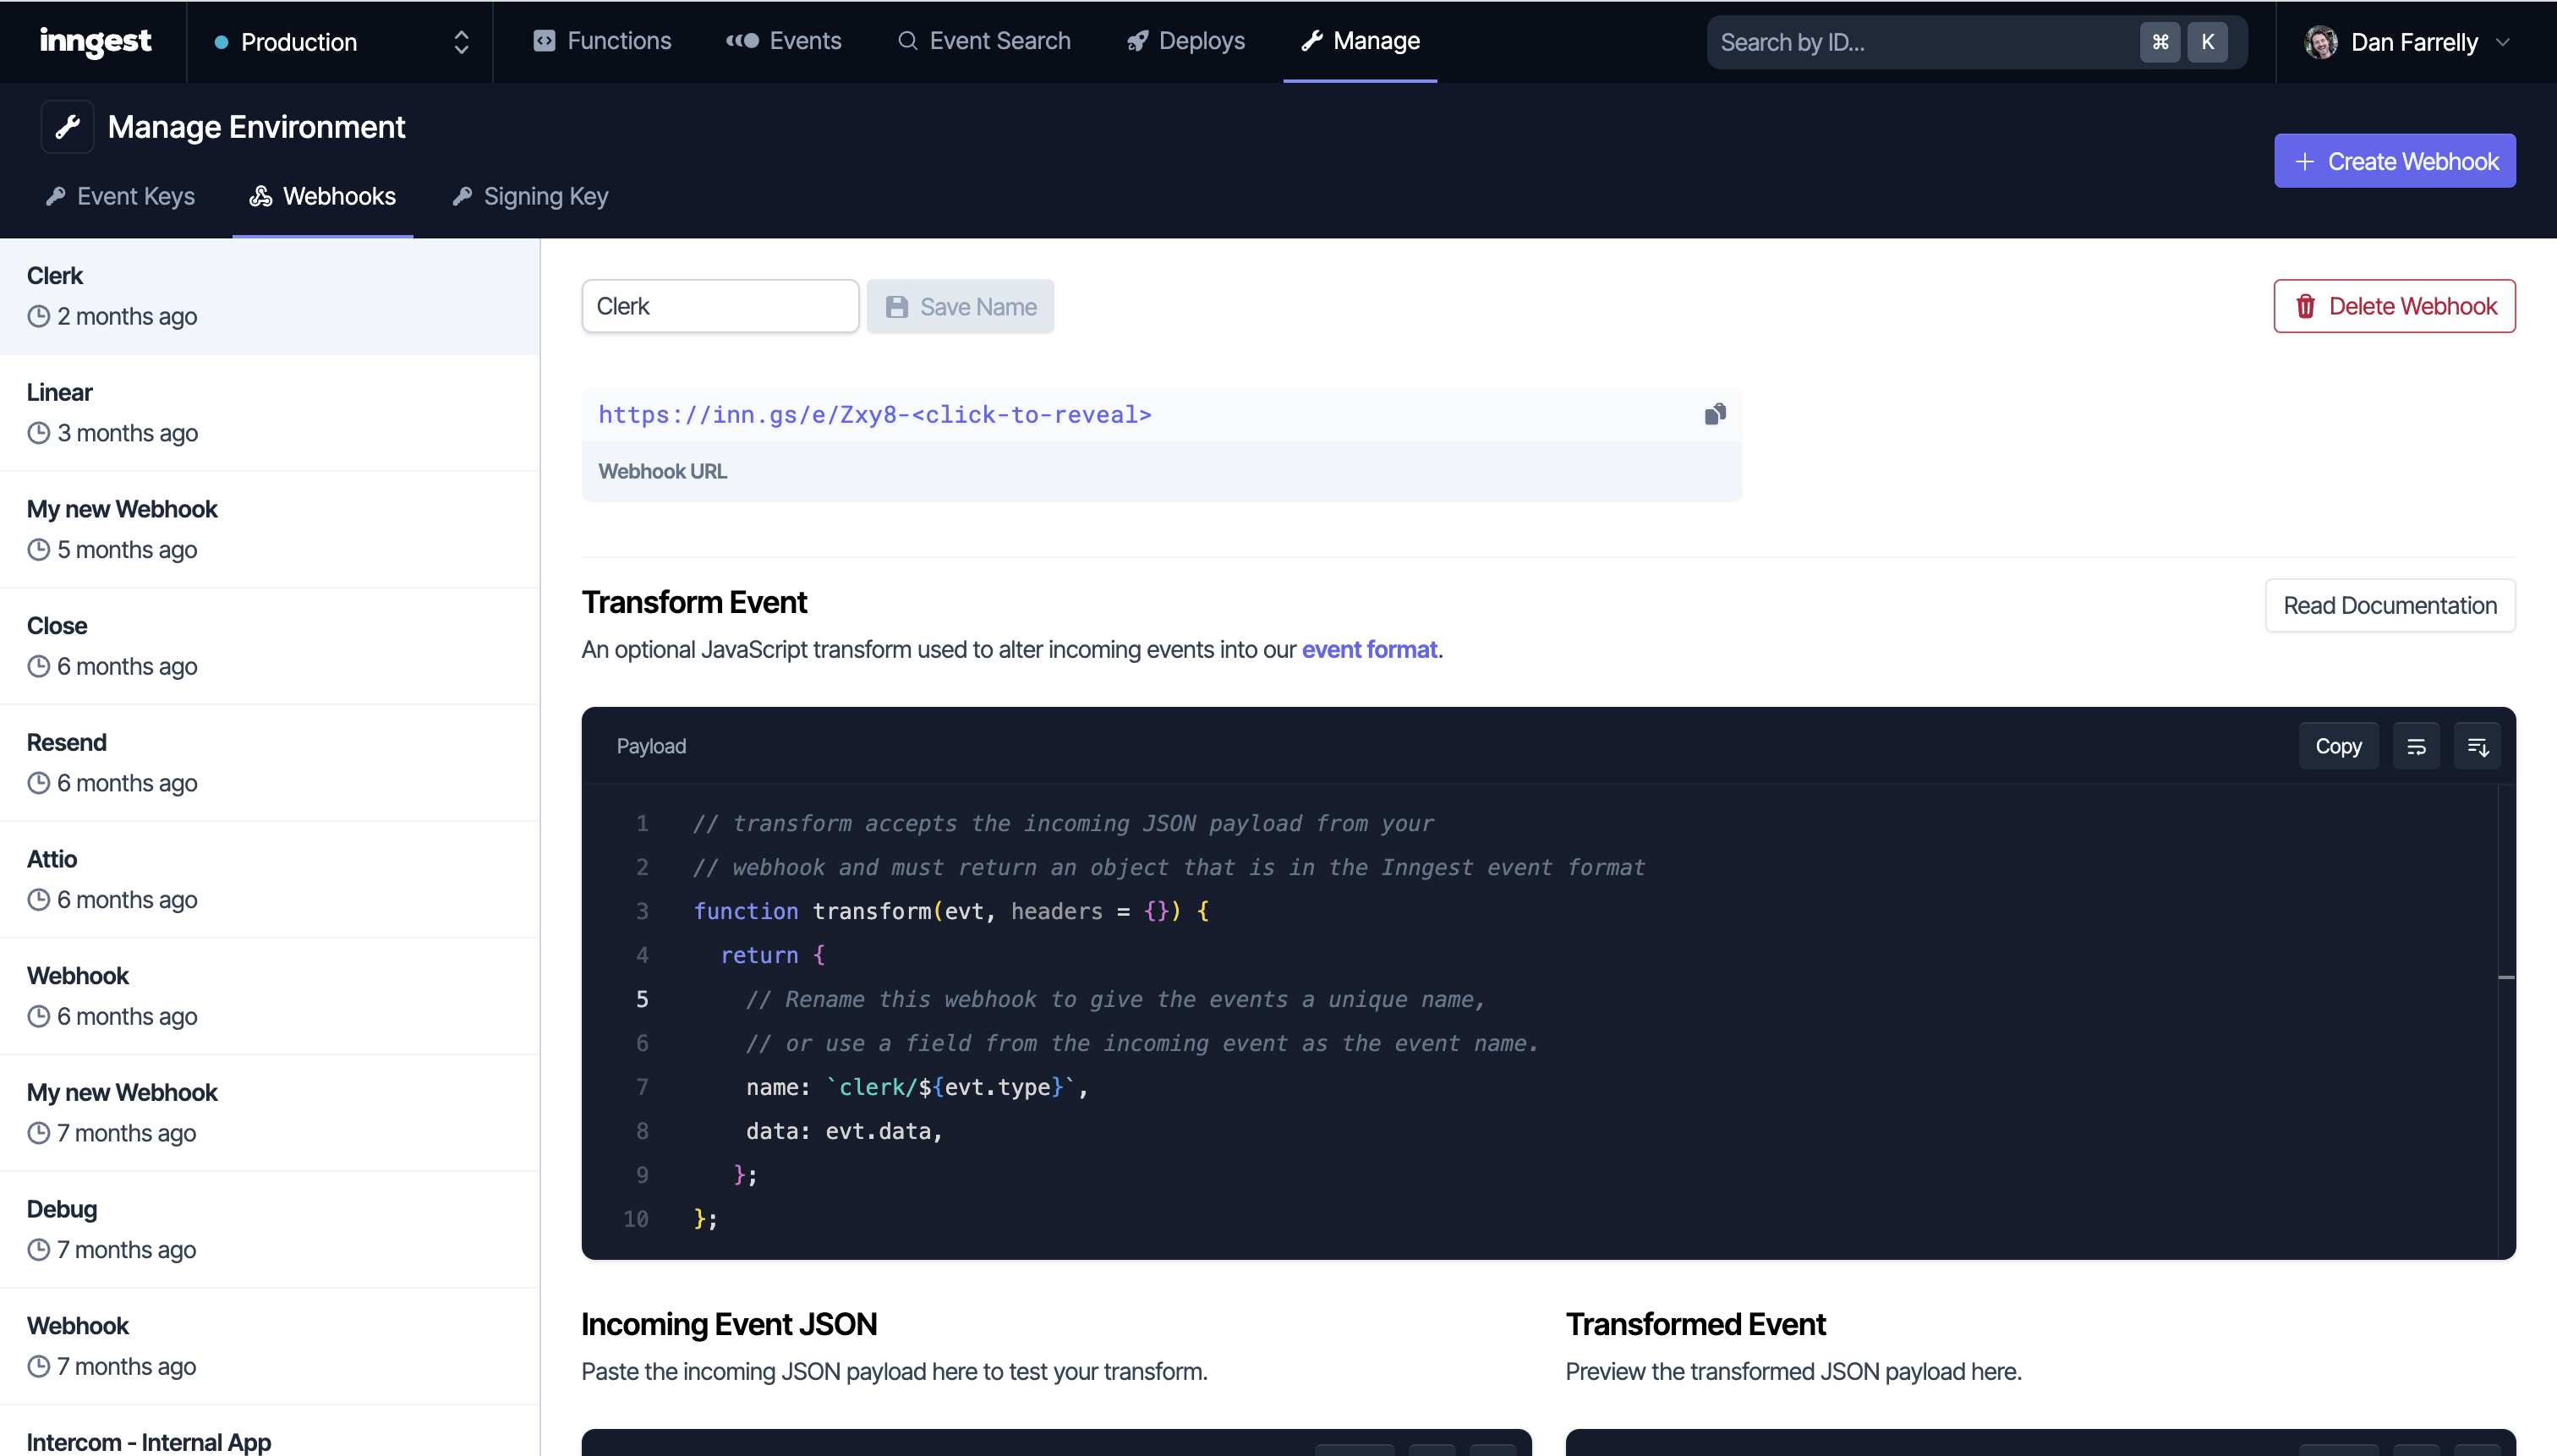
## Defining a transform function
Most webhooks send event data as JSON within the POST request body. These raw events must be transformed slightly to be compatible with [the Inngest event payload format](/docs/reference/events/send#inngest-send-event-payload-event-payload-promise). Mainly, we must have `name` and `data` set in the Inngest event.
Fortunately, Inngest includes **_transform_** functions for every webhook. You can define a short JavaScript function used to transform the shape of the payload. This transform runs on Inngest's servers so there is no added load or cost to your infra.
Here is [an example of a raw webhook payload from Clerk](https://clerk.com/docs/integrations/webhooks/overview#payload-structure) on the left and our transformed event:
```json {{ title: "Example Clerk webhook payload"}}
{
"type": "user.created",
"object": "event",
"data": {
"created_at": 1654012591514,
"external_id": "567772",
"first_name": "Example",
"id": "user_29w83sxmDNGwOuEthce5gg56FcC",
"last_name": "Example",
"last_sign_in_at": 1654012591514,
"object": "user",
"primary_email_address_id": "idn_29w83yL7CwVlJXylYLxcslromF1",
// ... simplified for example
},
}
```
```json {{ title: "Example Inngest event format"}}
{
"name": "clerk/user.created",
"data": {
"created_at": 1654012591514,
"external_id": "567772",
"first_name": "Example",
"id": "user_29w83sxmDNGwOuEthce5gg56FcC",
"last_name": "Example",
"last_sign_in_at": 1654012591514,
"object": "user",
"primary_email_address_id": "idn_29w83yL7CwVlJXylYLxcslromF1",
// ... simplified for example
}
}
```
Transforms are defined as simple JavaScript functions that accept three arguments and expect the Inngest event payload object in the returned value. The arguments are:
The raw JSON payload from the POST request body
A map of HTTP headers sent along with the request as key-value pairs. Header names are case-insensitive and are canonicalized by making the first character and any characters following a hyphen uppercase and the rest lowercase. For more details, [check out](https://pkg.go.dev/net/http#CanonicalHeaderKey) the underlying implementation reference.
A map of parsed query string parameters sent to the webhook URL. Values are all arrays to support multiple params for a single key.
Here's a simple transform function for the Clerk example shown above:
```ts
function transform(evt, headers = {}, queryParams = {}) {
return {
name: `clerk/${evt.type}`,
data: evt.data,
// You can optionally set ts using data from the raw json payload
// to explicitly set the timestamp of the incoming event.
// If ts is not set, it will be automatically set to the time the request is received.
}
}
```
👉 We also recommend prefixing each event name with the name of the producer service, e.g. `clerk/user.created`, `stripe/charge.failed`.
### Example transforms
💡 Header names are case-insensitive and are canonicalized by making the first character and any characters following a hyphen uppercase and the rest lowercase.
Remember to check your transforms for header usage and make sure to use the correct case.
**Github** - Using headers
Github uses a `X-Github-Event` header to specify the event type:
```js
function transform(evt, headers = {}, queryParams = {}) {
headers["X-Github-Event"];
return {
// Use the event as the data without modification
data: evt,
// Add an event name, prefixed with "github." based off of the X-Github-Event data
name: "github." + name.trim().replace("Event", "").toLowerCase(),
};
}
```
**Stripe** - Using an `id` for deduplication
Stripe sends an `id` with every event to deduplicate events. We can use this as the `id` for the Inngest event for the same reason:
```js
function transform(evt, headers = {}, queryParams = {}) {
return {
id: evt.id,
name: `stripe/${evt.type}`,
data: evt,
};
}
```
**Linear** - Creating useful event names
```js
function transform(evt, headers = {}, queryParams = {}) {
return {
// type (e.g. Issue) + action (e.g. create)
name: `linear/${evt.type.toLowerCase()}.${evt.action}`,
data: evt,
};
}
```
**Intercom** - Setting the `ts` field
```js
function transform(evt, headers = {}, queryParams = {}) {
return {
name: `intercom/${evt.topic}`,
// the top level obj only contains webhook data, so we omit that
data: evt.data,
ts: evt.created_at * 1000,
};
};
```
**Resend**
```js
function transform(evt, headers = {}, queryParams = {}) {
return {
name: `resend/${evt.type}`,
data: evt.data,
};
};
```
### Testing transforms
The Inngest dashboard includes a tool to quickly test your transform function. You can paste the incoming payload from the webhook producer in the "Incoming Event JSON" editor and immediately preview what the transformed event will look like.
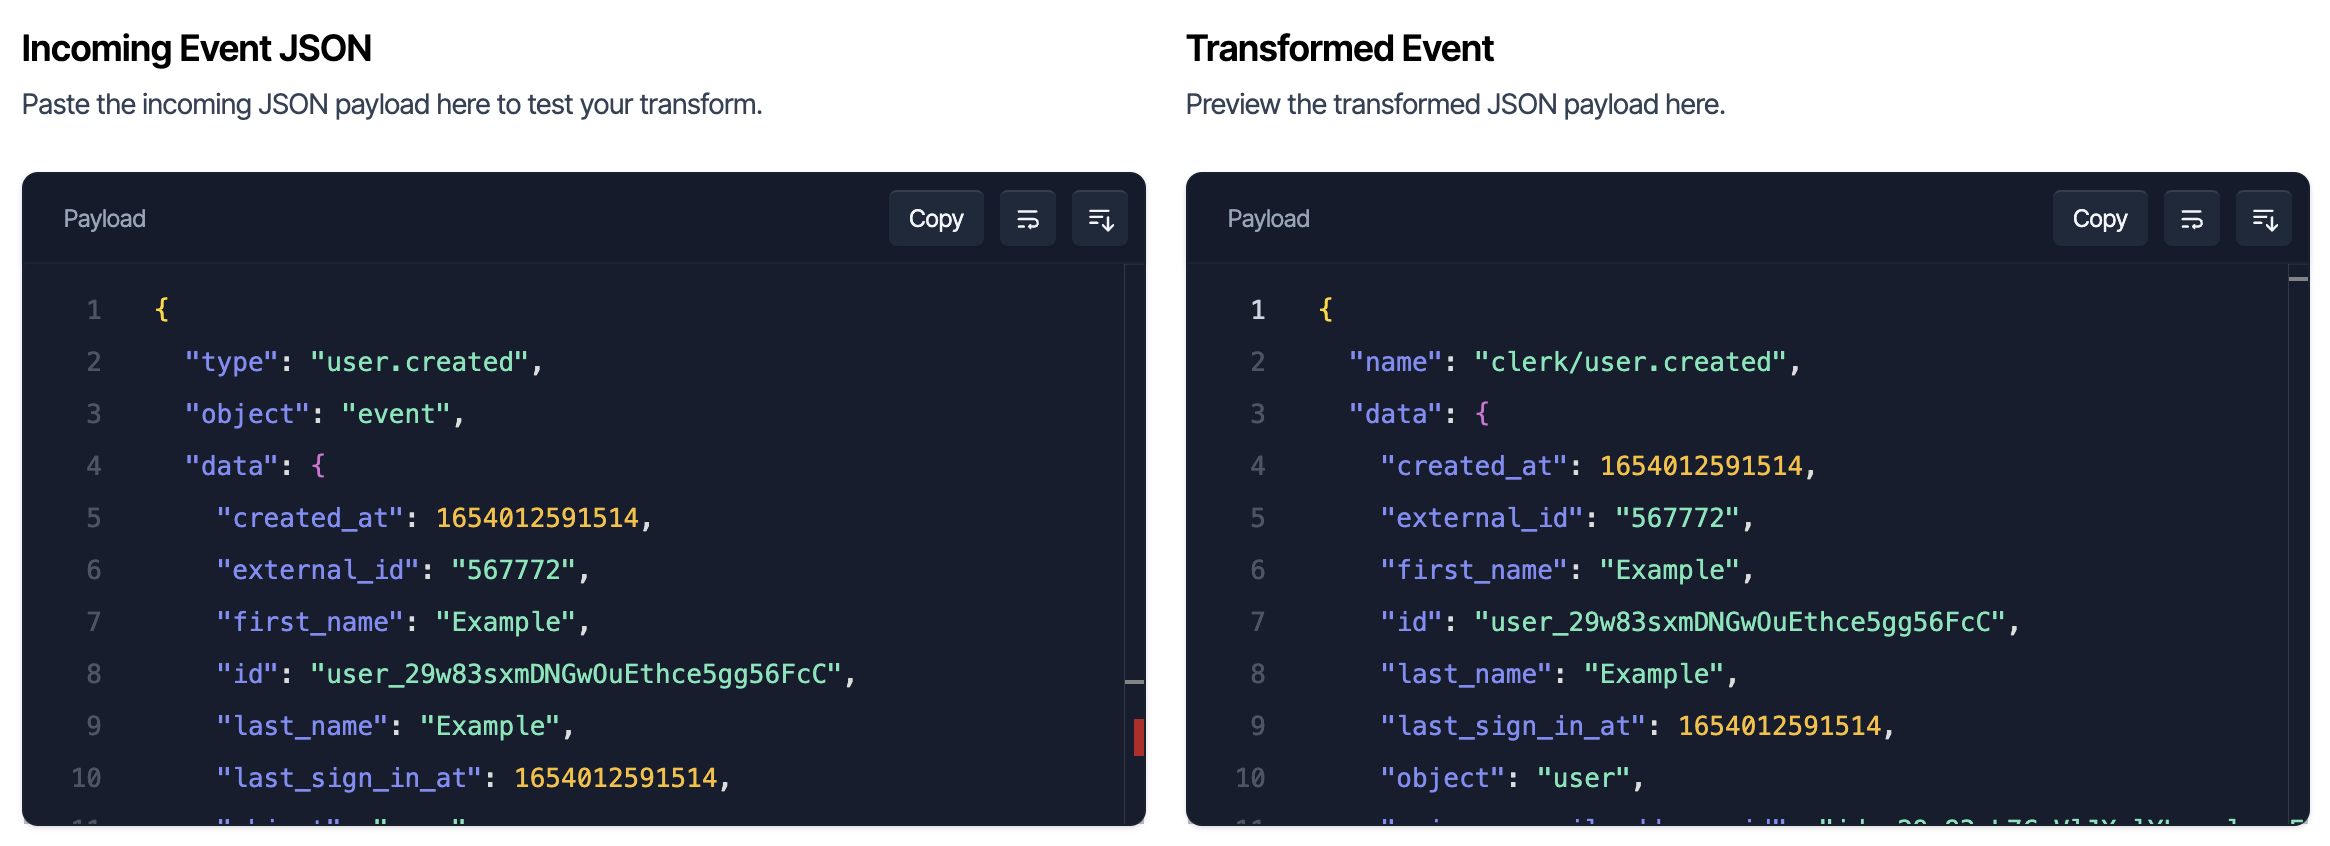
Some webhook producers do not provide example payloads in their documentation. If that's the case, you can use a tool that we built, [TypedWebhooks.tools](https://typedwebhook.tools/?ref=) to test webhooks and browse payloads.
## Advanced configuration
Additionally, you can configure allow/deny lists for event names and IP addresses. This can be useful if you want a bit more control over what events are ingested.
## Managing webhooks via REST API
Webhooks can be created, updated and deleted all via the Inngest REST API. This is very useful if you want to manage all transforms within your codebase and sync them to the Inngest platform. Check out the documentation below to learn more:
}
href={'https://api-docs.inngest.com/docs/inngest-api/b539bae406d1f-get-all-webhook-endpoints-in-given-environment'}>
Read the documentation about managing Webhooks via the Inngest REST API
}
href={'https://github.com/inngest/webhook-transform-sync'}>
View an end-to-end example of how to test and sync Webhooks in your codebase.
## Local development
To test your webhook locally, you can forward events to the [Dev Server](/docs/local-development) from the Inngest dashboard using the "Send to Dev Server" button. This button is found anywhere that an event payload is visible on the Inngest dashboard. This will send a copy of the event to your local machine where you can test your functions.
[IMAGE]
## Writing functions
Now that you have events flowing into Inngest, you can write functions that that handle the events that you care about. You can also explore the list of events that have been received at any time by heading to the _Events_ tab of the Inngest dashboard.
```ts {{ title: "Example: Send a welcome email when the clerk/user.created event is received"}}
inngest.createFunction(
{ name: "Send welcome email", id: "send-welcome-email" },
{ event: "clerk/user.created" },
async ({ event, step }) => {
event.data.email_addresses[0].email_address;
await step.run('send-email', async () => {
return await resend.emails.send({
to: emailAddress,
from: "noreply@inngest.com",
subject: "Welcome to Inngest!",
react: WelcomeEmail(),
})
});
}
)
```
💡 **Tip**: To test functions locally, copy an event from a webhook from the Inngest dashboard and use it with the Inngest dev server's `Send test` button.
## Verifying request signatures
Many webhook producers sign their requests with a secret key to ensure that the request is coming from them. This establishes trust with the webhook producer and ensures that the event data has not been tampered with.
To verify a webhook signature, you'll need to return the signature and raw request body string in your transform. For example, the following transform function could be used for Stripe webhooks:
```ts
function transform(evt, headers, queryParams, raw) {
return {
name: `stripe/${evt.type}`,
data: {
raw,
sig: headers["Stripe-Signature"],
}
};
};
```
Then you can use that data to verify the signature in your Inngest functions:
```ts
inngest.createFunction(
{ id: "stripe/charge.updated" },
{ event: "stripe/charge.updated" },
async ({ attempt, event, step }) => {
if (!verifySig(event.data.raw, event.data.sig, stripeSecret)) {
throw new NonRetriableError("failed signature verification");
}
// Now it's safe to use the event data.
JSON.parse(event.data.raw);
}
);
```
## Branch environments
All branch environments share the same webhooks. They are centrally-managed in a [single page](https://app.inngest.com/env/branch/manage/webhooks).
Additionally, the target branch environment must be specified using either an `x-inngest-env` query param or header. For example, the following command will send an webhook to the `branch-1` branch environment:
```sh
curl 'https://inn.gs/e/REDACTED?x-inngest-env=branch-1' -d '{"msg": "hi"}'
```
If the branch environment is not specified with the header or query param, the webhook will be sent to [this page](https://app.inngest.com/env/branch/events) and will not trigger any functions. Events will also go here if the branch environment does not exist.
The value for `x-inngest-env` is the name of the branch environment, not the ID in the URL.
# Create the Inngest Client
Source: https://www.inngest.com/docs/reference/client/create
The `Inngest` client object is used to configure your application, enabling you to create functions and send events.
```ts {{ title: "v3" }}
new Inngest({
id: "my-application",
});
```
```ts {{ title: "v2" }}
new Inngest({
name: "My application",
});
```
---
## Configuration
A unique identifier for your application. We recommend a hyphenated slug.
Override the default (`https://inn.gs/`) base URL for sending events. See also the [`INNGEST_BASE_URL`](/docs/sdk/environment-variables#inngest-base-url) environment variable.
The environment name. Required only when using [Branch Environments](/docs/platform/environments).
An Inngest [Event Key](/docs/events/creating-an-event-key). Alternatively, set the [`INNGEST_EVENT_KEY`](/docs/sdk/environment-variables#inngest-event-key) environment variable.
Override the default
[`fetch`](https://developer.mozilla.org/en-US/docs/Web/API/Fetch_API)
implementation. Defaults to the runtime's native Fetch API.
If you need to specify this, make sure that you preserve the function's [binding](https://developer.mozilla.org/en-US/docs/Web/JavaScript/Reference/Global_objects/Function/bind), either by using `.bind` or by wrappng it in an anonymous function.
Set to `true` to force Dev mode, setting default local URLs and turning off
signature verification, or force Cloud mode with `false`. Alternatively, set [`INNGEST_DEV`](/docs/sdk/environment-variables#inngest-dev).
A logger object that provides the following interfaces (`.info()`, `.warn()`, `.error()`, `.debug()`). Defaults to using `console` if not provided. Overwrites [`INNGEST_LOG_LEVEL`](/docs/sdk/environment-variables#inngest-log-level) if set. See [logging guide](/docs/guides/logging) for more details.
A stack of [middleware](/docs/reference/middleware/overview) to add to the client.
Event payload types. See [Defining Event Payload Types](#defining-event-payload-types).
We recommend setting the [`INNGEST_EVENT_KEY`](/docs/sdk/environment-variables#inngest-event-key) as an environment variable over using the `eventKey` option. As with any secret, it's not a good practice to hard-code the event key in your codebase.
## Defining Event Payload Types
You can leverage TypeScript or Zod to define your event payload types. When you pass types to the Inngest client, events are fully typed when using them with `inngest.send()` and `inngest.createFunction()`. This can more easily alert you to issues with your code during compile time.
Click the toggles on the top left of the code block to see the different methods available!
```ts {{ title: "Zod" }}
// Define each event individually
z.object({
name: z.literal("shop/product.purchased"),
data: z.object({ productId: z.string() }),
});
// You can use satisfies to provide some autocomplete when writing the event
z.object({
name: z.literal("shop/product.viewed"),
data: z.object({ productId: z.string() }),
}) satisfies LiteralZodEventSchema;
// Or all together in a single object
{
"app/account.created": {
data: z.object({
userId: z.string(),
}),
},
"app/subscription.started": {
data: z.object({
userId: z.string(),
planId: z.string(),
}),
},
};
inngest = new Inngest({
schemas: new EventSchemas()
.fromZod([productPurchasedEvent, productViewedEvent])
.fromZod(eventsMap),
});
```
```ts {{ title: "Union" }}
type AppAccountCreated = {
name: "app/account.created";
data: {
userId: string;
};
};
type AppSubscriptionStarted = {
name: "app/subscription.started";
data: {
userId: string;
planId: string;
};
};
type Events = AppAccountCreated | AppSubscriptionStarted;
inngest = new Inngest({
schemas: new EventSchemas().fromUnion(),
});
```
```ts {{ title: "Record"}}
type Events = {
"app/account.created": {
data: {
userId: string;
};
};
"app/subscription.started": {
data: {
userId: string;
planId: string;
};
};
};
inngest = new Inngest({
schemas: new EventSchemas().fromRecord(),
});
```
```ts {{ title: "Stacking" }}
type Events = {
"app/user.created": {
data: { id: string };
};
};
{
"app/account.created": {
data: z.object({
userId: z.string(),
}),
},
};
type AppPostCreated = {
name: "app/post.created";
data: { id: string };
};
type AppPostDeleted = {
name: "app/post.deleted";
data: { id: string };
};
inngest = new Inngest({
schemas: new EventSchemas()
.fromRecord()
.fromUnion()
.fromZod(zodEventSchemas),
});
```
### Reusing event types
You can use the `GetEvents<>` generic to access the final event types from an Inngest client.
It's recommended to use this instead of directly reusing your event types, as Inngest will add extra properties and internal events such as `ts` and `inngest/function.failed`.
```ts
inngest = new Inngest({
schemas: new EventSchemas().fromRecord<{
"app/user.created": { data: { userId: string } };
}>(),
});
type Events = GetEvents;
type AppUserCreated = Events["app/user.created"];
```
For more information on this and other TypeScript helpers, see [TypeScript -
Helpers](/docs/typescript#helpers).
## Cloud Mode and Dev Mode
An SDK can run in two separate "modes:" **Cloud** or **Dev**.
- **Cloud Mode**
- 🔒 Signature verification **ON**
- Defaults to communicating with Inngest Cloud (e.g. `https://api.inngest.com`)
- **Dev Mode**
- ❌ Signature verification **OFF**
- Defaults to communicating with an Inngest Dev Server (e.g. `http://localhost:8288`)
You can force either Dev or Cloud Mode by setting
[`INNGEST_DEV`](/docs/sdk/environment-variables#inngest-dev) or the
[`isDev`](#configuration) option.
If neither is set, the SDK will attempt to infer which mode it should be in
based on environment variables such as `NODE_ENV`. Most of the time, this inference is all you need and explicitly setting a mode
isn't required.
## Best Practices
### Share your client across your codebase
Instantiating the `Inngest` client in a single file and sharing it across your codebase is ideal as you only need a single place to configure your client and define types which can be leveraged anywhere you send events or create functions.
```ts {{ title: "v3" }}
inngest = new Inngest({ id: "my-app" });
```
```ts {{ title: "v2" }}
inngest = new Inngest({ name: "My App" });
```
```ts {{ filename: './inngest/myFunction.ts' }}
export default inngest.createFunction(...);
```
### Handling multiple environments with middleware
If your client uses middleware, that middleware may import dependencies that are not supported across multiple environments such as "Edge" and "Serverless" (commonly with either access to WebAPIs or Node).
In this case, we'd recommend creating a separate client for each environment, ensuring Node-compatible middleware is only used in Node-compatible environments and vice versa.
This need is common in places where function execution should declare more involved middleware, while sending events from the edge often requires much less.
```ts {{ title: "v3" }}
// inngest/client.ts
inngest = new Inngest({
id: "my-app",
middleware: [nodeMiddleware],
});
// inngest/edgeClient.ts
inngest = new Inngest({
id: "my-app-edge",
});
```
```ts {{ title: "v2" }}
// inngest/client.ts
inngest = new Inngest({
name: "My App",
middleware: [nodeMiddleware],
});
// inngest/edgeClient.ts
inngest = new Inngest({
id: "My App (Edge)",
});
```
Also see [Referencing functions](/docs/functions/references), which can help you invoke functions across these environments without pulling in any dependencies.
# Send events
Source: https://www.inngest.com/docs/reference/events/send
description = `Send one or more events to Inngest via inngest.send() in the TypeScript SDK.`
Send events to Inngest. Functions with matching event triggers will be invoked.
```ts
await inngest.send({
name: "app/account.created",
data: {
accountId: "645e9f6794e10937e9bdc201",
billingPlan: "pro",
},
user: {
external_id: "645ea000129f1c40109ca7ad",
email: "taylor@example.com",
}
})
```
To send events from within of the context of a function, use [`step.sendEvent()`](/docs/reference/functions/step-send-event).
---
## `inngest.send(eventPayload | eventPayload[], options): Promise<{ ids: string[] }>`
An event payload object or an array of event payload objects.
The event name. We recommend using lowercase dot notation for names, prepending `prefixes/` with a slash for organization.
Any data to associate with the event. Will be serialized as JSON.
Any relevant user identifying data or attributes associated with the event. **This data is encrypted at rest.**
An external identifier for the user. Most commonly, their user id in your system.
A unique ID used to idempotently trigger function runs. If duplicate event IDs are seen,
only the first event will trigger function runs. [Read the idempotency guide here](/docs/guides/handling-idempotency).
A timestamp integer representing the time (in milliseconds) at which the event occurred. Defaults to the time the Inngest receives the event.
If the `ts` time is in the future, function runs will be scheduled to start at the given time. This has the same effect as running `await step.sleepUntil(event.ts)` at
the start of the function.
Note: This does not apply to functions waiting for events. Functions waiting for events will immediately resume, regardless of the timestamp.
A version identifier for a particular event payload. e.g. `"2023-04-14.1"`
The [environment](/docs/platform/environments) to send the events to.
```ts
// Send a single event
await inngest.send({
name: "app/post.created",
data: { postId: "01H08SEAXBJFJNGTTZ5TAWB0BD" }
});
// Send an array of events
await inngest.send([
{
name: "app/invoice.created",
data: { invoiceId: "645e9e024befa68763f5b500" }
},
{
name: "app/invoice.created",
data: { invoiceId: "645e9e08f29fb563c972b1f7" }
},
]);
// Send user data that will be encrypted at rest
await inngest.send({
name: "app/account.created",
data: { billingPlan: "pro" },
user: {
external_id: "6463da8211cdbbcb191dd7da",
email: "test@example.com"
}
});
// Specify the idempotency id, version, and timestamp
await inngest.send({
// Use an id specific to the event type & payload
id: "cart-checkout-completed-ed12c8bde",
name: "storefront/cart.checkout.completed",
data: { cartId: "ed12c8bde" },
user: { external_id: "6463da8211cdbbcb191dd7da" },
ts: 1684274328198,
v: "2024-05-15.1"
});
```
### Return values
The function returns a promise that resolves to an object with an array of Event IDs that were sent. These events can be used to look up the event in the Inngest dashboard or via [the REST API](https://api-docs.inngest.com/docs/inngest-api/pswkqb7u3obet-get-an-event).
```ts
await inngest.send([
{
name: "app/invoice.created",
data: { invoiceId: "645e9e024befa68763f5b500" }
},
{
name: "app/invoice.created",
data: { invoiceId: "645e9e08f29fb563c972b1f7" }
},
]);
/**
* ids = [
* "01HQ8PTAESBZPBDS8JTRZZYY3S",
* "01HQ8PTFYYKDH1CP3C6PSTBZN5"
* ]
*/
```
## User data encryption 🔐
All data sent in the `user` object is fully encrypted at rest.
⚠️ When [replaying a function](/docs/platform/replay), `event.user` will be empty. This will be fixed in the future, but for now assume that you cannot replay functions that rely on `event.user` data.
In the future, this object will be used to support programmatic deletion via API endpoint to support certain right-to-be-forgotten flows in your system. This will use the `user.external_id` property for lookup.
## Usage limits
See [usage limits][usage-limits] for more details.
[usage-limits]: /docs/usage-limits/inngest#events
# Create Function
Source: https://www.inngest.com/docs/reference/functions/create
Define your functions using the `createFunction` method on the [Inngest client](/docs/reference/client/create).
```ts
export default inngest.createFunction(
{ id: "import-product-images" },
{ event: "shop/product.imported" },
async ({ event, step, runId }) => {
// Your function code
}
);
```
---
## `inngest.createFunction(configuration, trigger, handler): InngestFunction`
The `createFunction` method accepts a series of arguments to define your function.
### Configuration
A unique identifier for your function. This should not change between deploys.
A name for your function. If defined, this will be shown in the UI as a friendly display name instead of the ID.
Limit the number of concurrently running functions ([reference](/docs/functions/concurrency))
The maximum number of concurrently running steps.
The scope for the concurrency limit, which impacts whether concurrency is managed on an individual function, across an environment, or across your entire account.
* `fn` (default): only the runs of this function affects the concurrency limit
* `env`: all runs within the same environment that share the same evaluated key value will affect the concurrency limit. This requires setting a `key` which evaluates to a virtual queue name.
* `account`: every run that shares the same evaluated key value will affect the concurrency limit, across every environment. This requires setting a `key` which evaluates to a virtual queue name.
A unique key expression for which to restrict concurrently running steps to. The expression is evaluated for each triggering event and a unique key is generate. Read [our guide to writing expressions](/docs/guides/writing-expressions) for more info.
Limits the number of new function runs started over a given period of time ([guide](/docs/guides/throttling)).
The total number of runs allowed to start within the given `period`.
The period within which the `limit` will be applied.
The number of runs allowed to start in the given window in a single burst. This defaults to 1, which ensures that requests are smoothed amongst the given `period`.
A unique expression for which to apply the throttle limit to. The expression is evaluated for each triggering event and will be applied for each unique value. Read [our guide to writing expressions](/docs/guides/writing-expressions) for more info.
A key expression which is used to prevent duplicate events from triggering a function more than once in 24 hours. This is equivalent to setting `rateLimit` with a `key`, a `limit` of `1` and `period` of `24hr`. [Read the idempotency guide here](/docs/guides/handling-idempotency).
Expressions are defined using the Common Expression Language (CEL) with the original event accessible using dot-notation. Read [our guide to writing expressions](/docs/guides/writing-expressions) for more info. Examples:
* Only run once for each customer id: `'event.data.customer_id'`
* Only run once for each account and email address: `'event.data.account_id + "-" + event.user.email'`
Options to configure how to rate limit function execution ([reference](/docs/reference/functions/rate-limit))
The maximum number of functions to run in the given time period.
The time period of which to set the limit. The period begins when the first matching event is received.
Current permitted values are from `1s` to `60s`.
A unique key expression to apply the limit to. The expression is evaluated for each triggering event.
Expressions are defined using the Common Expression Language (CEL) with the original event accessible using dot-notation. Read [our guide to writing expressions](/docs/guides/writing-expressions) for more info. Examples:
* Rate limit per customer id: `'event.data.customer_id'`
* Rate limit per account and email address: `'event.data.account_id + "-" + event.user.email'`
Options to configure function debounce ([reference](/docs/reference/functions/debounce))
The time period of which to set the limit. The period begins when the first matching event is received.
Current permitted values are from `1s` to `7d` (`168h`).
A unique key expression to apply the debounce to. The expression is evaluated for each triggering event.
Expressions are defined using the Common Expression Language (CEL) with the original event accessible using dot-notation. Read [our guide to writing expressions](/docs/guides/writing-expressions) for more info. Examples:
* Debounce per customer id: `'event.data.customer_id'`
* Debounce per account and email address: `'event.data.account_id + "-" + event.user.email'`
Options to configure how to prioritize functions
An expression which must return an integer between -600 and 600 (by default), with higher return values resulting in a higher priority.
Examples:
* Return the priority within an event directly: `event.data.priority` (where
`event.data.priority` is an int within your account's range)
* Rate limit by a string field: `event.data.plan == 'enterprise' ? 180 : 0`
See [reference](/docs/reference/functions/run-priority) for more information.
Configure how the function should consume batches of events ([reference](/docs/guides/batching))
The maximum number of events a batch can have. Current limit is `100`.
How long to wait before invoking the function with the batch even if it's not full.
Current permitted values are from `1s` to `60s`.
A unique key expression to apply the batching to. The expression is evaluated for each triggering event.
Expressions are defined using the Common Expression Language (CEL) with the original event accessible using dot-notation. Read [our guide to writing expressions](/docs/guides/writing-expressions) for more info. Examples:
* Batch events per customer id: `'event.data.customer_id'`
* Batch events per account and email address: `'event.data.account_id + "-" + event.user.email'`
Configure the number of times the function will be retried from `0` to `20`. Default: `4`
A function that will be called only when this Inngest function fails after all retries have been attempted ([reference](/docs/reference/functions/handling-failures))
Define events that can be used to cancel a running or sleeping function ([reference](/docs/reference/typescript/functions/cancel-on))
The event name which will be used to cancel
The property to match the event trigger and the cancelling event, using dot-notation, for example, `data.userId`. Read [our guide to writing expressions](/docs/guides/writing-expressions) for more info.
An expression on which to conditionally match the original event trigger (`event`) and the wait event (`async`). Cannot be combined with `match`.
Expressions are defined using the Common Expression Language (CEL) with the events accessible using dot-notation. Read our [guide to writing expressions](/docs/guides/writing-expressions) for more info. Examples:
* `event.data.userId == async.data.userId && async.data.billing_plan == 'pro'`
The amount of time to wait to receive the cancelling event. A time string compatible with the [ms](https://npm.im/ms) package, e.g. `"30m"`, `"3 hours"`, or `"2.5d"`
Options to configure timeouts for cancellation ([reference](/docs/features/inngest-functions/cancellation/cancel-on-timeouts))
The timeout for starting a function run. If the time between scheduling and starting a function exceeds this duration, the function will be cancelled.
Examples are: `10s`, `45m`, `18h30m`.
The timeout for executing a run. If a run takes longer than this duration to execute, the run will be cancelled. This does not include the
time waiting for the function to start (see `timeouts.start`).
Examples are: `10s`, `45m`, `18h30m`.
{/* TODO - Document fns arg */}
### Trigger
One of the following function triggers is **Required**.
You can also specify an array of up to 10 of the following triggers to invoke
your function with multiple events or crons. See the [Multiple Triggers](/docs/guides/multiple-triggers) guide.
Cron triggers with overlapping schedules for a single function will be deduplicated.
The name of the event that will trigger this event to run
A [unix-cron](https://crontab.guru/) compatible schedule string.
Optional timezone prefix, e.g. `TZ=Europe/Paris 0 12 * * 5`.
When using an `event` trigger, you can optionally combine it with the `if` option to filter events:
A comparison expression that returns true or false whether the function should handle or ignore a given matching event.
Expressions are defined using the Common Expression Language (CEL) with the original event accessible using dot-notation. Read [our guide to writing expressions](/docs/guides/writing-expressions) for more info. Examples:
* `'event.data.action == "published"'`
* `'event.data.priority >= 4'`
### Handler
The handler is your code that runs whenever the trigger occurs. Every function handler receives a single object argument which can be deconstructed. The key arguments are `event` and `step`. Note, that scheduled functions that use a `cron` trigger will not receive an `event` argument.
```ts
function handler({ event, events, step, runId, logger, attempt }) {/* ... */}
```
#### `event`
The event payload `object` that triggered the given function run. The event payload object will match what you send with [`inngest.send()`](/docs/reference/events/send). Below is an example event payload object:
```ts
{
name: "app/account.created",
data: {
userId: "1234567890"
},
v: "2023-05-12.1",
ts: 1683898268584
}
```
#### `events`
`events` is an array of `event` payload objects that's accessible when the `batchEvents` is set on the function configuration.
If batching is not configured, the array contains a single event payload matching the `event` argument.
#### `step`
The `step` object has methods that enable you to define
- [`step.run()`](/docs/reference/functions/step-run) - Run synchronous or asynchronous code as a retriable step in your function
- [`step.sleep()`](/docs/reference/functions/step-sleep) - Sleep for a given amount of time
- [`step.sleepUntil()`](/docs/reference/functions/step-sleep-until) - Sleep until a given time
- [`step.invoke()`](/docs/reference/functions/step-invoke) - Invoke another Inngest function as a step, receiving the result of the invoked function
- [`step.waitForEvent()`](/docs/reference/functions/step-wait-for-event) - Pause a function's execution until another event is received
- [`step.sendEvent()`](/docs/reference/functions/step-send-event) - Send event(s) reliability within your function. Use this instead of `inngest.send()` to ensure reliable event delivery from within functions.
#### `runId`
The unique ID for the given function run. This can be useful for logging and looking up specific function runs in the Inngest dashboard.
#### `logger`
The `logger` object exposes the following interfaces.
```ts
export interface Logger {
info(...args: any[]): void;
warn(...args: any[]): void;
error(...args: any[]): void;
debug(...args: any[]): void;
}
```
It is a proxy object that is either backed by `console` or the logger you provided ([reference](/docs/guides/logging)).
#### `attempt`
The current zero-indexed attempt number for this function execution. The first attempt will be 0, the second 1, and so on. The attempt number is incremented every time the function throws an error and is retried.
# Debounce functions
Source: https://www.inngest.com/docs/reference/functions/debounce
Debounce delays a function run for the given `period`, and reschedules functions for the given `period` any time new events are received while the debounce is active. The function run starts after the specified `period` passes and no new events have been received. Functions use the last event as their input data.
See the [Debounce guide](/docs/guides/debounce) for more information about how this feature works.
```ts
export default inngest.createFunction(
{
id: "handle-webhook",
debounce: {
key: "event.data.account_id",
period: "5m",
},
},
{ event: "intercom/company.updated" },
async ({ event, step }) => {
// This function will only be scheduled 5m after events have stopped being received with the same
// `event.data.account_id` field.
//
// `event` will be the last event in the series received.
}
);
```
Options to configure how to debounce function execution
The time delay to delay execution. The period begins when the first matching event is received.
Current permitted values are from `1s` to `7d` (`168h`).
An optional unique key expression to apply the limit to. The expression is evaluated for each triggering event,
and allows you to debounce against event data.
Expressions are defined using the Common Expression Language (CEL) with the original event accessible using dot-notation. Read [our guide to writing expressions](/docs/guides/writing-expressions) for more info. Examples:
* Rate limit per customer id: `'event.data.customer_id'`
* Rate limit per account and email address: `'event.data.account_id + "-" + event.user.email'`
The maximum time that a debounce can be extended before running.
Functions will run using the last event received as the input data.
Debounce cannot be combined with [batching](/docs/guides/batching).
# Handling Failures
Source: https://www.inngest.com/docs/reference/functions/handling-failures
Define any failure handlers for your function with the [`onFailure`](/docs/reference/functions/create#configuration) option. This function will be automatically called when your function fails after it's maximum number of retries. Alternatively, you can use the [`"inngest/function.failed"`](#the-inngest-function-failed-event) system event to handle failures across all functions.
```ts
export default inngest.createFunction(
{
id: "import-product-images",
onFailure: async ({ error, event, step }) => {
// This is the failure handler which can be used to
// send an alert, notification, or whatever you need to do
},
},
{ event: "shop/product.imported" },
async ({ event, step, runId }) => {
// This is the main function handler's code
}
);
```
The failure handler is very useful for:
* Sending alerts to your team
* Sending metrics to a third party monitoring tool (e.g. Datadog)
* Send a notification to your team or user that the job has failed
* Perform a rollback of the transaction (i.e. undo work partially completed by the main handler)
_Failures_ should not be confused with _Errors_ which will be retried. Read the [error handling & retries documentation](/docs/functions/retries) for more context.
---
## How `onFailure` works
The `onFailure` handler is a helper that actually creates a separate Inngest function used specifically for handling failures for your main function handler.
The separate Inngest function utilizes an [`"inngest/function.failed"`](#the-inngest-function-failed-event) system event that gets sent to your account any time a function fails. The function created with `onFailure` will appear as a separate function in your dashboard with the name format: `" (failure)"`.
## `onFailure({ error, event, step, runId })`
The `onFailure` handler function has the same arguments as [the main function handler](/docs/reference/functions/create#handler) when creating a function, but also received an `error` argument.
### `error`
The JavaScript [`Error`](https://developer.mozilla.org/en-US/docs/Web/JavaScript/Reference/Global_Objects/Error/Error) object as thrown from the last retry in your main function handler.
The Inngest SDK attempts to serialize and deserialize the `Error` object to the best of its ability and any custom error classes (e.g. `Prisma.PrismaClientKnownRequestError` or `MyCustomErrorType`) that may be thrown will be deserialized as the default `Error` object. This means you _cannot_ use `instance` of within `onFailure` to infer the type of error.
### `event`
The [`"inngest/function.failed"`](/docs/reference/system-events/inngest-function-failed) system event payload object. This object is similar to any event payload, but it contains data specific to the failed function's final retry attempt. [See the complete reference for this event payload here](/docs/reference/system-events/inngest-function-failed).
### `step`
[See the `step` reference in the create function documentation](/docs/reference/functions/create#step).
### `runId`
This will be the function run ID for the error handling function, _not the function that failed_. To get the failed function's run ID, use `event.data.run_id`. [Learn more about `runId` here](/docs/reference/functions/create#run-id).
## Examples
### Send a Slack notification when a function fails
In this example, the function attempts to sync all products from a Shopify store, and if it fails, it sends a message to the team's _#eng-alerts_ Slack channel using the Slack Web Api's `chat.postMessage` ([docs](https://api.slack.com/methods/chat.postMessage)) API.
```ts
export default inngest.createFunction(
{
id: "sync-shopify-products",
// Your handler should be an async function:
onFailure: async ({ error, event }) => {
event.data.event;
// Post a message to the Engineering team's alerts channel in Slack:
await client.chat.postMessage({
token: process.env.SLACK_TOKEN,
channel: "C12345",
blocks: [
{
type: "section",
text: {
type: "mrkdwn",
text: `Sync Shopify function failed for Store ${
originalEvent.storeId
}: ${error.toString()}`,
},
},
],
});
return result;
},
},
{ event: "shop/product_sync.requested" },
async ({ event, step, runId }) => {
// This is the main function handler's code
await step.run("fetch-products", async () => {
event.data.storeId;
// The function might fail here or...
});
await step.run("save-products", async () => {
// The function might fail here after the maximum number of retries
});
}
);
```
### Capture all failure errors with Sentry
Similar to the above example, you can capture and all failed functions' errors and send them to a singular place. Here's an example using [Sentry's node.js library](https://docs.datadoghq.com/api/latest/events/) to capture and send all failure errors to Sentry.
```ts
Sentry.init({
dsn: "https://examplePublicKey@o0.ingest.sentry.io/0",
});
export default inngest.createFunction(
{
name: "Send failures to Sentry",
id: "send-failed-function-errors-to-sentry"
},
{ event: "inngest/function.failed" },
async ({ event, step }) => {
// The error is serialized as JSON, so we must re-construct it for Sentry's error handling:
event.data.error;
new Error(error.message);
// Set the name in the newly created event:
// You can even customize the name here if you'd like,
// e.g. `Function Failure: ${event.} - ${error.name}`
reerror.name;
// Add the stack trace to the error:
reerror.stack;
// Capture the error with Sentry and append any additional tags or metadata:
Sentry.captureException(reconstructedEvent,{
extra: {
function_id,
},
});
// Flush the Sentry queue to ensure the error is sent:
return await Sentry.flush();
}
);
```
### Additional examples
# Rate limit function execution
Source: https://www.inngest.com/docs/reference/functions/rate-limit
Set a _hard limit_ on how many function runs can start within a time period. Events that exceed the rate limit are _skipped_ and do not trigger functions to start.
See the [Rate Limiting guide](/docs/guides/rate-limiting) for more information about how this feature works.
```ts
export default inngest.createFunction(
{
id: "synchronize-data",
rateLimit: {
key: "event.data.company_id",
limit: 1,
period: "4h",
},
},
{ event: "intercom/company.updated" },
async ({ event, step }) => {
// This function will be rate limited
// It will only run 1 once per 4 hours for a given event payload with matching company_id
}
);
```
## Configuration
Options to configure how to rate limit function execution
The maximum number of functions to run in the given time period.
The time period of which to set the limit. The period begins when the first matching event is received.
Current permitted values are from `1s` to `24h`.
A unique key expression to apply the limit to. The expression is evaluated for each triggering event.
Expressions are defined using the Common Expression Language (CEL) with the original event accessible using dot-notation. Read [our guide to writing expressions](/docs/guides/writing-expressions) for more info. Examples:
* Rate limit per customer id: `'event.data.customer_id'`
* Rate limit per account and email address: `'event.data.account_id + "-" + event.user.email'`
## Examples
### Limiting synchronization triggered by webhook events
In this example, we use events from the Intercom webhook. The webhook can be overly chatty and send multiple `intercom/company.updated` events in a short time window. We also only really care to sync the user's data from Intercom no more than 4 times per day, so we set our limit to `6h`:
```ts
/** Example event payload:
{
name: "intercom/company.updated",
data: {
company_id: "123456789",
company_name: "Acme, Inc."
}
}
*/
export default inngest.createFunction(
{
id: "synchronize-data",
rateLimit: {
key: "event.data.company_id",
limit: 1,
period: "4h",
},
},
{ event: "intercom/company.updated" },
async ({ event, step }) => {
await step.run(
"fetch-latest-company-data-from-intercom",
async () => {
return await client.companies.find({
companyId: event.data.company_id,
});
}
);
await step.run("update-company-data-in-database", async () => {
return await database.companies.upsert({ id: company.id }, company);
});
}
);
```
### Send at most one email for multiple alerts over an hour
When there is an issue in your system, you may want to send your user an email notification, but don't want to spam them. The issue may repeat several times within the span of few minutes, but the user really just needs one email. You can
```ts
/** Example event payload:
{
name: "service/check.failed",
data: {
incident_id: "01HB9PWHZ4CZJYRAGEY60XEHCZ",
issue: "HTTP uptime check failed at 2023-09-26T21:23:51.515631317Z",
user_id: "user_aW5uZ2VzdF9pc19mdWNraW5nX2F3ZXNvbWU=",
service_name: "api",
service_id: "01HB9Q2EFBYG2B7X8VCD6JVRFH"
},
user: {
external_id: "user_aW5uZ2VzdF9pc19mdWNraW5nX2F3ZXNvbWU=",
email: "user@example.com"
}
}
*/
export default inngest.createFunction(
{
id: "send-check-failed-notification",
rateLimit: {
// Don't send duplicate emails to the same user for the same service over 1 hour
key: `event.data.user_id + "-" + event.data.service_id`,
limit: 1,
period: "1h",
},
},
{ event: "service/check.failed" },
async ({ event, step }) => {
await step.run("send-alert-email", async () => {
return await resend.emails.send({
from: "notifications@myco.com",
to: event.user.email,
subject: `ALERT: ${event.data.issue}`,
text: `Dear user, ...`,
});
});
}
);
```
# Function run priority
Source: https://www.inngest.com/docs/reference/functions/run-priority
You can prioritize specific function runs above other runs **within the same function**.
See the [Priority guide](/docs/guides/priority) for more information about how this feature works.
```ts
export default inngest.createFunction(
{
id: "ai-generate-summary",
priority: {
// For enterprise accounts, a given function run will be prioritized
// ahead of functions that were enqueued up to 120 seconds ago.
// For all other accounts, the function will run with no priority.
run: "event.data.account_type == 'enterprise' ? 120 : 0",
},
},
{ event: "ai/summary.requested" },
async ({ event, step }) => {
// This function will be prioritized based on the account type
}
);
```
## Configuration
Options to configure how to prioritize functions
An expression which must return an integer between -600 and 600 (by default), with higher return
values resulting in a higher priority.
Expressions are defined using the Common Expression Language (CEL) with the original event accessible using dot-notation. Read [our guide to writing expressions](/docs/guides/writing-expressions) for more info. Examples:
* Return the priority within an event directly: `event.data.priority` (where
`event.data.priority` is an int within your account's range)
* Prioritize by a string field: `event.data.plan == 'enterprise' ? 180 : 0`
Return values outside of your account's range (by default, -600 to 600) will automatically be clipped
to your max bounds.
An invalid expression will evaluate to 0, as in "no priority".
# Ensure exclusive execution of a function
Source: https://www.inngest.com/docs/reference/functions/singleton
Ensure that only a single run of a function (_or a set of specific functions, based on specific event properties_) is running at a time.
See the [Singleton Functions guide](/docs/guides/singleton) for more information about how this feature works.
```ts
export default inngest.createFunction(
{
id: "data-sync",
singleton: {
key: "event.data.user_id",
mode: "skip",
},
},
{ event: "data-sync.start" },
async ({ event }) => {
// This function will be skipped if another run of the same function is already running for the same user
}
);
```
## Configuration
Options to configure exclusive execution of a function.
A unique key expression to which the limit is applied. This expression is evaluated for each triggering event.
Expressions are defined using the Common Expression Language (CEL) with the original event accessible using dot-notation. Read [our guide to writing expressions](/docs/guides/writing-expressions) for more info. Examples:
* Ensure exclusive execution of a function per customer ID: `'event.data.customer_id'`
* Ensure exclusive execution of a function per account and email address: `'event.data.account_id + "-" + event.user.email'`
The mode to use for the singleton function:
* `"skip"`: Skip the new run.
{/* * `"cancel"`: Cancel the existing run and start the new one. */}
{/* ## Examples
### Ensure executing only upon the latest event
In this example, the active run of our `data-sync` function will be cancelled if another event with the same `user_id` is received:
```ts
// Example event payload:
// {
// name: "data-sync.start",
// data: {
// user_id: "123456789",
// }
// }
export default inngest.createFunction(
{
id: "data-sync",
singleton: {
key: "event.data.user_id",
mode: "cancel",
},
},
{ event: "data-sync.start" },
async ({ event, step }) => {
await step.run(
"fetch-latest-data-from-source",
async () => {
return await client.fetchData(event.data.user_id);
}
);
await step.run("update-data-in-database", async () => {
return await database.upsert({ id: company.id }, company);
});
}
);
```
While similar to [Debounce](/docs/guides/debounce), Singleton Functions are designed to ensure that only a single run of a function is happening at a time, whereas Debounce ensures that only a single event is processed within a given time window.
Refer to the [Singleton Functions guide](/docs/guides/singleton) for more information about how this feature works. */}
# Invoke
Source: https://www.inngest.com/docs/reference/functions/step-invoke
description = `Calling Inngest functions directly from other functions with step.invoke()`
Use `step.invoke()` to asynchronously call another function and handle the result. Invoking other functions allows you to easily re-use functionality and compose them to create more complex workflows or map-reduce type jobs. `step.invoke()` returns a `Promise` that resolves with the return value of the invoked function.
```ts
// Some function we'll call
inngest.createFunction(
{ id: "compute-square" },
{ event: "calculate/square" },
async ({ event }) => {
return { result: event.data.number * event.data.number }; // Result typed as { result: number }
}
);
// In this function, we'll call `computeSquare`
inngest.createFunction(
{ id: "main-function" },
{ event: "main/event" },
async ({ step }) => {
await step.invoke("compute-square-value", {
function: computeSquare,
data: { number: 4 }, // input data is typed, requiring input if it's needed
});
return `Square of 4 is ${square.result}.`; // square.result is typed as number
}
);
```
## `step.invoke(id, options): Promise`
The ID of the invocation. This is used in logs and to keep track of the invocation's state across different versions.
Options for the invocation:
A local instance of a function or a reference to a function to invoke.
Optional data to pass to the invoked function. Will be required and typed if it can be.
Optional user context for the invocation.
{/* Purposefully not mentioning the default timeout of 1 year, as we expect to lower this very soon. */}
The amount of time to wait for the invoked function to complete. The time to wait can be specified using a `number` of milliseconds, an `ms`-compatible time string like `"1 hour"`, `"30 mins"`, or `"2.5d"`, or a `Date` object.
If the timeout is reached, the step will throw an error. See [Error handling](#error-handling) below. Note that the invoked function will continue to run even if this step times out.
Throwing errors within the invoked function will be reflected in the invoking function.
```ts
await step.invoke("invoke-by-definition", {
function: anotherFunction,
data: { ... },
});
```
```ts
await step.invoke("invoke-by-reference", {
function: referenceFunction(...),
data: { ... },
});
```
```ts
await step.invoke("invoke-with-timeout", {
function: anotherFunction,
data: { ... },
timeout: "1h",
});
```
## How to call `step.invoke()`
Handling `step.invoke()` is similar to handling any other Promise in JavaScript:
```ts
// Using the "await" keyword
await step.invoke("invoke-function", {
function: someInngestFn,
data: { ... },
});
// Using `then` for chaining
step
.invoke("invoke-function", { function: someInngestFn, data: { ... } })
.then((result) => {
// further processing
});
// Running multiple invocations in parallel
Promise.all([
step.invoke("invoke-first-function", {
function: firstFunctionReference,
data: { ... },
}),
step.invoke("invoke-second-function", {
function: secondFn,
data: { ... },
}),
]);
```
## Using function references
Instead of directly importing a local function to invoke, [`referenceFunction()`](/docs/functions/references) can be used to call an Inngest function located in another app, or to avoid importing the dependencies of a function within the same app.
```ts
// Create a local reference to a function without importing dependencies
referenceFunction({
functionId: "compute-pi",
});
// Create a reference to a function in another application
referenceFunction({
appId: "my-python-app",
functionId: "compute-square",
});
// square.result is typed as a number
await step.invoke("compute-square-value", {
function: computePi,
data: { number: 4 }, // input data is typed, requiring input if it's needed
});
```
See [Referencing functions](/docs/functions/references) for more information.
## When to use `step.invoke()`
Use of `step.invoke()` to call an Inngest function directly is more akin to traditional RPC than Inngest's usual event-driven flow. While this tool still uses events behind the scenes, you can use it to help break up your codebase into reusable workflows that can be called from anywhere.
Use `step.invoke()` in tasks that need specific settings like concurrency limits. Because it runs with its own configuration,
distinct from the invoker's, you can provide a tailored configuration for each function.
If you don't need to define granular configuration or if your function won't be reused across app boundaries, use `step.run()` for simplicity.
## Internal behaviour
When a function object is passed as an argument, internally, the SDK retrieves the function's ID automatically. Alternatively, if a function ID `string` is passed, the Inngest SDK will assert the ID is correct at runtime. See [Error handling](#error-handling) for more information about this point.
When Inngest receives the request to invoke a function, it'll do so and wait for an `inngest/function.finished` event, which it will use to fulfil the data (or error) for the step.
## Return values and serialization
Similar to `step.run()`, all data returned from `step.invoke()` is serialized as JSON. This is done to enable the SDK to return a valid serialized response to the Inngest service.
## Retries
The invoked function will be executed as a regular Inngest function: it will have its own set of retries and can be seen as a brand new run.
If a `step.invoke()` fails for any of the reasons below, it will throw a `NonRetriableError`. This is to combat compounding retries, such that chains of invoked functions can be executed many more times than expected. For example, if A invokes B which invokes C, which invokes D, on failure D would be run 27 times (`retryCount^n`).
This may change on the future - [let us know](https://roadmap.inngest.com/roadmap?ref=docs) if you'd like to change this.
## Error handling
### Function not found
If Inngest could not find a function to invoke using the given ID (see [Internal behaviour](#internal-behaviour) above), an `inngest/function.finished` event will be sent with an appropriate error and the step will fail with a `NonRetriableError`.
### Invoked function fails
If the function exhausts all retries and fails, an `inngest/function.finished`
event will be sent with an appropriate error and the step will fail with a
`NonRetriableError`.
### Invoked function times out
If the `timeout` has been reached and the invoked function is still running, the
step will fail with a `NonRetriableError`.
### Invoked function is rate limited
If the called function has a rate limit configuration and is skipped, the step will fail with a `NonRetriableError`.
It's recommended to wrap the `step.invoke` with a `try catch` if the invoked function is expected to be executing occassionally.
## Usage limits
See [usage limits][usage-limits] for more details.
[usage-limits]: /docs/usage-limits/inngest#functions
# Run
Source: https://www.inngest.com/docs/reference/functions/step-run
description = `Define steps to execute with step.run()`
Use `step.run()` to run synchronous or asynchronous code as a retriable step in your function. `step.run()` returns a [Promise](https://developer.mozilla.org/en-US/docs/Web/JavaScript/Reference/Global_Objects/Promise) that resolves with the return value of your handler function.
```ts
export default inngest.createFunction(
{ id: "import-product-images" },
{ event: "shop/product.imported" },
async ({ event, step }) => {
await step.run("copy-images-to-s3", async () => {
return copyAllImagesToS3(event.data.imageURLs);
});
}
);
```
---
## `step.run(id, handler): Promise`
The ID of the step. This will be what appears in your function's logs and is used to memoize step state across function versions.
The function that code that you want to run and automatically retry for this step. Functions can be:
* A synchronous function
* An `async` function
* Any function that returns a [`Promise`](https://developer.mozilla.org/en-US/docs/Web/JavaScript/Reference/Global_Objects/Promise)
Throwing errors within the handler function will trigger the step to be retried ([reference](/docs/functions/retries)).
```ts
// Steps can have async handlers
await step.run("get-api-data", async () => {
// Steps should return data used in other steps
return fetch("...").json();
});
// Steps can have synchronous handlers
await step.run("transform", () => {
return transformData(result);
});
// Returning data is optional
await step.run("insert-data", async () => {
db.insert(data);
});
```
## How to call `step.run()`
As `step.run()` returns a [Promise](https://developer.mozilla.org/en-US/docs/Web/JavaScript/Reference/Global_Objects/Promise), you will need to handle it like any other Promise in JavaScript. Here are some ways you can use `step.run()` in your code:
```ts
// Use the "await" keyword to wait for the promise to fulfil
await step.run("create-user", () => {/* ... */});
await step.run("create-user", () => {/* ... */});
// Use `then` (or similar)
step.run("create-user", () => {/* ... */})
.then((user) => {
// do something else
});
// Use with a Promise helper function to run in parallel
Promise.all([
step.run("create-subscription", () => {/* ... */}),
step.run("add-to-crm", () => {/* ... */}),
step.run("send-welcome-email", () => {/* ... */}),
]);
```
## Return values and serialization
All data returned from `step.run` is serialized as JSON. This is done to enable the SDK to return a valid serialized response to the Inngest service.
```ts
await step.run("create-user", () => {
return { id: new ObjectId(), createdAt: new Date() };
});
/*
{
"id": "647731d1759aa55be43b975d",
"createdAt": "2023-05-31T11:39:18.097Z"
}
*/
```
## Usage limits
See [usage limits][usage-limits] for more details.
[usage-limits]: /docs/usage-limits/inngest#functions
# Send Event
Source: https://www.inngest.com/docs/reference/functions/step-send-event
description = `Send one or more events reliably from within your function with step.sendEvent().`;
Use to send event(s) reliably within your function. Use this instead of [`inngest.send()`](/docs/reference/events/send) to ensure reliable event delivery from within functions. This is especially useful when [creating functions that fan-out](/docs/guides/fan-out-jobs).
```ts {{ title: "v3" }}
export default inngest.createFunction(
{ id: "user-onboarding" },
{ event: "app/user.signup" },
async ({ event, step }) => {
// Do something
await step.sendEvent("send-activation-event", {
name: "app/user.activated",
data: { userId: event.data.userId },
});
// Do something else
}
);
```
```ts {{ title: "v2" }}
export default inngest.createFunction(
{ name: "User onboarding" },
{ event: "app/user.signup" },
async ({ event, step }) => {
// Do something
await step.sendEvent({
name: "app/user.activated",
data: { userId: event.data.userId },
});
// Do something else
}
);
```
To send events from outside of the context of a function, use [`inngest.send()`](/docs/reference/events/send).
---
## `step.sendEvent(id, eventPayload | eventPayload[]): Promise<{ ids: string[] }>`
The ID of the step. This will be what appears in your function's logs and is used to memoize step state across function versions.
An event payload object or an array of event payload objects.
[See the documentation for `inngest.send()`](/docs/reference/events/send#inngest-send-event-payload-event-payload-promise) for the event payload format.
```ts {{ title: "v3" }}
// Send a single event
await step.sendEvent("send-activation-event", {
name: "app/user.activated",
data: { userId: "01H08SEAXBJFJNGTTZ5TAWB0BD" },
});
// Send an array of events
await step.sendEvent("send-invoice-events", [
{
name: "app/invoice.created",
data: { invoiceId: "645e9e024befa68763f5b500" },
},
{
name: "app/invoice.created",
data: { invoiceId: "645e9e08f29fb563c972b1f7" },
},
]);
```
```ts {{ title: "v2" }}
// Send a single event
await step.sendEvent({
name: "app/user.activated",
data: { userId: "01H08SEAXBJFJNGTTZ5TAWB0BD" },
});
// Send an array of events
await step.sendEvent([
{
name: "app/invoice.created",
data: { invoiceId: "645e9e024befa68763f5b500" },
},
{
name: "app/invoice.created",
data: { invoiceId: "645e9e08f29fb563c972b1f7" },
},
]);
```
`step.sendEvent()` must be called using `await` or some other Promise handler to ensure your function sleeps correctly.
### Return values
The function returns a promise that resolves to an object with an array of Event IDs that were sent. These events can be used to look up the event in the Inngest dashboard or via [the REST API](https://api-docs.inngest.com/docs/inngest-api/pswkqb7u3obet-get-an-event).
```ts
await step.sendEvent([
{
name: "app/invoice.created",
data: { invoiceId: "645e9e024befa68763f5b500" }
},
{
name: "app/invoice.created",
data: { invoiceId: "645e9e08f29fb563c972b1f7" }
},
]);
/**
* ids = [
* "01HQ8PTAESBZPBDS8JTRZZYY3S",
* "01HQ8PTFYYKDH1CP3C6PSTBZN5"
* ]
*/
```
# Sleep until `step.sleepUntil()`
Source: https://www.inngest.com/docs/reference/functions/step-sleep-until
description = `Sleep until a specific date time with step.sleepUntil()`;
## `step.sleepUntil(id, datetime): Promise`
The ID of the step. This will be what appears in your function's logs and is used to memoize step state across function versions.
The datetime at which to continue execution of your function. This can be:
* A [`Date`](https://developer.mozilla.org/en-US/docs/Web/JavaScript/Reference/Global_Objects/Date) object
* Any date time `string` in [the format accepted by the `Date` object](https://developer.mozilla.org/en-US/docs/Web/JavaScript/Reference/Global_Objects/Date#date_time_string_format), i.e. `YYYY-MM-DDTHH:mm:ss.sssZ` or simplified forms like `YYYY-MM-DD` or `YYYY-MM-DDHH:mm:ss`
* [`Temporal.Instant`](https://developer.mozilla.org/en-US/docs/Web/JavaScript/Reference/Global_Objects/Temporal/Instant)
* [`Temporal.ZonedDateTime`](https://developer.mozilla.org/en-US/docs/Web/JavaScript/Reference/Global_Objects/Temporal/ZonedDateTime)
```ts {{ title: "v3" }}
// Sleep until the new year
await step.sleepUntil("happy-new-year", "2024-01-01");
// Sleep until September ends
await step.sleepUntil("wake-me-up", "2023-09-30T11:59:59");
// Sleep until the end of the this week
dayjs().endOf("week").toDate();
await step.sleepUntil("wait-for-end-of-the-week", date);
// Sleep until tea time in London
Temporal.ZonedDateTime.from("2025-05-01T16:00:00+01:00[Europe/London]");
await step.sleepUntil("british-tea-time", teaTime);
// Sleep until the end of the day
Temporal.Now.instant();
now.round({ smallestUnit: "day", roundingMode: "ceil" });
await step.sleepUntil("done-for-today", endOfDay);
```
```ts {{ title: "v2" }}
// Sleep until the new year
await step.sleepUntil("2024-01-01");
// Sleep until September ends
await step.sleepUntil("2023-09-30T11:59:59");
// Sleep until the end of the this week
dayjs().endOf('week').toDate();
await step.sleepUntil(date)
```
`step.sleepUntil()` must be called using `await` or some other Promise handler to ensure your function sleeps correctly.
# Sleep `step.sleep()`
Source: https://www.inngest.com/docs/reference/functions/step-sleep
## `step.sleep(id, duration): Promise`
The ID of the step. This will be what appears in your function's logs and is used to memoize step state across function versions.
The duration of time to sleep:
* `number` of milliseconds
* `string` compatible with the [ms](https://npm.im/ms) package, e.g. `"30m"`, `"3 hours"`, or `"2.5d"`
* [`Temporal.Duration`](https://developer.mozilla.org/en-US/docs/Web/JavaScript/Reference/Global_Objects/Temporal/Duration)
```ts {{ title: "v3" }}
// Sleep for 30 minutes
Temporal.Duration.from({ minutes: 5 });
await step.sleep("wait-with-temporal", thirtyMins);
await step.sleep("wait-with-string", "30m");
await step.sleep("wait-with-string-alt", "30 minutes");
await step.sleep("wait-with-ms", 30 * 60 * 1000);
```
```ts {{ title: "v2" }}
// Sleep for 30 minutes
await step.sleep("30m");
await step.sleep("30 minutes");
await step.sleep(30 * 60 * 1000);
```
`step.sleep()` must be called using `await` or some other Promise handler to ensure your function sleeps correctly.
# Wait for event
Source: https://www.inngest.com/docs/reference/functions/step-wait-for-event
description = `Wait for a particular event to be received before continuing with step.waitForEvent()`;
## `step.waitForEvent(id, options): Promise`
The ID of the step. This will be what appears in your function's logs and is used to memoize step state across function versions.
Options for configuring how to wait for the event.
The name of a given event to wait for.
The amount of time to wait to receive the event. A time string compatible with the [ms](https://npm.im/ms) package, e.g. `"30m"`, `"3 hours"`, or `"2.5d"`
The property to match the event trigger and the wait event, using dot-notation, e.g. `data.userId`. Cannot be combined with `if`.
An expression on which to conditionally match the original event trigger (`event`) and the wait event (`async`). Cannot be combined with `match`.**
Expressions are defined using the Common Expression Language (CEL) with the events accessible using dot-notation. Read [our guide to writing expressions](/docs/guides/writing-expressions) for more info. Examples:
* `event.data.userId == async.data.userId && async.data.billing_plan == 'pro'`
```ts {{ title: "v3" }}
// Wait 7 days for an approval and match invoice IDs
await step.waitForEvent("wait-for-approval", {
event: "app/invoice.approved",
timeout: "7d",
match: "data.invoiceId",
});
// Wait 30 days for a user to start a subscription
// on the pro plan
await step.waitForEvent("wait-for-subscription", {
event: "app/subscription.created",
timeout: "30d",
if: "event.data.userId == async.data.userId && async.data.billing_plan == 'pro'",
});
```
```ts {{ title: "v2" }}
// Wait 7 days for an approval and match invoice IDs
await step.waitForEvent("app/invoice.approved", {
timeout: "7d",
match: "data.invoiceId",
});
// Wait 30 days for a user to start a subscription
// on the pro plan
await step.waitForEvent("app/subscription.created", {
timeout: "30d",
if: "event.data.userId == async.data.userId && async.data.billing_plan == 'pro'",
});
```
`step.waitForEvent()` must be called using `await` or some other Promise handler to ensure your function sleeps correctly.
# Go SDK migration guide: v0.7 to v0.8
Source: https://www.inngest.com/docs/reference/go/migrations/v0.7-to-v0.8
This guide will help you migrate your Inngest Go SDK from v0.7 to v0.8 by providing a summary of the breaking changes.
## High-level
A minimal Inngest app looks like this:
```go
import (
"context"
"net/http"
"github.com/inngest/inngestgo"
)
func main() {
client, err := inngestgo.NewClient(inngestgo.ClientOpts{AppID: "my-app"})
if err != nil {
panic(err)
}
_, err = inngestgo.CreateFunction(
client,
inngestgo.FunctionOpts{ID: "my-fn"},
inngestgo.EventTrigger("my-event", nil),
func(
ctx context.Context,
input inngestgo.Input[inngestgo.GenericEvent[any, any]],
) (any, error) {
return "Hello, world!", nil
},
)
if err != nil {
panic(err)
}
_ = http.ListenAndServe(":8080", client.Serve())
}
```
## `Client`
The `DefaultClient` was removed. You should now use the `NewClient` function to create a new client:
```go
client, err := inngest.NewClient(inngest.ClientOpts{AppID: "my-app"})
```
`AppID` is now a required field. `NewClient` will return an error if it is not provided.
The removal of `DefaultClient` also means that `inngestgo.Send` and `inngestgo.SendMany` are no longer available. You should now use the `Client.Send` and `Client.SendMany` methods.
## `Handler`
The `Handler` was removed, along with `DefaultHandler` and the `NewHandler` function. The handler is predominately replaced by the `Client`, with `HandlerOpts` being replaced by `ClientOpts`.
## `CreateFunction`
`CreateFunction` now accepts a `Client` argument and returns an error. Calling `CreateFunction` automatically registers the function, obviating the `Handler.Register` method.
```go
_, err := inngestgo.CreateFunction(
client,
inngestgo.FunctionOpts{ID: "my-fn"},
inngestgo.EventTrigger("my-event", nil),
func(
ctx context.Context,
input inngestgo.Input[inngestgo.GenericEvent[any, any]],
) (any, error) {
return "Hello, world!", nil
},
)
```
`ID` is now a required field. `CreateFunction` will return an error if it is not provided.
If you were previously only setting the `Name` field, you can use `inngestgo.Slugify` to generate the same ID we used internally.
If `inngestgo.CreateFunction` is called in a different package than `inngestgo.NewClient`, then you must use a side-effect import to include the function:
```go
import (
"github.com/inngest/inngestgo"
// Side-effect import to include functions declared in a different package.
_ "github.com/myorg/myapp/fns"
)
func main() {
client, err := inngestgo.NewClient(inngestgo.ClientOpts{AppID: "my-app"})
// ...
}
```
# Go SDK migration guide: v0.8 to v0.11
Source: https://www.inngest.com/docs/reference/go/migrations/v0.8-to-v0.11
This guide will help you migrate your Inngest Go SDK from v0.8 to v0.11 by providing a summary of the breaking changes.
## `Input`
The `Input` type now accepts the event data type as a generic parameter. Previously, it accepted the `GenericEvent` type.
```go
type MyEventData struct {
Message string `json:"message"`
}
_, err = inngestgo.CreateFunction(
client,
inngestgo.FunctionOpts{ID: "my-fn"},
inngestgo.EventTrigger("my-event", nil),
func(
ctx context.Context,
input inngestgo.Input[MyEventData],
) (any, error) {
fmt.Println(input.Event.Data.Message)
return nil, nil
},
)
```
## `GenericEvent`
The `GenericEvent` type no longer accepts the event user type as a generic parameter.
```go
type MyEventData struct {
Message string `json:"message"`
}
type MyEvent = inngestgo.GenericEvent[MyEventData]
```
# Reference
Source: https://www.inngest.com/docs/reference/index
import {
CommandLineIcon
} from "@heroicons/react/24/outline";
hidePageSidebar = true;
Learn about our SDKs:
# Example middleware
Source: https://www.inngest.com/docs/reference/middleware/examples
The following examples show how you might use middleware in some real-world scenarios.
- [Cloudflare Workers AI](#cloudflare-workers-ai)
- [Common actions for every function](#common-actions-for-every-function)
- [Logging](#logging)
- [Prisma in function context](#prisma-in-function-context)
- [Cloudflare Workers & Hono environment variables](/docs/examples/middleware/cloudflare-workers-environment-variables)
---
## Cloudflare Workers AI
[Workers AI](https://developers.cloudflare.com/workers-ai/) allows you to run machine learning models, on the Cloudflare network, from your own code, triggered by Inngest.
To use the `@cloudflare/ai` package, you need access to the `env` object passed to a Workers route handler. This argument is usually abstracted away by a serve handler, but middleware can access arguments passed to the request.
Use this along with [mutating function input](/docs/reference/middleware/typescript#mutating-input) to set a new `ai` property that you can use within functions, like in the following example:
```ts
interface Env {
// If you set another name in wrangler.toml as the value for 'binding',
// replace "AI" with the variable name you defined.
AI: Ai;
}
cloudflareMiddleware = new InngestMiddleware({
name: "Inngest: Workers AI",
init: () => {
return {
onFunctionRun: ({ reqArgs }) => {
reqArgs as [Request, Env];
ctx.env.AI
return {
transformInput: () => {
return { ctx: { ai } };
},
};
},
};
},
});
```
```ts
export default inngest.createFunction(
{ id: "hello-world" },
{ event: "demo/event.sent" },
async ({ ai }) => {
// `ai` is typed and can be used directly or within a step
await ai.run("@cf/meta/llama-2-7b-chat-int8", {
prompt: "What is the origin of the phrase Hello, World",
});
}
);
```
## Common actions for every function
You likely reuse the same steps across many functions - whether it be fetching user data or sending an email, your app is hopefully full of reusable blocks of code.
We could add some middleware to pass these into any Inngest function, automatically wrapping them in `step.run()` and allowing the code inside our function to feel a little bit cleaner.
```ts
/**
* Pass to a client to provide a set of actions as steps to all functions, or to
* a function to provide a set of actions as steps only to that function.
*/
new Inngest({
id: "my-app",
middleware: [
createActionsMiddleware({
getUser(id: string) {
return db.user.get(id);
},
}),
],
});
inngest.createFunction(
{ id: "user-data-dump" },
{ event: "app/data.requested" },
async ({ event, action: { getUser } }) => {
// The first parameter is the step's options or ID
await getUser("get-user-details", event.data.userId);
}
);
```
```ts
/**
* Create a middleware that wraps a set of functions in step tooling, allowing
* them to be invoked directly instead of using `step.run()`.
*
* This is useful for providing a set of common actions to a particular function
* or to all functions created by a client.
*/
createActionsMiddleware = (rawActions: T) => {
return new InngestMiddleware({
name: "Inngest: Actions",
init: () => {
return {
onFunctionRun: () => {
return {
transformInput: ({ ctx: { step } }) => {
Object.entries(
rawActions
).reduce((acc, [key, value]) => {
if (typeof value !== "function") {
return acc;
}
(
idOrOptions: StepOptionsOrId,
...args: unknown[]
) => {
return step.run(idOrOptions, () => value(...args));
};
return {
...acc,
[key]: action,
};
}, {} as FilterActions);
return {
ctx: { action },
};
},
};
},
};
},
});
};
type Actions = Record;
/**
* Filter out all keys from `T` where the associated value does not match type
* `U`.
*/
type KeysNotOfType = {
[P in keyof T]: T[P] extends U ? never : P;
}[keyof T];
/**
* Given a set of generic objects, extract any top-level functions and
* appropriately shim their types.
*
* We use this type to allow users to spread a set of functions into the
* middleware without having to worry about non-function properties.
*/
type FilterActions> = {
[K in keyof Omit any>>]: (
idOrOptions: StepOptionsOrId,
...args: Parameters
) => Promise>>;
};
```
## Logging
The following shows you how you can create a logger middleware and customize it to your needs.
It is based on the [built-in logger middleware](/docs/guides/logging) in the SDK, and hope it gives you an idea of what you can do if the built-in logger doesn't meet your needs.
```ts
new InngestMiddleware({
name: "Inngest: Logger",
init({ client }) {
return {
onFunctionRun(arg) {
arg;
{
runID: ctx.runId,
eventName: ctx.event.name,
functionName: arg.fn.name,
};
let providedLogger: Logger = client["logger"];
// create a child logger if the provided logger has child logger implementation
try {
if ("child" in providedLogger) {
type ChildLoggerFn = (
metadata: Record
) => Logger;
providedLogger = (providedLogger.child as ChildLoggerFn)(metadata)
}
} catch (err) {
console.error('failed to create "childLogger" with error: ', err);
// no-op
}
new ProxyLogger(providedLogger);
return {
transformInput() {
return {
ctx: {
/**
* The passed in logger from the user.
* Defaults to a console logger if not provided.
*/
logger,
},
};
},
beforeExecution() {
logger.enable();
},
transformOutput({ result: { error } }) {
if (error) {
logger.error(error);
}
},
async beforeResponse() {
await logger.flush();
},
};
},
};
},
})
```
---
## Prisma in function context
The following is an example of adding a [Prisma](https://www.prisma.io/?ref=inngest) client to all Inngest functions, allowing them immediate access without needing to create the client themselves.
While this example uses Prisma, it serves as a good example of using the [onFunctionRun -> input](/docs/reference/middleware/lifecycle#on-function-run-lifecycle) hook to mutate function input to perform crucial setup for your functions and keep them to just business logic.
💡 Types are inferred from middleware outputs, so your Inngest functions will see an appropriately-typed `prisma` property in their input.
```ts
inngest.createFunction(
{ name: "Example" },
{ event: "app/user.loggedin" },
async ({ prisma }) => {
await prisma.auditTrail.create(/* ... */);
}
);
```
```ts
new InngestMiddleware({
name: "Prisma Middleware",
init() {
new PrismaClient();
return {
onFunctionRun(ctx) {
return {
transformInput(ctx) {
return {
// Anything passed via `ctx` will be merged with the function's arguments
ctx: {
prisma,
},
};
},
};
},
};
},
});
```
Check out [Common actions for every function](/docs/reference/middleware/examples#common-actions-for-every-function) to see how this technique can be used to create steps for all of your unique logic.
## Other examples
} href={'/docs/examples/middleware/cloudflare-workers-environment-variables'}>
Access environment variables within Inngest functions.
# Middleware lifecycle
Source: https://www.inngest.com/docs/reference/middleware/lifecycle
## Hook reference
The `init()` function can return functions for two separate lifecycles to hook into.
💡 All lifecycle and hook functions can be synchronous or `async` functions - the SDK will always wait until a middleware's function has resolved before continuing to the next one.
### `onFunctionRun` lifecycle
Triggered when a function is going to be executed.
The input data for the function. Only `event` and `runId` are available at this point.
An array of previously-completed step objects.
The serialized data for this step if it was successful.
The serialized error for this step if it failed.
The function that is about to be executed.
Arguments passed to the framework's request handler, which are used by the SDK's `serve` handler.
Called once the input for the function has been set up. This is where you can modify the input before the function starts.
Has the same input as the containing `onFunctionRun()` lifecycle function, but with a complete `ctx` object, including `step` tooling.
An object that will be merged with the existing function input to create a new input.
An array of modified step data to use in place of the current step data.
Called before the function starts to memoize state (running over previously-seen code).
Called after the function has finished memoizing state (running over previously-seen code).
Called before any step or code executes.
Called after any step or code has finished executing.
Called after the function has finished executing and before the response is sent back to Inngest. This is where you can modify the output.
An object containing the data to be sent back to Inngest in the `data` key, and an original `error` (if any) that threw.
If this execution ran a step, will be a step that ran.
An object containing a `data` key to overwrite the data that will be sent back to Inngest for this step or function.
Called when execution is complete and a final response is returned (success or an error), which will end the run.
This function is not guaranteed to be called on every execution. It may be called multiple times if there are many parallel executions or during retries.
An object that contains either the successful `data` ending the run or the `error` that has been thrown. Both outputs have already been affected by `transformOutput`.
Called after the output has been set and before the response has been sent back to Inngest. Use this to perform any final actions before the request closes.
```ts
new InngestMiddleware({
name: "My Middleware",
init({ client, fn }) {
return {
onFunctionRun({ ctx, fn, steps }) {
return {
transformInput({ ctx, fn, steps }) {
// ...
return {
// All returns are optional
ctx: { /* extend fn input */ },
steps: steps.map(({ data }) => { /* transform step data */ })
}
},
beforeMemoization() {
// ...
},
afterMemoization() {
// ...
},
beforeExecution() {
// ...
},
afterExecution() {
// ...
},
transformOutput({ result, step }) {
// ...
return {
// All returns are optional
result: {
// Transform data before it goes back to Inngest
data: transformData(result.data)
}
}
},
finished({ result }) {
// ...
},
beforeResponse() {
// ...
},
};
},
};
},
});
```
---
### `onSendEvent` lifecycle
Triggered when an event is going to be sent via `inngest.send()`, `step.sendEvent()`, or `step.invoke()`.
Called before the events are sent to Inngest. This is where you can modify the events before they're sent.
Called after events are sent to Inngest. This is where you can perform any final actions and modify the output from `inngest.send()`.
```ts
new InngestMiddleware({
name: "My Middleware",
init: ({ client, fn }) => {
return {
onSendEvent() {
return {
transformInput({ payloads }) {
// ...
},
transformOutput() {
// ...
},
};
},
};
},
});
```
# Inngest client
Source: https://www.inngest.com/docs/reference/python/client/overview
The Inngest client is used to configure your application and send events outside of Inngest functions.
```py
import inngest
inngest_client = inngest.Inngest(
app_id="flask_example",
)
```
---
## Configuration
Override the default base URL for our REST API (`https://api.inngest.com/`). See also the [`INNGEST_EVENT_API_BASE_URL`](/docs/reference/python/overview/env-vars#inngest-event-api-base-url) environment variable.
A unique identifier for your application. We recommend a hyphenated slug.
The environment name. Required only when using [Branch Environments](/docs/platform/environments).
Override the default base URL for sending events (`https://inn.gs/`). See also the [`INNGEST_EVENT_API_BASE_URL`](/docs/reference/python/overview/env-vars#inngest-event-api-base-url) environment variable.
An Inngest event key. Alternatively, set the [`INNGEST_EVENT_KEY`](/docs/reference/python/overview/env-vars#inngest-event-key) environment variable.
Whether the SDK should run in [production mode](/docs/reference/python/overview/prod-mode). See also the [`INNGEST_DEV`](/docs/reference/python/overview/env-vars#inngest-dev) environment variable.
A logger object derived from `logging.Logger` or `logging.LoggerAdapter`. Defaults to using `logging.getLogger(__name__)` if not provided.
A list of middleware to add to the client. Read more in our [middleware docs](/docs/reference/python/middleware/overview).
The Inngest signing key. Alternatively, set the [`INNGEST_SIGNING_KEY`](/docs/reference/python/overview/env-vars#inngest-signing-key) environment variable.
# Send events
Source: https://www.inngest.com/docs/reference/python/client/send
💡️ This guide is for sending events from *outside* an Inngest function. To send events within an Inngest function, refer to the [step.send_event](/docs/reference/python/steps/send-event) guide.
Sends 1 or more events to the Inngest server. Returns a list of the event IDs.
```py
import inngest
inngest_client = inngest.Inngest(app_id="my_app")
# Call the `send` method if you're using async/await
ids = await inngest_client.send(
inngest.Event(name="my_event", data={"msg": "Hello!"})
)
# Call the `send_sync` method if you aren't using async/await
ids = inngest_client.send_sync(
inngest.Event(name="my_event", data={"msg": "Hello!"})
)
# Can pass a list of events
ids = await inngest_client.send(
[
inngest.Event(name="my_event", data={"msg": "Hello!"}),
inngest.Event(name="my_other_event", data={"name": "Alice"}),
]
)
```
## `send`
Only for async/await code.
1 or more events to send.
Any data to associate with the event.
A unique ID used to idempotently trigger function runs. If duplicate event IDs are seen, only the first event will trigger function runs.
The event name. We recommend using lowercase dot notation for names (e.g. `app/user.created`)
A timestamp integer representing the time (in milliseconds) at which the event occurred. Defaults to the time the Inngest receives the event.
If the `ts` time is in the future, function runs will be scheduled to start at the given time. This has the same effect as sleeping at the start of the function.
Note: This does not apply to functions waiting for events. Functions waiting for events will immediately resume, regardless of the timestamp.
## `send_sync`
Blocks the thread. If you're using async/await then use `send` instead.
Arguments are the same as `send`.
# Create Function
Source: https://www.inngest.com/docs/reference/python/functions/create
Define your functions using the `create_function` decorator.
```py
import inngest
@inngest_client.create_function(
fn_id="import-product-images",
trigger=inngest.TriggerEvent(event="shop/product.imported"),
)
async def fn(ctx: inngest.Context):
# Your function code
```
---
## `create_function`
The `create_function` decorator accepts a configuration and wraps a plain function.
### Configuration
Configure how the function should consume batches of events ([reference](/docs/guides/batching))
The maximum number of events a batch can have. Current limit is `100`.
How long to wait before invoking the function with the batch even if it's not full.
Current permitted values are between 1 second and 1 minute. If you pass an `int` then it'll be interpreted in milliseconds.
Define an event that can be used to cancel a running or sleeping function ([guide](/docs/guides/cancel-running-functions))
The event name which will be used to cancel
A match expression using arbitrary event data. For example, `event.data.user_id == async.data.user_id` will only match events whose `data.user_id` matches the original trigger event's `data.user_id`.
The amount of time to wait to receive the cancelling event. If you pass an `int` then it'll be interpreted in milliseconds.
Options to configure function debounce ([reference](/docs/reference/functions/debounce))
A unique key expression to apply the debounce to. The expression is evaluated for each triggering event.
Expressions are defined using the Common Expression Language (CEL) with the events accessible using dot-notation. Read [our guide to writing expressions](/docs/guides/writing-expressions) for more info. Examples:
* Debounce per customer id: `'event.data.customer_id'`
* Debounce per account and email address: `'event.data.account_id + "-" + event.user.email'`
The time period of which to set the limit. The period begins when the first matching event is received.
How long to wait before invoking the function with the batch even if it's not full.
If you pass an `int` then it'll be interpreted in milliseconds.
A unique identifier for your function. This should not change between deploys.
A name for your function. If defined, this will be shown in the UI as a friendly display name instead of the ID.
A function that will be called only when this Inngest function fails after all retries have been attempted ([reference](/docs/reference/functions/handling-failures))
Configure function run prioritization.
An expression which must return an integer between -600 and 600 (by default), with higher return values resulting in a higher priority.
Examples:
* Return the priority within an event directly: `event.data.priority` (where
`event.data.priority` is an int within your account's range)
* Rate limit by a string field: `event.data.plan == 'enterprise' ? 180 : 0`
See [reference](/docs/reference/functions/run-priority) for more information.
Options to configure how to rate limit function execution ([reference](/docs/reference/functions/rate-limit))
A unique key expression to apply the limit to. The expression is evaluated for each triggering event.
Expressions are defined using the Common Expression Language (CEL) with the events accessible using dot-notation. Read [our guide to writing expressions](/docs/guides/writing-expressions) for more info. Examples:
* Rate limit per customer id: `'event.data.customer_id'`
* Rate limit per account and email address: `'event.data.account_id + "-" + event.user.email'`
The maximum number of functions to run in the given time period.
The time period of which to set the limit. The period begins when the first matching event is received.
How long to wait before invoking the function with the batch even if it's not full.
Current permitted values are from 1 second to 1 minute. If you pass an `int` then it'll be interpreted in milliseconds.
Configure the number of times the function will be retried from `0` to `20`. Default: `4`
Options to configure how to throttle function execution
The maximum number of functions to run in the given time period.
A unique key expression to apply the limit to. The expression is evaluated for each triggering event.
Expressions are defined using the Common Expression Language (CEL) with the events accessible using dot-notation. Read [our guide to writing expressions](/docs/guides/writing-expressions) for more info. Examples:
* Rate limit per customer id: `'event.data.customer_id'`
* Rate limit per account and email address: `'event.data.account_id + "-" + event.user.email'`
The time period of which to set the limit. The period begins when the first matching event is received.
How long to wait before invoking the function with the batch even if it's not full.
Current permitted values are from 1 second to 1 minute. If you pass an `int` then it'll be interpreted in milliseconds.
A key expression used to prevent duplicate events from triggering a function more than once in 24 hours. [Read the idempotency guide here](/docs/guides/handling-idempotency).
Expressions are defined using the Common Expression Language (CEL) with the original event accessible using dot-notation. Read [our guide to writing expressions](/docs/guides/writing-expressions) for more information.
What should trigger the function to run. Either an event or a cron schedule. Use a list to specify multiple triggers.
---
## Triggers
### `TriggerEvent`
The name of the event.
A match expression using arbitrary event data. For example, `event.data.user_id == async.data.user_id` will only match events whose `data.user_id` matches the original trigger event's `data.user_id`.
### `TriggerCron`
A [unix-cron](https://crontab.guru/) compatible schedule string.
Optional timezone prefix, e.g. `TZ=Europe/Paris 0 12 * * 5`.
### Multiple Triggers
Multiple triggers can be defined by setting the `trigger` option to a list of `TriggerEvent` or `TriggerCron` objects:
```py
import inngest
@inngest_client.create_function(
fn_id="import-product-images",
trigger=[
inngest.TriggerEvent(event="shop/product.imported"),
inngest.TriggerEvent(event="shop/product.updated"),
],
)
async def fn(ctx: inngest.Context):
# Your function code
```
For more information, see the [Multiple
Triggers](/docs/guides/multiple-triggers) guide.
---
## Handler
The handler is your code that runs whenever the trigger occurs. Every function handler receives a single object argument which can be deconstructed. The key arguments are `event` and `step`. Note, that scheduled functions that use a `cron` trigger will not receive an `event` argument.
```py
@inngest_client.create_function(
# Function options
)
async def fn(ctx: inngest.Context):
# Function code
```
### `ctx`
The current zero-indexed attempt number for this function execution. The first attempt will be 0, the second 1, and so on. The attempt number is incremented every time the function throws an error and is retried.
The event payload `object` that triggered the given function run. The event payload object will match what you send with [`inngest.send()`](/docs/reference/events/send). Below is an example event payload object:
The event payload data.
Time (Unix millis) the event was received by the Inngest server.
A list of `event` objects that's accessible when the `batch_events` is set on the function configuration.
If batching is not configured, the list contains a single event payload matching the `event` argument.
A proxy object around either the logger you provided or the default logger.
The unique ID for the given function run. This can be useful for logging and looking up specific function runs in the Inngest dashboard.
### `step`
The `step` object has a method for each kind of step in the Inngest platform.
If your function is `async` then its type is `Step` and you can use `await` to call its methods. If your function is not `async` then its type is `SyncStep`.
[Docs](/docs/reference/python/steps/run)
[Docs](/docs/reference/python/steps/send-event)
[Docs](/docs/reference/python/steps/sleep)
[Docs](/docs/reference/python/steps/sleep-until)
[Docs](/docs/reference/python/steps/parallel)
# Modal
Source: https://www.inngest.com/docs/reference/python/guides/modal
This guide will help you use setup an Inngest app in [Modal](https://modal.com), a platform for building and deploying serverless Python applications.
## Setting up your development environment
This section will help you setup your development environment. You'll have an Inngest Dev Server running locally and a FastAPI app running in Modal.
### Creating a tunnel
Since we need bidirectional communication between the Dev Server and your app, you'll also need a tunnel to allow your app to reach your locally-running Dev Server. We recommend using [ngrok](https://ngrok.com) for this.
```sh
# Tunnel to the Dev Server's port
ngrok http 8288
```
This should output a public URL that can reach port `8288` on your machine. The URL can be found in the `Forwarding` part of ngrok's output:
```
Forwarding https://23ef-173-10-53-121.ngrok-free.app -> http://localhost:8288
```
### Creating and deploying a FastAPI app
Create an `.env` file that contains the tunnel URL:
```
INNGEST_DEV=https://23ef-173-10-53-121.ngrok-free.app
```
Create a dependency file that Modal will use to install dependencies. For this guide, we'll use `requirements.txt`:
```
fastapi==0.115.0
inngest==0.4.12
python-dotenv==1.0.1
```
Create a `main.py` file that contains your FastAPI app:
```py
import os
from dotenv import load_dotenv
from fastapi import FastAPI
import inngest
import inngest.fast_api
import modal
load_dotenv()
app = modal.App("test-fast-api")
# Load all environment variables that start with "INNGEST_"
env: dict[str, str] = {}
for k, v, in os.environ.items():
if k.startswith("INNGEST_"):
env[k] = v
image = (
modal.Image.debian_slim()
.pip_install_from_requirements("requirements.txt")
.env(env)
)
fast_api_app = FastAPI()
# Create an Inngest client
inngest_client = inngest.Inngest(app_id="fast_api_example")
# Create an Inngest function
@inngest_client.create_function(
fn_id="my-fn",
trigger=inngest.TriggerEvent(event="my-event"),
)
async def fn(ctx: inngest.Context) -> str:
print(ctx.event)
return "done"
# Serve the Inngest endpoint (its path is /api/inngest)
inngest.fast_api.serve(fast_api_app, inngest_client, [fn])
@app.function(image=image)
@modal.asgi_app()
def fastapi_app():
return fast_api_app
```
Deploy your app to Modal:
```sh
modal deploy main.py
```
Your terminal should show the deployed app's URL:
```
└── 🔨 Created web function fastapi_app =>
https://test-fast-api-fastapi-app.modal.run
```
To test whether the deploy worked, send a request to the Inngest endpoint (note that we added the `/api/inngest` to the Modal URL). It should output JSON similar to the following:
```sh
$ curl https://test-fast-api-fastapi-app.modal.run/api/inngest
{"schema_version": "2024-05-24", "authentication_succeeded": null, "function_count": 1, "has_event_key": false, "has_signing_key": false, "has_signing_key_fallback": false, "mode": "dev"}
```
### Syncing with the Dev Server
Start the Dev Server, specifying the FastAPI app's Inngest endpoint:
```sh
npx inngest-cli@latest dev -u https://test-fast-api-fastapi-app.modal.run/api/inngest --no-discovery
```
In your browser, navigate to `http://127.0.0.1:8288/apps`. Your app should be successfully synced.
## Deploying to production
A production Inngest app is very similar to an development app. The only difference is with environment variables:
- `INNGEST_DEV` must not be set. Alternatively, you can set it to `0`.
- `INNGEST_EVENT_KEY` must be set. Its value can be found on the [event keys page](https://app.inngest.com/env/production/manage/keys).
- `INNGEST_SIGNING_KEY` must be set. Its value can be found on the [signing key page](https://app.inngest.com/env/production/manage/signing-key).
Once your app is deployed with these environment variables, you can sync it on our [new app page](https://app.inngest.com/env/production/apps/sync-new).
For more information about syncing, please see our [docs](/docs/apps/cloud).
# Pydantic
Source: https://www.inngest.com/docs/reference/python/guides/pydantic
This guide will help you use Pydantic to perform runtime type validation when sending and receiving events.
## Step output
Steps can return Pydantic objects as long as the `output_type` parameter is set to the Pydantic model return type.
```py
client = inngest.Inngest(
app_id="my-app",
# Must set the client serializer when using Pydantic output
serializer=inngest.PydanticSerializer(),
)
class User(pydantic.BaseModel):
name: str
async def get_user() -> User:
return User(name="Alice")
@client.create_function(
fn_id="my-fn",
trigger=inngest.TriggerEvent(event="my-event"),
)
async def my_fn(ctx: inngest.Context) -> None:
# user object is a Pydantic object at both runtime and compile time
user = await ctx.step.run("get-user", get_user, output_type=User)
```
More complex types work as well. For example, if the `get_user` function returned an `list[Admin | User]` type, you could set the `output_type` to `list[Admin | User]`.
```py
await ctx.step.run("get-person", get_users, output_type=list[User | Admin])
```
Why do I need to set the `output_type` parameter?
Since step output is transmitted as JSON back to the Inngest server, we lose the reference to the original Python class. So the `output_type` parameter is used to deserialize the JSON back into the correct type.
Why can't the SDK infer the output type from my type annotations?
The could sometimes work, but there are common patterns that break it. Runtime return type inference is impossible if the return type:
- Is implicit (i.e. not specified but your type checker figures it out).
- Is a generic.
## Function output
Functions can return Pydantic objects as long as the `output_type` parameter is set to the Pydantic model return type.
```py
client = inngest.Inngest(
app_id="my-app",
# Must set the client serializer when using Pydantic output
serializer=inngest.PydanticSerializer(),
)
class User(pydantic.BaseModel):
name: str
@client.create_function(
fn_id="my-fn",
output_type=User,
trigger=inngest.TriggerEvent(event="my-event"),
)
async def my_fn(ctx: inngest.Context) -> None:
return User(name="Alice")
```
## Sending events
Create a base class that all your event classes will inherit from. This class has methods to convert to and from `inngest.Event` objects.
```py
import inngest
import pydantic
import typing
TEvent = typing.TypeVar("TEvent", bound="BaseEvent")
class BaseEvent(pydantic.BaseModel):
data: pydantic.BaseModel
id: str = ""
name: typing.ClassVar[str]
ts: int = 0
@classmethod
def from_event(cls: type[TEvent], event: inngest.Event) -> TEvent:
return cls.model_validate(event.model_dump(mode="json"))
def to_event(self) -> inngest.Event:
return inngest.Event(
name=self.name,
data=self.data.model_dump(mode="json"),
id=self.id,
ts=self.ts,
)
```
Next, create a Pydantic model for your event.
```py
class PostUpvotedEventData(pydantic.BaseModel):
count: int
class PostUpvotedEvent(BaseEvent):
data: PostUpvotedEventData
name: typing.ClassVar[str] = "forum/post.upvoted"
```
Since Pydantic validates on instantiation, the following code will raise an error if the data is invalid.
```py
client.send(
PostUpvotedEvent(
data=PostUpvotedEventData(count="bad data"),
).to_event()
)
```
## Receiving events
When defining your Inngest function, use the `name` class field when specifying the trigger. Within the function body, call the `from_event` class method to convert the `inngest.Event` object to your Pydantic model.
```py
@client.create_function(
fn_id="handle-upvoted-post",
trigger=inngest.TriggerEvent(event=PostUpvotedEvent.name),
)
def fn(ctx: inngest.ContextSync) -> None:
event = PostUpvotedEvent.from_event(ctx.event)
```
# Testing
Source: https://www.inngest.com/docs/reference/python/guides/testing
## Unit testing
If you'd like to unit test without an Inngest server, the `mocked` (requires `v0.4.14+`) library can simulate much of the Inngest server's behavior.
The `mocked` library is experimental. It may have interface and behavioral changes that don't follow semantic versioning.
Let's say you've defined this function somewhere in your app:
```python
import inngest
def create_message(name: object) -> str:
return f"Hello, {name}!"
client = inngest.Inngest(app_id="my-app")
@client.create_function(
fn_id="greet",
trigger=inngest.TriggerEvent(event="user.login"),
)
async def greet(ctx: inngest.Context) -> str:
message = await ctx.step.run(
"create-message",
create_message,
ctx.event.data["name"],
)
return message
```
You can unit test it like this:
```python
import unittest
import inngest
from inngest.experimental import mocked
from .functions import greet
# Mocked Inngest client. The app_id can be any string (it's currently unused)
client_mock = mocked.Inngest(app_id="test")
# A normal Python test class
class TestGreet(unittest.TestCase):
def test_greet(self) -> None:
# Trigger the function with an in-memory, simulated Inngest server
res = mocked.trigger(
greet,
inngest.Event(name="user.login", data={"name": "Alice"}),
client_mock,
)
# Assert that it ran as expected
assert res.status is mocked.Status.COMPLETED
assert res.output == "Hello, Alice!"
```
### Limitations
The `mocked` library has some notable limitations:
- `ctx.step.invoke` and `ctx.step.wait_for_event` must be stubbed using the `step_stubs` parameter of `mocked.trigger`.
- `step.send_event` does not send events. It returns a stubbed value.
- `step.sleep` and `step.sleep_until` always sleep for 0 seconds.
### Stubbing
Stubbing is required for `ctx.step.invoke` and `ctx.step.wait_for_event`. Here's an example of how to stub these functions:
```python
# Real production function
@client.create_function(
fn_id="signup",
trigger=inngest.TriggerEvent(event="user.signup"),
)
def signup(ctx: inngest.ContextSync) -> bool:
email_id = ctx.step.invoke(
"send-email",
function=send_email,
)
event = ctx.step.wait_for_event(
"wait-for-reply",
event="email.reply",
if_exp=f"async.data.email_id == '{email_id}'",
timeout=datetime.timedelta(days=1),
)
user_replied = event is not None
return user_replied
# Mocked Inngest client
client_mock = mocked.Inngest(app_id="test")
class TestSignup(unittest.TestCase):
def test_signup(self) -> None:
res = mocked.trigger(
fn,
inngest.Event(name="test"),
client_mock,
# Stub the invoke and wait_for_event steps. The keys are the step
# IDs
step_stubs={
"send-email": "email-id-abc123",
"wait-for-reply": inngest.Event(
data={"text": "Sounds good!"}, name="email.reply"
),
},
)
assert res.status is mocked.Status.COMPLETED
assert res.output is True
```
To simulate a `ctx.step.wait_for_event` timeout, stub the step with `mocked.Timeout`.
## Integration testing
If you'd like to start and stop a real Dev Server with your integration tests, the `dev_server` (requires `v0.4.15+`) library can help. It requires `npm` to be installed on your machine.
The `dev_server` library is experimental. It may have interface and behavioral changes that don't follow semantic versioning.
You can use the library in your `conftest.py`:
```python
import pytest
from inngest.experimental import dev_server
def pytest_configure(config: pytest.Config) -> None:
dev_server.server.start()
def pytest_unconfigure(config: pytest.Config) -> None:
dev_server.server.stop()
```
This Dev Server will not automatically discover your app. You'll need to manually sync by sending a `PUT` request to your app's Inngest endpoint (`/api/inngest` by default).
Since Pytest automatically discovers and runs `conftest.py` files, simply running your `pytest` command will start the Dev Server before running tests and stop the Dev Server after running tests.
# Python SDK
Source: https://www.inngest.com/docs/reference/python/index
## Installing
```shell
pip install inngest
```
## Quick start guide
Read the Python [quick start guide](/docs/getting-started/python-quick-start) to learn how to add Inngest to a FastAPI app and run an Inngest function.
## Source code
Our Python SDK is open source and available on Github: [ inngest/inngest-py](https://github.com/inngest/inngest-py).
# Python middleware lifecycle
Source: https://www.inngest.com/docs/reference/python/middleware/lifecycle
The order of middleware lifecycle hooks is as follows:
1. [`transform_input`](#transform-input)
2. [`before_memoization`](#before-memoization)
3. [`after_memoization`](#after-memoization)
4. [`before_execution`](#before-execution)
5. [`after_execution`](#after-execution)
6. [`transform_output`](#transform-output)
7. [`before_response`](#before-response)
All of these functions may be called multiple times in a single function run. For example, if your function has 2 steps then all of the hooks will run 3 times (once for each step and once for the function).
Additionally, there are two hooks when sending events:
1. [`before_send_events`](#before-send-events)
2. [`after_send_events`](#after-send-events)
## Hook reference
### `transform_input`
Called when receiving a request from Inngest and before running any functions. Commonly used to mutate data sent by Inngest, like decryption.
`ctx` argument passed to Inngest functions.
Inngest function object.
Memoized step data.
### `before_memoization`
Called before checking memoized step data.
### `after_memoization`
Called after exhausting memoized step data.
### `before_execution`
Called before executing "new code". For example, `before_execution` is called after returning the last memoized step data, since function-level code after that step is "new".
### `after_execution`
Called after executing "new code".
### `transform_output`
Called after a step or function returns. Commonly used to mutate data before sending it back to Inngest, like encryption.
Only set if there's an error.
Step or function output. Since `None` is a valid output, always call the `has_output` method before accessing the output.
Step or function output. Since `None` is a valid output, always call the `has_output` method before accessing the output.
Step ID.
Step type enum. Useful in very rare cases.
Step options. Useful in very rare cases.
### `before_response`
Called before sending a response back to Inngest.
### `before_send_events`
Called before sending events to Inngest.
Events to send.
### `after_send_events`
Called after sending events to Inngest.
Error string if an error occurred.
Event IDs.
# Middleware
Source: https://www.inngest.com/docs/reference/python/middleware/overview
Middleware allows you to run code at various points in an Inngest function's lifecycle. This is useful for adding custom behavior to your functions, like error reporting and end-to-end encryption.
```py
class MyMiddleware(inngest.Middleware):
async def before_send_events( self, events: list[inngest.Event]) -> None:
print(f"Sending {len(events)} events")
async def after_send_events(self, result: inngest.SendEventsResult) -> None:
print("Done sending events")
inngest_client = inngest.Inngest(
app_id="my_app",
middleware=[MyMiddleware],
)
```
## Examples
- [End-to-end encryption](https://github.com/inngest/inngest-py/tree/main/pkg/inngest_encryption)
- [Sentry](https://github.com/inngest/inngest-py/blob/main/pkg/inngest/inngest/experimental/sentry_middleware.py)
# Python SDK migration guide: v0.3 to v0.4
Source: https://www.inngest.com/docs/reference/python/migrations/v0.3-to-v0.4
This guide will help you migrate your Inngest Python SDK from v0.3 to v0.4 by providing a summary of the breaking changes.
## Middleware
### Constructor
Added the `raw_request` arg to the constructor. This is the raw HTTP request received by the `serve` function. Its usecase is predominately for platforms that include critical information in the request, like environment variables in Cloudflare Workers.
### `transform_input`
Added the `steps` arg, which was previous in `ctx._steps`. This is useful in encryption middleware.
Added the `function` arg, which is the `inngest.Function` object. This is useful for middleware that needs to know the function's metadata (like error reporting).
Its return type is now `None` since modifying data should happen by mutating args.
### `transform_output`
Replaced the `output` arg with `result` arg. Its type is the new `inngest.TransformOutputResult` class:
```py
class TransformOutputResult:
# Mutations to these fields within middleware will be kept after running
# middleware
error: typing.Optional[Exception]
output: object
# Mutations to these fields within middleware will be discarded after
# running middleware
step: typing.Optional[TransformOutputStepInfo]
class TransformOutputStepInfo:
id: str
op: execution.Opcode
opts: typing.Optional[dict[str, object]]
```
Its return type is now `None` since modifying data should happen by mutating args.
## Removed exports
- `inngest.FunctionID` -- No use case.
- `inngest.Output` -- Replaced by `inngest.TransformOutputResult`.
## Removed `async_mode` arg in `inngest.django.serve`
This argument is no longer needed since async mode is inferred based on the Inngest functions you declare. If you have one or more `async` Inngest functions then async mode is enabled.
## `NonRetriableError`
Removed the `cause` arg since it wasn't actually used. We'll eventually reintroduce it in a proper way.
# Python SDK migration guide: v0.4 to v0.5
Source: https://www.inngest.com/docs/reference/python/migrations/v0.4-to-v0.5
This guide will help you migrate your Inngest Python SDK from v0.4 to v0.5.
## New features
- First-class Pydantic support in step and function output ([docs](/docs/reference/python/guides/pydantic))
- Python 3.13 support
- Function singletons ([docs](/docs/guides/singleton))
- Function timeouts ([docs](/docs/features/inngest-functions/cancellation/cancel-on-timeouts))
- Experimental step.infer ([docs](/docs/features/inngest-functions/steps-workflows/step-ai-orchestration))
- Improved parallel step performance
## Breaking changes
### Move `step` into `ctx`
The `step` object will be moved to `ctx.step`.
Before:
```py
@inngest_client.create_function(
fn_id="provision-user",
trigger=inngest.TriggerEvent(event="user.signup"),
)
async def fn(ctx: inngest.Context, step: inngest.Step) -> None:
await step.run("create-user", create_db_user)
```
After:
```py
@inngest_client.create_function(
fn_id="provision-user",
trigger=inngest.TriggerEvent(event="user.signup"),
)
async def fn(ctx: inngest.Context) -> None:
await ctx.step.run("create-user", create_db_user)
```
### Parallel steps
`step.parallel` will be removed in favor of a new `ctx.group.parallel` method. This method will behave the same way, so it's a drop-in replacement for `step.parallel`.
```py
@client.create_function(
fn_id="my-fn",
trigger=inngest.TriggerEvent(event="my-event"),
)
async def fn(
ctx: inngest.Context,
step: inngest.Step,
) -> None:
user_id = ctx.event.data["user_id"]
await ctx.group.parallel(
(
lambda: step.run("update-user", update_user, user_id),
lambda: step.run("send-email", send_email, user_id),
)
)
```
### Remove `event.user`
We're sunsetting `event.user`. It's already incompatible with some features (e.g. function run replay).
### Disallow mixed async-ness within Inngest functions
Setting an async `on_failure` on a non-async Inngest function will throw an error:
```py
async def on_failure(ctx: inngest.Context) -> None:
pass
@client.create_function(
fn_id="foo",
trigger=inngest.TriggerEvent(event="foo"),
on_failure=on_failure,
)
def fn(ctx: inngest.ContextSync) -> None:
pass
```
Setting a non-async `on_failure` on an async Inngest function will throw an error:
```py
def on_failure(ctx: inngest.ContextSync) -> None:
pass
@client.create_function(
fn_id="foo",
trigger=inngest.TriggerEvent(event="foo"),
on_failure=on_failure,
)
async def fn(ctx: inngest.Context) -> None:
pass
```
### Static error when passing a non-async callback to an async `step.run`
When passing a non-async callback to an async `step.run`, it will work at runtime but there will be a static type error.
```py
@client.create_function(
fn_id="foo",
trigger=inngest.TriggerEvent(event="foo"),
)
async def fn(ctx: inngest.Context) -> None:
# Type error because `lambda: "hello"` is non-async.
msg = await step.run("step", lambda: "hello")
# Runtime value is "hello", as expected.
print(msg)
```
### `inngest.Function` is generic
The `inngest.Function` class is now a generic that represents the return type. So if an Inngest function returns `str` then it would be `inngest.Function[str]`.
### Middleware order
Use LIFO for the "after" hooks. In other words, when multiple middleware is specified then the "after" hooks are run in reverse order.
For example, let's say the following middleware is defined and used:
```py
class A(inngest.MiddlewareSync):
def before_execution(self) -> None:
# ...
def after_execution(self) -> None:
# ...
class B(inngest.MiddlewareSync):
def before_execution(self) -> None:
# ...
def after_execution(self) -> None:
# ...
inngest.Inngest(
app_id="my-app",
middleware=[A, B],
)
```
The middleware will be executed in the following order for each hook:
- `before_execution` -- `A` then `B`.
- `after_execution` -- `B` then `A`.
The "before" hooks are:
```
before_execution
before_response
before_send_events
transform_input
```
The "after" hooks are:
```
after_execution
after_send_events
transform_output
```
### Remove middleware hooks
- `before_memoization`
- `after_memoization`
### Remove experimental stuff
- `inngest.experimental.encryption_middleware` (it's now the [inngest-encryption](https://pypi.org/project/inngest-encryption/) package).
- `experimental_execution` option on functions. We won't support native `asyncio` methods (e.g. `asyncio.gather`) going forward.
### Dependencies
Drop support for Python `3.9`.
Bump dependency minimum versions:
```
httpx>=0.26.0
pydantic>=2.11.0
typing-extensions>=4.13.0
```
Bump peer dependency minimum versions:
```
Django>=5.0
Flask>=3.0.0
fastapi>=0.110.0
tornado>=6.4
```
# Environment variables
Source: https://www.inngest.com/docs/reference/python/overview/env-vars
You can use environment variables to control some configuration.
---
## `INNGEST_API_BASE_URL`
Origin for the Inngest API. Your app registers itself with this API.
- Defaults to `https://api.inngest.com/`.
- Can be overwritten by specifying `api_base_url` when calling a `serve` function.
You likely won't need to set this.
---
## `INNGEST_DEV`
- Set to `1` to disable [production mode](/docs/reference/python/overview/prod-mode).
- Set to a URL if the Dev Server is not hosted at `http://localhost:8288`. For example, you may need to set it to `http://host.docker.internal:8288` when running the Dev Server within a Docker container (learn more in our [Docker guide](/docs/guides/development-with-docker)). Please note that URLs are not supported below version `0.4.6`.
---
## `INNGEST_ENV`
Use this to tell Inngest which [branch environment](/docs/platform/environments#branch-environments) you want to send and receive events from.
Can be overwritten by manually specifying `env` on the Inngest client.
This is detected and set automatically for some platforms, but others will need manual action. See our [configuring branch environments](/docs/platform/environments#configuring-branch-environments) guide to check if you need this.
---
## `INNGEST_EVENT_API_BASE_URL`
Origin for the Inngest Event API. The Inngest client sends events to this API.
- Defaults to `https://inn.gs/`.
- If set, it should be an origin (protocol, host, and optional port). For example, `http://localhost:8288` or `https://my.tunnel.com` are both valid.
- Can be overwritten by specifying `base_url` when creating the Inngest client.
You likely won't need to set this. But some use cases include:
- Forcing a production build of your app to use the Inngest Dev Server instead of Inngest Cloud for local integration testing. You might want `http://localhost:8288` for that.
- Using the Dev Server within a Docker container. You might want `http://host.docker.internal:8288` for that. Learn more in our [Docker guide](/docs/guides/development-with-docker).
---
## `INNGEST_EVENT_KEY`
The secret key used to send events to Inngest.
- Can be overwritten by specifying `event_key` when creating the Inngest client.
- Not needed when using the Dev Server.
---
## `INNGEST_SIGNING_KEY`
The secret key used to sign requests to and from Inngest, mitigating the risk of man-in-the-middle attacks.
- Can be overwritten by specifying `signing_key` when calling a `serve` function.
- Not needed when using the Dev Server.
---
## `INNGEST_SIGNING_KEY_FALLBACK`
Only used during signing key rotation. When it's specified, the SDK will automatically retry signing key auth failures with the fallback key.
Available in version `0.3.9` and above.
# Production mode
Source: https://www.inngest.com/docs/reference/python/overview/prod-mode
When the SDK is in production mode it will try to connect to Inngest Cloud instead of the Inngest Dev Server. Production mode is opt-out for security reasons.
## How to opt-out
You'll want to disable production mode whenever you're using the Inngest Dev Server. This is typically during local development and CI. Production mode can be disabled in 2 ways:
1. Set the `INNGEST_DEV` environment variable to `1`.
2. Set the `Inngest`'s `is_production` constructor argument to `false`.
Using the `INNGEST_DEV` environment variable is the recommended way to disable production mode. But make sure that it isn't set in production!
`Inngest`'s `is_production` constructor argument is useful for disabling production mode based on whatever logic you want. For example, you could control it using the `FLASK_ENV` environment variable:
```py
import inngest
inngest.Inngest(
app_id="my_flask_app",
is_production=os.environ.get("FLASK_ENV") == "production",
)
```
# Invoke
Source: https://www.inngest.com/docs/reference/python/steps/invoke
Calls another Inngest function, waits for its completion, and returns its output.
## Arguments
Step ID. Should be unique within the function.
Invoked function.
JSON-serializable data that will be passed to the invoked function as `event.data`.
JSON-serializable data that will be passed to the invoked function as `event.user`.
## Examples
```py
@inngest_client.create_function(
fn_id="fn-1",
trigger=inngest.TriggerEvent(event="app/fn-1"),
)
async def fn_1(ctx: inngest.Context) -> None:
return "Hello!"
@inngest_client.create_function(
fn_id="fn-2",
trigger=inngest.TriggerEvent(event="app/fn-2"),
)
async def fn_2(ctx: inngest.Context) -> None:
output = await ctx.step.invoke(
"invoke",
function=fn_1,
)
# Prints "Hello!"
print(output)
```
💡 `step.invoke` works within a single app or across apps, since the app ID is built into the function object.
# Invoke by ID
Source: https://www.inngest.com/docs/reference/python/steps/invoke_by_id
Calls another Inngest function, waits for its completion, and returns its output.
This method behaves identically to the [invoke](/docs/reference/python/steps/invoke) step method, but accepts an ID instead of the function object. This can be useful for a few reasons:
- Trigger a function whose code is in a different codebase.
- Avoid circular dependencies.
- Avoid undesired transitive imports.
## Arguments
Step ID. Should be unique within the function.
App ID of the invoked function.
ID of the invoked function.
JSON-serializable data that will be passed to the invoked function as `event.data`.
JSON-serializable data that will be passed to the invoked function as `event.user`.
## Examples
### Within the same app
```py
@inngest_client.create_function(
fn_id="fn-1",
trigger=inngest.TriggerEvent(event="app/fn-1"),
)
async def fn_1(ctx: inngest.Context) -> str:
return "Hello!"
@inngest_client.create_function(
fn_id="fn-2",
trigger=inngest.TriggerEvent(event="app/fn-2"),
)
async def fn_2(ctx: inngest.Context) -> None:
output = ctx.step.invoke_by_id(
"invoke",
function_id="fn-1",
)
# Prints "Hello!"
print(output)
```
### Across apps
```py
inngest_client_1 = inngest.Inngest(app_id="app-1")
inngest_client_2 = inngest.Inngest(app_id="app-2")
@inngest_client_1.create_function(
fn_id="fn-1",
trigger=inngest.TriggerEvent(event="app/fn-1"),
)
async def fn_1(ctx: inngest.Context) -> str:
return "Hello!"
@inngest_client_2.create_function(
fn_id="fn-2",
trigger=inngest.TriggerEvent(event="app/fn-2"),
)
async def fn_2(ctx: inngest.Context) -> None:
output = ctx.step.invoke_by_id(
"invoke",
app_id="app-1",
function_id="fn-1",
)
# Prints "Hello!"
print(output)
```
# Parallel
Source: https://www.inngest.com/docs/reference/python/steps/parallel
Run steps in parallel. Returns the parallel steps' result as a tuple.
## Arguments
Accepts a tuple of callables. Each callable has no arguments and returns a JSON serializable value. Typically this is just a `lambda` around a `step` method.
## Examples
Running two steps in parallel:
```py
@inngest_client.create_function(
fn_id="my-function",
trigger=inngest.TriggerEvent(event="my-event"),
)
async def fn(ctx: inngest.Context) -> None:
user_id = ctx.event.data["user_id"]
(updated_user, sent_email) = await ctx.group.parallel(
(
lambda: ctx.step.run("update-user", update_user, user_id),
lambda: ctx.step.run("send-email", send_email, user_id),
)
)
```
Dynamically building a tuple of parallel steps:
```py
@client.create_function(
fn_id="my-function",
trigger=inngest.TriggerEvent(event="my-event"),
)
async def fn(ctx: inngest.Context) -> None:
parallel_steps = tuple[typing.Callable[[], typing.Awaitable[bool]]]()
for user_id in ctx.event.data["user_ids"]:
parallel_steps += tuple(
[
functools.partial(
ctx.step.run,
f"get-user-{user_id}",
functools.partial(update_user, user_id),
)
]
)
updated_users = await ctx.group.parallel(parallel_steps)
```
⚠️ Use `functools.partial` instead of `lambda` when building the tuple in a loop. If `lambda` is used, then the step functions will use the last value of the loop variable. This is due to Python's lack of block scoping.
## Frequently Asked Questions
### Do parallel steps work if I don't use `async` functions?
Yes, parallel steps work with both `async` and non-`async` functions. Since our execution model uses a separate HTTP request for each step, threaded HTTP frameworks (for example, Flask) will create a separate thread for each step.
### Can I use `asyncio.gather` instead of `step.parallel`?
No, `asyncio.gather` will not work as expected. Inngest's execution model necessitates a control flow interruption when it encounters a `step` method, but currently that does not work with `asyncio.gather`.
### Why does `step.parallel` accept a tuple instead of variadic arguments?
To properly type-annotate `step.parallel`, the return types of the callables need to be statically "extracted". Python's type-checkers are better at doing this with tuples than with variadic arguments. Mypy still struggles even with tuples, but Pyright is able to properly infer the `step.parallel` return type.
# Run
Source: https://www.inngest.com/docs/reference/python/steps/run
Turn a normal function into a durable function. Any function passed to `step.run` will be executed in a durable way, including retries and memoization.
## Arguments
Step ID. Should be unique within the function.
A callable that has no arguments and returns a JSON serializable value.
Positional arguments for the handler. This is type-safe since we infer the types from the handler using generics.
## Examples
```py
@inngest_client.create_function(
fn_id="my_function",
trigger=inngest.TriggerEvent(event="app/my_function"),
)
async def fn(ctx: inngest.Context) -> None:
# Pass a function to step.run
await ctx.step.run("my_fn", my_fn)
# Args are passed after the function
await ctx.step.run("my_fn_with_args", my_fn_with_args, 1, "a")
# Kwargs require functools.partial
await ctx.step.run(
"my_fn_with_args_and_kwargs",
functools.partial(my_fn_with_args_and_kwargs, 1, b="a"),
)
# Defining functions like this gives you easy access to scoped variables
def use_scoped_variable() -> None:
print(ctx.event.data["user_id"])
await ctx.step.run("use_scoped_variable", use_scoped_variable)
async def my_fn() -> None:
pass
async def my_fn_with_args(a: int, b: str) -> None:
pass
async def my_fn_with_args_and_kwargs(a: int, *, b: str) -> None:
pass
```
# Send event
Source: https://www.inngest.com/docs/reference/python/steps/send-event
💡️ This guide is for sending events from *inside* an Inngest function. To send events outside an Inngest function, refer to the [client event sending](/docs/reference/python/client/send) guide.
Sends 1 or more events to the Inngest server. Returns a list of the event IDs.
## Arguments
Step ID. Should be unique within the function.
1 or more events to send.
Any data to associate with the event.
A unique ID used to idempotently trigger function runs. If duplicate event IDs are seen, only the first event will trigger function runs.
The event name. We recommend using lowercase dot notation for names (e.g. `app/user.created`)
A timestamp integer representing the time (in milliseconds) at which the event occurred. Defaults to the time the Inngest receives the event.
If the `ts` time is in the future, function runs will be scheduled to start at the given time. This has the same effect as sleeping at the start of the function.
Note: This does not apply to functions waiting for events. Functions waiting for events will immediately resume, regardless of the timestamp.
## Examples
```py
@inngest_client.create_function(
fn_id="my_function",
trigger=inngest.TriggerEvent(event="app/my_function"),
)
async def fn(ctx: inngest.Context) -> list[str]:
return await ctx.step.send_event("send", inngest.Event(name="foo"))
```
# Sleep until
Source: https://www.inngest.com/docs/reference/python/steps/sleep-until
Sleep until a specific time. Accepts a `datetime.datetime` object.
## Arguments
Step ID. Should be unique within the function.
Time to sleep until.
## Examples
```py
@inngest_client.create_function(
fn_id="my_function",
trigger=inngest.TriggerEvent(event="app/my_function"),
)
async def fn(ctx: inngest.Context) -> None:
await ctx.step.sleep_until(
"zzz",
datetime.datetime.now() + datetime.timedelta(seconds=2),
)
```
# Sleep
Source: https://www.inngest.com/docs/reference/python/steps/sleep
Sleep for a period of time. Accepts either a `datetime.timedelta` object or a number of milliseconds.
## Arguments
Step ID. Should be unique within the function.
How long to sleep. Can be either a number of milliseconds or a `datetime.timedelta` object.
## Examples
```py
@inngest_client.create_function(
fn_id="my_function",
trigger=inngest.TriggerEvent(event="app/my_function"),
)
async def fn(ctx: inngest.Context) -> None:
await ctx.step.sleep("zzz", datetime.timedelta(seconds=2))
```
# Wait for event
Source: https://www.inngest.com/docs/reference/python/steps/wait-for-event
Wait until the Inngest server receives a specific event.
If an event is received before the timeout then the event is returned. If the timeout is reached then `None` is returned.
## Arguments
Step ID. Should be unique within the function.
Name of the event to wait for.
Only match events that match this CEL expression. For example, `"event.data.height == async.data.height"` will only match incoming events whose `data.height` matches the `data.height` value for the trigger event.
In milliseconds.
## Examples
```py
@inngest_client.create_function(
fn_id="my_function",
trigger=inngest.TriggerEvent(event="app/my_function"),
)
async def fn(ctx: inngest.Context) -> None:
res = await ctx.step.wait_for_event(
"wait",
event="app/wait_for_event.fulfill",
timeout=datetime.timedelta(seconds=2),
)
```
# REST API
Source: https://www.inngest.com/docs/reference/rest-api/index
You can view our REST API docs at our API reference portal: [https://api-docs.inngest.com/docs/inngest-api](https://api-docs.inngest.com/docs/inngest-api).
# Serve
Source: https://www.inngest.com/docs/reference/serve/index
The `serve()` API handler is used to serve your application's [functions](/docs/reference/functions/create) via HTTP. This handler enables Inngest to remotely and securely read your functions' configuration and invoke your function code. This enables you to host your function code on any platform.
```ts {{ title: "v3" }}
// or your preferred framework
import {
importProductImages,
sendSignupEmail,
summarizeText,
} from "./functions";
serve({
client: inngest,
functions: [sendSignupEmail, summarizeText, importProductImages],
});
```
```ts {{ title: "v2" }}
// or your preferred framework
import {
importProductImages,
sendSignupEmail,
summarizeText,
} from "./functions";
serve(inngest, [sendSignupEmail, summarizeText, importProductImages]);
```
`serve` handlers are imported from convenient framework-specific packages like `"inngest/next"`, `"inngest/express"`, or `"inngest/lambda"`. [Click here for a full list of officially supported frameworks](/docs/learn/serving-inngest-functions). For any framework that is not support, you can [create a custom handler](#custom-frameworks).
---
## `serve(options)`
An Inngest client ([reference](/docs/reference/client/create)).
An array of Inngest functions defined using `inngest.createFunction()` ([reference](/docs/reference/functions/create)).
The Inngest [Signing Key](/docs/platform/signing-keys) for your [selected environment](/docs/platform/environments). We recommend setting the [`INNGEST_SIGNING_KEY`](/docs/sdk/environment-variables#inngest-signing-key) environment variable instead of passing the `signingKey` option. You can find this in [the Inngest dashboard](https://app.inngest.com/env/production/manage/signing-key).
The domain host of your application, _including_ protocol, e.g. `https://myapp.com`. The SDK attempts to infer this via HTTP headers at runtime, but this may be required when using platforms like AWS Lambda or when using a reverse proxy. See also [`INNGEST_SERVE_HOST`](/docs/sdk/environment-variables#inngest-serve-host).
The path where your `serve` handler is hosted. The SDK attempts to infer this via HTTP headers at runtime. We recommend `/api/inngest`. See also [`INNGEST_SERVE_PATH`](/docs/sdk/environment-variables#inngest-serve-path).
Enables streaming responses back to Inngest which can enable maximum serverless function timeouts. See [reference](/docs/streaming) for more information on the configuration. See also [`INNGEST_SERVE_HOST`](/docs/sdk/environment-variables#inngest-serve-host).
The minimum level to log from the Inngest serve endpoint. Defaults to `"info"`. See also [`INNGEST_LOG_LEVEL`](/docs/sdk/environment-variables#inngest-log-level).
The URL used to communicate with Inngest. This can be useful in testing environments when using the Inngest Dev Server. Defaults to: `"https://api.inngest.com/"`. See also [`INNGEST_BASE_URL`](/docs/sdk/environment-variables#inngest-base-url).
Override the default [`fetch`](https://developer.mozilla.org/en-US/docs/Web/API/Fetch_API) implementation. Defaults to the runtime's native Fetch API.
The ID to use to represent this application instead of the client's ID. Useful for creating many Inngest endpoints in a single application.
We always recommend setting the [`INNGEST_SIGNING_KEY`](/docs/sdk/environment-variables#inngest-signing-key) over using the `signingKey` option. As with any secret, it's not a good practice to hard-code the signing key in your codebase.
## How the `serve` API handler works
The API works by exposing a single endpoint at `/api/inngest` which handles different actions utilizing HTTP request methods:
- `GET`: Return function metadata and render a debug page in in **development only**. See [`landingPage`](#landingPage).
- `POST`: Invoke functions with the request body as incoming function state.
- `PUT`: Trigger the SDK to register all functions with Inngest using the signing key.
# `inngest/function.cancelled` {{ className: "not-prose" }}
Source: https://www.inngest.com/docs/reference/system-events/inngest-function-cancelled
The `inngest/function.cancelled` event is sent whenever any single function is cancelled in your [Inngest environment](/docs/platform/environments). The event will be sent if the event is cancelled via [`cancelOn` event](/docs/features/inngest-functions/cancellation/cancel-on-events), [function timeouts](/docs/features/inngest-functions/cancellation/cancel-on-timeouts), [REST API](/docs/guides/cancel-running-functions) or [bulk cancellation](/docs/platform/manage/bulk-cancellation).
This event can be used to handle cleanup or similar for a single function or handle some sort of tracking function cancellations in some external system like Datadog.
You can write a function that uses the `"inngest/function.cancelled"` event with the optional `if` parameter to filter to specifically handle a single function by `function_id`.
## The event payload
The `inngest/` event prefix is reserved for system events in each environment.
The event payload data.
Data about the error payload as returned from the cancelled function.
The cancellation error, always `"function cancelled"`
The name of the error, defaulting to `"Error"`.
The cancelled function's original event payload.
The cancelled function's [`id`](/docs/reference/functions/create#configuration).
The cancelled function's [run ID](/docs/reference/functions/create#run-id).
The timestamp integer in milliseconds at which the cancellation occurred.
```json {{ title: "Example payload" }}
{
"name": "inngest/function.cancelled",
"data": {
"error": {
"error": "function cancelled",
"message": "function cancelled",
"name": "Error"
},
"event": {
"data": {
"content": "Yost LLC explicabo eos",
"transcript": "s3://product-ideas/carber-vac-release.txt",
"userId": "bdce1b1b-6e3a-43e6-84c2-2deb559cdde6"
},
"id": "01JDJK451Y9KFGE5TTM2FHDEDN",
"name": "integrations/export.requested",
"ts": 1732558407003,
"user": {}
},
"events": [
{
"data": {
"content": "Yost LLC explicabo eos",
"transcript": "s3://product-ideas/carber-vac-release.txt",
"userId": "bdce1b1b-6e3a-43e6-84c2-2deb559cdde6"
},
"id": "01JDJK451Y9KFGE5TTM2FHDEDN",
"name": "integrations/export.requested",
"ts": 1732558407003
}
],
"function_id": "demo-app-export",
"run_id": "01JDJKGTGDVV4DTXHY6XYB7BKK"
},
"id": "01JDJKH1S5P2YER8PKXPZJ1YZJ",
"ts": 1732570023717
}
```
## Related resources
* [Example: Cleanup after function cancellation](/docs/examples/cleanup-after-function-cancellation)
# `inngest/function.failed` {{ className: "not-prose" }}
Source: https://www.inngest.com/docs/reference/system-events/inngest-function-failed
The `inngest/function.failed` event is sent whenever any single function fails in your [Inngest environment](/docs/platform/environments).
This event can be used to track all function failures in a single place, enabling you to send metrics, alerts, or events to [external systems like Datadog or Sentry](/docs/examples/track-failures-in-datadog) for all of your Inngest functions.
Our SDKs offer shorthand ["on failure"](#related-resources) handler options that can be used to handle this event for a specific function.
## The event payload
The `inngest/` event prefix is reserved for system events in each environment.
The event payload data.
Data about the error payload as returned from the failed function.
The error message when an error is caught.
The name of the error, defaulting to "Error" if unspecified.
The stack trace of the error, if supported by the language SDK.
The failed function's original event payload.
The failed function's [`id`](/docs/reference/functions/create#configuration).
The failed function's [run ID](/docs/reference/functions/create#run-id).
The timestamp integer in milliseconds at which the failure occurred.
```json {{ title: "Example payload" }}
{
"name": "inngest/function.failed",
"data": {
"error": {
"__serialized": true,
"error": "invalid status code: 500",
"message": "taylor@ok.com is already a list member. Use PUT to insert or update list members.",
"name": "Error",
"stack": "Error: taylor@ok.com is already a list member. Use PUT to insert or update list members.\n at /var/task/.next/server/pages/api/inngest.js:2430:23\n at process.processTicksAndRejections (node:internal/process/task_queues:95:5)\n at async InngestFunction.runFn (/var/task/node_modules/.pnpm/inngest@2.6.0_typescript@5.1.6/node_modules/inngest/components/InngestFunction.js:378:32)\n at async InngestCommHandler.runStep (/var/task/node_modules/.pnpm/inngest@2.6.0_typescript@5.1.6/node_modules/inngest/components/InngestCommHandler.js:459:25)\n at async InngestCommHandler.handleAction (/var/task/node_modules/.pnpm/inngest@2.6.0_typescript@5.1.6/node_modules/inngest/components/InngestCommHandler.js:359:33)\n at async ServerTiming.wrap (/var/task/node_modules/.pnpm/inngest@2.6.0_typescript@5.1.6/node_modules/inngest/helpers/ServerTiming.js:69:21)\n at async ServerTiming.wrap (/var/task/node_modules/.pnpm/inngest@2.6.0_typescript@5.1.6/node_modules/inngest/helpers/ServerTiming.js:69:21)"
},
"event": {
"data": { "billingPlan": "pro" },
"id": "01H0TPSHZTVFF6SFVTR6E25MTC",
"name": "user.signup",
"ts": 1684523501562,
"user": { "external_id": "6463da8211cdbbcb191dd7da" }
},
"function_id": "my-gcp-cloud-functions-app-hello-inngest",
"run_id": "01H0TPSJ576QY54R6JJ8MEX6JH"
},
"id": "01H0TPW7KB4KCR739TG2J3FTHT",
"ts": 1684523589227
}
```
## Related resources
* [TypeScript SDK: onFailure handler](/docs/reference/functions/handling-failures)
* [Python SDK: on_failure handler](/docs/reference/python/functions/create#on_failure)
* [Example: Track all function failures in Datadog](/docs/examples/track-failures-in-datadog)
# Testing
Source: https://www.inngest.com/docs/reference/testing/index
To test your Inngest functions programmatically, use the `@inngest/test`
library, available on [npm](https://www.npmjs.com/package/@inngest/test) and [JSR](https://jsr.io/@inngest/test).
This allows you to mock function state, step tooling, and inputs with a
Jest-compatible API supporting all major testing frameworks, runtimes, and
libraries:
- `jest`
- `vitest`
- `bun:test` (Bun)
- `@std/expect` (Deno)
- `chai`/`expect`
## Installation
The `@inngest/test` package requires `inngest@>=3.22.12`.
```shell {{ title: "npm" }}
npm install -D @inngest/test
```
```shell {{ title: "Yarn" }}
yarn add -D @inngest/test
```
```shell {{ title: "pnpm" }}
pnpm add -D @inngest/test
```
```shell {{ title: "Bun" }}
bun add -d @inngest/test
```
```shell {{ title: "Deno" }}
deno add --dev @inngest/test
# or with JSR...
deno add --dev jsr:@inngest/test
```
## Unit tests
Use whichever supported testing framework; `@inngest/test` is unopinionated
about how your tests are run. We'll demonstrate here using `jest`.
Import `InngestTestEngine`, our function to test, and create a new
`InngestTestEngine` instance.
```ts
describe("helloWorld function", () => {
new InngestTestEngine({
function: helloWorld,
});
});
```
Now we can use the primary API for testing, `t.execute()`:
```ts
test("returns a greeting", async () => {
await t.execute();
expect(result).toEqual("Hello World!");
});
```
This will run the entire function (steps and all) to completion, then return the
response from the function, where we assert that it was the string `"Hello
World!"`.
A serialized `error` will be returned instead of `result` if the function threw:
```ts
test("throws an error", async () => {
await t.execute();
expect(error).toContain("Some specific error");
});
```
When using steps that delay execution, like `step.sleep` or `step.waitForEvent`, you will need to mock them. [Learn more about mocking steps](#steps).
### Running an individual step
`t.executeStep()` can be used to run the function until a particular step has
been executed.
This is useful to test a single step within a function or to see that a
non-runnable step such as `step.waitForEvent()` has been registered with the
correct options.
```ts
test("runs the price calculations", async () => {
await t.executeStep("calculate-price");
expect(result).toEqual(123);
});
```
Assertions can also be made on steps in any part of a run, regardless of if
that's the checkpoint we've waited for. See [Assertions -> State](#assertions).
### Assertions
`@inngest/test` adds Jest-compatible mocks by default that can help you assert
function and step input and output. You can assert:
- Function input
- Function output
- Step output
- Step tool usage
All of these values are returned from both `t.execute()` and `t.executeStep()`;
we'll only show one for simplicity here.
The `result` is returned, which is the output of the run or step:
```ts
await t.execute();
expect(result).toEqual("Hello World!");
```
`ctx` is the input used for the function run. This can be used to assert outputs
that are based on input data such as `event` or `runId`, or to confirm that
middleware is working correctly and affecting input arguments.
```ts
await t.execute();
expect(result).toEqual(`Run ID was: "${ctx.runId}"`);
```
The step tooling at `ctx.step` are all Jest-compatible spy functions, so you can
use them to assert that they've been called and used correctly:
```ts
await t.execute();
expect(ctx.step.run).toHaveBeenCalledWith("my-step", expect.any(Function));
```
`state` is also returned, which is a view into the outputs of all steps in the
run. This allows you to test each individual step output for any given input:
```ts
await t.execute();
expect(state["my-step"]).resolves.toEqual("some successful output");
expect(state["dangerous-step"]).rejects.toThrowError("something failed");
```
### Mocking
Some mocking is done automatically by `@inngest/test`, but can be overwritten if
needed.
All mocks detailed below can be specified either when creating an
`InngestTestEngine` instance or for each individual execution:
```ts
// Set the events for every execution
new InngestTestEngine({
function: helloWorld,
// mocks here
});
// Or for just one, which will overwrite any current event mocks
t.execute({
// mocks here
});
t.executeStep("my-step", {
// mocks here
})
```
You can also clone an existing `InngestTestEngine` instance to encourage re-use
of complex mocks:
```ts
// Make a direct clone, which includes any mocks
t.clone();
// Provide some more mocks in addition to any existing ones
t.clone({
// mocks here
});
```
For simplicity, the following examples will show usage of `t.execute()`, but the
mocks can be placed in any of these locations.
#### Events
The incoming event data can be mocked. They are always specified as an array of
events to allow also mocking batches.
```ts
t.execute({
events: [{ name: "demo/event.sent", data: { message: "Hi!" } }],
});
```
If no event mocks are given at all (or `events: undefined` is explicitly set),
an `inngest/function.invoked` event will be mocked for you.
#### Steps
Mocking steps can help you model different paths and situations within your
function. To do so, any step can be mocked by providing the `steps` option. You should always mock `sleep` and `waitForEvent` steps - [learn more here](#sleep-and-wait-for-event).
Here we mock two steps, one that will run successfully and another that will
model a failure and throw an error:
```ts
t.execute({
steps: [
{
id: "successful-step",
handler() {
return "We did it!";
},
},
{
id: "dangerous-step",
handler() {
throw new Error("Oh no!");
},
},
],
});
```
These handlers will run lazily when they are found during a function's execution.
This means you can write complex mocks that respond to other information:
```ts
let message = "";
t.execute({
steps: [
{
id: "build-greeting",
handler() {
message = "Hello, ";
return message;
},
},
{
id: "build-name",
handler() {
return message + " World!";
},
},
],
});
```
#### Sleep and waitForEvent
Steps that pause the function, `step.sleep`, `step.sleepUntil`, and `step.waitForEvent` should always be mocked.
```ts {{ title: 'step.sleep' }}
// Given the following function that sleeps
inngest.createFunction(
{ id: "my-function" },
{ event: "user.created" },
async ({ event, step }) => {
await step.sleep("one-day-delay", "1d");
return { message: "success" };
}
)
// Mock the step to execute a no-op handler to return immediately
t.execute({
steps: [
{
id: "one-day-delay",
handler() {}, // no return value necessary
},
],
});
```
```ts {{ title: "step.waitForEvent" }}
// Given the following function that sleeps
inngest.createFunction(
{ id: "my-function" },
{ event: "time_off.requested" },
async ({ event, step }) => {
await step.waitForEvent("wait-for-approval", {
event: "manager.approved",
timeout: "1d",
});
return { message: evt?.data.message };
}
)
// Mock the step to return null to simulate a timeout
t.execute({
steps: [
{
id: "wait-for-approval",
handler() {
// A timeout will return null
return null;
},
},
],
});
// Mock the step to return an event
t.execute({
steps: [
{
id: "wait-for-approval",
handler() {
// If the event is approved, it will be returned
return {
name: 'manager.approved',
data: {
message: 'This looks great!'
}
};
},
},
],
});
```
#### Modules and imports
Any mocking of modules or imports outside of Inngest which your functions may
rely on should be done outside of Inngest with the testing framework you're
using.
Here are some links to the major supported frameworks and their guidance for
mocking imports:
- [`jest`](https://jestjs.io/docs/mock-functions#mocking-modules)
- [`vitest`](https://vitest.dev/guide/mocking#modules)
- [`bun:test` (Bun)](https://bun.sh/docs/test/mocks#module-mocks-with-mock-module)
- [`@std/testing` (Deno)](https://jsr.io/@std/testing/doc/mock/~)
#### Custom
You can also provide your own custom mocks for the function input.
When instantiating a new `InngestTestEngine` or starting an execution, provide a
`transformCtx` function that will add these mocks every time the function is
run:
```ts
new InngestTestEngine({
function: helloWorld,
transformCtx: (ctx) => {
return {
...ctx,
event: someCustomThing,
};
},
});
```
If you wish to still add the automatic mocking from `@inngest/test` (such as the
spies on `ctx.step.*`), you can import and use the automatic transforms as part
of your own:
```ts
new InngestTestEngine({
function: helloWorld,
transformCtx: (ctx) => {
return {
...mockCtx(ctx),
event: someCustomThing,
};
},
});
```
# Cancel on
Source: https://www.inngest.com/docs/reference/typescript/functions/cancel-on
Stop the execution of a running function when a specific event is received using `cancelOn`.
```ts
inngest.createFunction(
{
id: "sync-contacts",
cancelOn: [
{
event: "app/user.deleted",
// ensure the async (future) event's userId matches the trigger userId
if: "async.data.userId == event.data.userId",
},
],
}
// ...
);
```
Using `cancelOn` is very useful for handling scenarios where a long-running function should be terminated early due to changes elsewhere in your system.
The API for this is similar to the [`step.waitForEvent()`](/docs/guides/multi-step-functions#wait-for-event) tool, allowing you to specify the incoming event and different methods for matching pieces of data within.
---
## How to use `cancelOn`
The most common use case for cancellation is to cancel a function's execution if a specific field in the incoming event matches the same field in the triggering event. For example, you might want to cancel a sync event for a user if that user is deleted. For this, you need to specify a `match` [expression](/docs/guides/writing-expressions). Let's look at an example function and two events.
This function specifies it will `cancelOn` the `"app/user.deleted"` event only when it and the original `"app/user.created"` event have the same `data.userId` value:
```ts
inngest.createFunction(
{
id: "sync-contacts",
cancelOn: [
{
event: "app/user.deleted",
// ensure the async (future) event's userId matches the trigger userId
if: "async.data.userId == event.data.userId",
},
],
},
{ event: "app/user.created" },
// ...
);
```
For the given function, this is an example of an event that would trigger the function:
```json
{
"name": "app/user.created",
"data": {
"userId": "123",
"name": "John Doe"
}
}
```
And this is an example of an event that would cancel the function as it and the original event have the same `data.userId` value of `"123"`:
```json
{
"name": "app/user.deleted",
"data": {
"userId": "123"
}
}
```
Match expressions can be simple equalities or be more complex. Read [our guide to writing expressions](/docs/guides/writing-expressions) for more info.
Functions are cancelled _between steps_, meaning that if there is a `step.run` currently executing, it will finish before the function is cancelled.
Inngest does this to ensure that steps are treated like atomic operations and each step either completes or does not run at all.
## Configuration
Define events that can be used to cancel a running or sleeping function
The event name which will be used to cancel
The property to match the event trigger and the cancelling event, using dot-notation, for example, `data.userId`. Read [our guide to writing expressions](/docs/guides/writing-expressions) for more info.
An expression on which to conditionally match the original event trigger (`event`) and the wait event (`async`). Cannot be combined with `match`.
Expressions are defined using the Common Expression Language (CEL) with the events accessible using dot-notation. Read our [guide to writing expressions](/docs/guides/writing-expressions) for more info. Examples:
* `event.data.userId == async.data.userId && async.data.billing_plan == 'pro'`
The amount of time to wait to receive the cancelling event. A time string compatible with the [ms](https://npm.im/ms) package, e.g. `"30m"`, `"3 hours"`, or `"2.5d"`
## Examples
### With a timeout window
Cancel a function's execution if a matching event is received within a given amount of time from the function being triggered.
```ts {{ title: "v3" }}
inngest.createFunction(
{
id: "sync-contacts",
cancelOn: [{ event: "app/user.deleted", match: "data.userId", timeout: "1h" }],
}
// ...
);
```
```ts {{ title: "v2" }}
inngest.createFunction(
{
name: "Sync contacts",
cancelOn: [{ event: "app/user.deleted", match: "data.userId", timeout: "1h" }],
}
// ...
);
```
This is useful when you want to limit the time window for cancellation, ensuring that the function will continue to execute if no matching event is received within the specified time frame.
# TypeScript SDK
Source: https://www.inngest.com/docs/reference/typescript/index
## Installing
```shell {{ title: "npm" }}
npm install inngest
```
```shell {{ title: "pnpm" }}
pnpm add inngest
```
```shell {{ title: "yarn" }}
yarn add inngest
```
## Source code
Our TypeScript SDK and its related packages are open source and available on Github: [ inngest/inngest-js](https://github.com/inngest/inngest-js).
## Supported Versions
All versions `>=v0.5.0` (released [October 5th 2022](https://github.com/inngest/inngest-js/releases/tag/v0.5.0)) are supported.
If you'd like to upgrade, see the [migration guide](/docs/sdk/migration).
## Official libraries
- [inngest](https://www.npmjs.com/package/inngest) - the Inngest SDK
- [@inngest/eslint-plugin](https://www.npmjs.com/package/@inngest/eslint-plugin) - specific ESLint rules for Inngest
- [@inngest/middleware-encryption](https://www.npmjs.com/package/@inngest/middleware-encryption) - middleware providing E2E encryption
## Examples
### Frameworks
- [Astro](https://github.com/inngest/inngest-js/tree/main/examples/framework-astro)
- [Bun.serve()](https://github.com/inngest/inngest-js/tree/main/examples/bun)
- [Fastify](https://github.com/inngest/inngest-js/tree/main/examples/framework-fastify)
- [Koa](https://github.com/inngest/inngest-js/tree/main/examples/framework-koa)
- [NestJS](https://github.com/inngest/inngest-js/tree/main/examples/framework-nestjs)
- [Next.js (app router)](https://github.com/inngest/inngest-js/tree/main/examples/framework-nextjs-app-router)
- [Next.js (pages router)](https://github.com/inngest/inngest-js/tree/main/examples/framework-nextjs-pages-router)
- [Nuxt](https://github.com/inngest/inngest-js/tree/main/examples/framework-nuxt)
- [Remix](https://github.com/inngest/inngest-js/tree/main/examples/framework-remix)
- [SvelteKit](https://github.com/inngest/inngest-js/tree/main/examples/framework-sveltekit)
### Middleware
- [E2E Encryption](https://github.com/inngest/inngest-js/tree/main/examples/middleware-e2e-encryption)
## Community libraries
Explore our collection of community-created libraries, offering unofficial but valuable extensions and integrations to enhance Inngest's functionality with various frameworks and systems.
Want to be added to the list? [Contact us!](https://app.inngest.com/support)
- [nest-inngest](https://github.com/thawankeane/nest-inngest) - strongly typed Inngest module for NestJS projects
- [nuxt-inngest](https://www.npmjs.com/package/nuxt-inngest) - Inngest integration for Nuxt
# Creating workflow actions
Source: https://www.inngest.com/docs/reference/workflow-kit/actions
The [`@inngest/workflow-kit`](https://npmjs.com/package/@inngest/workflow-kit) package provides a [workflow engine](/docs/reference/workflow-kit/engine), enabling you to create workflow actions on the back end. These actions are later provided to the front end so end-users can build their own workflow instance using the [``](/docs/reference/workflow-kit/components-api).
Workflow actions are defined as two objects using the [`EngineAction`](#passing-actions-to-the-workflow-engine-engine-action) (for the back-end) and [`PublicEngineAction`](#passing-actions-to-the-react-components-public-engine-action) (for the front-end) types.
```ts {{ title: "src/inngest/actions-definition.ts" }}
actionsDefinition: PublicEngineAction[] = [
{
kind: "grammar_review",
name: "Perform a grammar review",
description: "Use OpenAI for grammar fixes",
},
];
```
```tsx {{ title: "src/inngest/actions.ts" }}
actions: EngineAction[] = [
{
// Add a Table of Contents
...actionsDefinition[0],
handler: async ({ event, step, workflowAction }) => {
// implementation...
}
},
];
```
In the example above, the `actionsDefinition` array would be passed via props to the [``](/docs/reference/workflow-kit/components-api) while the `actions` are passed to the [`Engine`](/docs/reference/workflow-kit/engine).
**Why do I need two types of actions?**
The actions need to be separated into 2 distinct objects to avoid leaking the action handler implementations and dependencies into the front end:
## Passing actions to the React components: `PublicEngineAction[]`
Kind is an enum representing the action's ID. This is not named as "id" so that we can keep consistency with the WorkflowAction type.
Name is the human-readable name of the action.
Description is a short description of the action.
Icon is the name of the icon to use for the action. This may be an URL, or an SVG directly.
{/*
TODO
TODO
*/}
## Passing actions to the Workflow Engine: `EngineAction[]`
**Note**: Inherits `PublicEngineAction` properties.
The handler is your code that runs whenever the action occurs. Every function handler receives a single object argument which can be deconstructed. The key arguments are `event` and `step`.
```ts {{ title: "src/inngest/actions.ts" }}
actions: EngineAction[] = [
{
// Add a Table of Contents
...actionsDefinition[0],
handler: async ({ event, step, workflow, workflowAction, state }) => {
// ...
}
},
];
```
The details of the `handler()` **unique argument's properties** can be found below:
### `handler()` function argument properties
See the Inngest Function handler [`event` argument property definition](/docs/reference/functions/create#event).
See the Inngest Function handler [`step` argument property definition](/docs/reference/functions/create#step).
See the [Workflow instance format](/docs/reference/workflow-kit/workflow-instance).
WorkflowAction is the action being executed, with fully interpolated inputs.
Key properties are:
- `id: string`: The ID of the action within the workflow instance.
- `kind: string`: The action kind, as provided in the [`PublicEngineAction`](#passing-actions-to-the-react-components-public-engine-action).
- `name?: string`: The name, as provided in the [`PublicEngineAction`](#passing-actions-to-the-react-components-public-engine-action).
- `description?: string`: The description, as provided in the [`PublicEngineAction`](#passing-actions-to-the-react-components-public-engine-action).
- `inputs?: string`: The record key is the key of the EngineAction input name, and the value is the variable's value.
State represents the current state of the workflow, with previous action's outputs recorded as key-value pairs.
# Components API (React)
Source: https://www.inngest.com/docs/reference/workflow-kit/components-api
The [`@inngest/workflow-kit`](https://npmjs.com/package/@inngest/workflow-kit) package provides a set of React components, enabling you to build a workflow editor UI in no time!

## Usage
```tsx {{ title: "src/components/my-workflow-editor.ts" }}
// import `PublicEngineAction[]`
// NOTE - Importing CSS from JavaScript requires a bundler plugin like PostCSS or CSS Modules
import "@inngest/workflow-kit/ui/ui.css";
import "@xyflow/react/dist/style.css";
MyWorkflowEditor = ({ workflow }: { workflow: Workflow }) => {
useState(workflow);
return (
);
};
```
## Reference
### ``
`` is a [Controlled Component](https://react.dev/learn/sharing-state-between-components#controlled-and-uncontrolled-components), watching the `workflow={}` to update.
Make sure to updated `workflow={}` based on the updates received via `onChange={}`.
A [Workflow instance object](/docs/reference/workflow-kit/workflow-instance).
An object with a `name: string` property [representing an event name](/docs/reference/functions/create#trigger).
See [the `PublicEngineActionEngineAction[]` reference](/docs/reference/workflow-kit/actions#passing-actions-to-the-react-components-public-engine-action).
A callback function, called after each `workflow` changes.
The `` component should always get the following tree as children:
```tsx
```
# Using the workflow engine
Source: https://www.inngest.com/docs/reference/workflow-kit/engine
The workflow `Engine` is used to run a given [workflow instance](/docs/reference/workflow-kit/workflow-instance) within an Inngest Function:
```tsx {{ title: "src/inngest/workflow.ts" }}
new Engine({
actions: actionsWithHandlers,
loader: (event) => {
return loadWorkflowInstanceFromEvent(event);
},
});
export default inngest.createFunction(
{ id: "blog-post-workflow" },
{ event: "blog-post.updated" },
async ({ event, step }) => {
// When `run` is called,
// the loader function is called with access to the event
await workflowEngine.run({ event, step });
}
);
```
## Configure
See [the `EngineAction[]` reference](/docs/reference/workflow-kit/actions#passing-actions-to-the-workflow-engine-engine-action).
An async function receiving the [`event`](/docs/reference/functions/create#event) as unique argument and returning a valid [`Workflow` instance](/docs/reference/workflow-kit/workflow-instance) object.
For selectively adding built-in actions, set this to true and expose the actions you want via the [``](/docs/reference/workflow-kit/components-api) `availableActions` prop.
# Workflow Kit
Source: https://www.inngest.com/docs/reference/workflow-kit/index
Workflow Kit enables you to build [user-defined workflows](/docs/guides/user-defined-workflows) with Inngest by providing a set of workflow actions to the **[Workflow Engine](/docs/reference/workflow-kit/engine)** while using the **[pre-built React components](/docs/reference/workflow-kit/components-api)** to build your Workflow Editor UI.
## Installing
```shell {{ title: "npm" }}
npm install @inngest/workflow-kit inngest
```
```shell {{ title: "pnpm" }}
pnpm add @inngest/workflow-kit inngest
```
```shell {{ title: "yarn" }}
yarn add @inngest/workflow-kit inngest
```
**Prerequisites**
The Workflow Kit integrates with our [TypeScript SDK](/docs/reference/typescript).
To use it, you'll need an application with [Inngest set up](/docs/sdk/overview), ready to [serve Inngest functions](/docs/learn/serving-inngest-functions).
## Source code
Our Workflow Kit is open source and available on Github: [**inngest/workflow-kit**](https://github.com/inngest/workflow-kit/)
## Guides and examples
Get started with Worflow Kit by exploring our guide or cloning our Next.js template:
}
iconPlacement="top"
>
Follow this step-by-step tutorial to learn how to use Workflow Kit to add automations to a CMS Next.js application.
}
iconPlacement="top"
>
This Next.js template features AI workflows helping with grammar fixes, generating Table of Contents or Tweets.
# Workflow instance
Source: https://www.inngest.com/docs/reference/workflow-kit/workflow-instance
A workflow instance represents a user configuration of a sequence of [workflow actions](/docs/reference/workflow-kit/actions), later provided to the [workflow engine](/docs/reference/workflow-kit/engine) for execution.
Example of a workflow instance object:
```json
{
"name": "Generate social posts",
"edges": [
{
"to": "1",
"from": "$source"
},
{
"to": "2",
"from": "1"
}
],
"actions": [
{
"id": "1",
"kind": "generate_tweet_posts",
"name": "Generate Twitter posts"
},
{
"id": "2",
"kind": "generate_linkedin_posts",
"name": "Generate LinkedIn posts"
}
]
}
```
**How to use the workflow instance object**
Workflow instance objects are meant to be retrieved from the [``](/docs/reference/workflow-kit/components-api) Editor, stored in database and loaded into the [Workflow Engine](/docs/reference/workflow-kit/engine) using a loader.
Use this reference if you need to update the workflow instance between these steps.
## `Workflow`
A Workflow instance in an object with the following properties:
Name of the worklow configuration, provided by the end-user.
description of the worklow configuration, provided by the end-user.
See the [`WorkflowAction`](#workflow-action) reference below.
See the [`WorkflowEdge`](#workflow-edge) reference below.
## `WorkflowAction`
`WorkflowAction` represent a step of the workflow instance linked to an defined [`EngineAction`](/docs/reference/workflow-kit/actions).
The ID of the action within the workflow instance. This is used as a reference and must be unique within the Instance itself.
The action kind, used to look up the `EngineAction` definition.
Name is the human-readable name of the action.
Description is a short description of the action.
Inputs is a list of configured inputs for the EngineAction.
The record key is the key of the EngineAction input name, and
the value is the variable's value.
This will be type checked to match the EngineAction type before
save and before execution.
Ref inputs for interpolation are `"!ref($.)"`, eg. `"!ref($.event.data.email)"`
## `WorkflowEdge`
A `WorkflowEdge` represents the link between two `WorkflowAction`.
The `WorkflowAction.id` of the source action.
`"$source"` is a reserved value used as the starting point of the worklow instance.
The `WorkflowAction.id` of the next action.
{/*
`WorkflowAction.id` of the next action.
*/}
# Release Phases for Inngest
Source: https://www.inngest.com/docs/release-phases
Description: How Inngest features are released
This pages outlines how Inngest features and products are released through 3 distinct phases of development maturity and availability to users.
The release flow varies depending on the security or scalability requirements of the newly available feature or product:
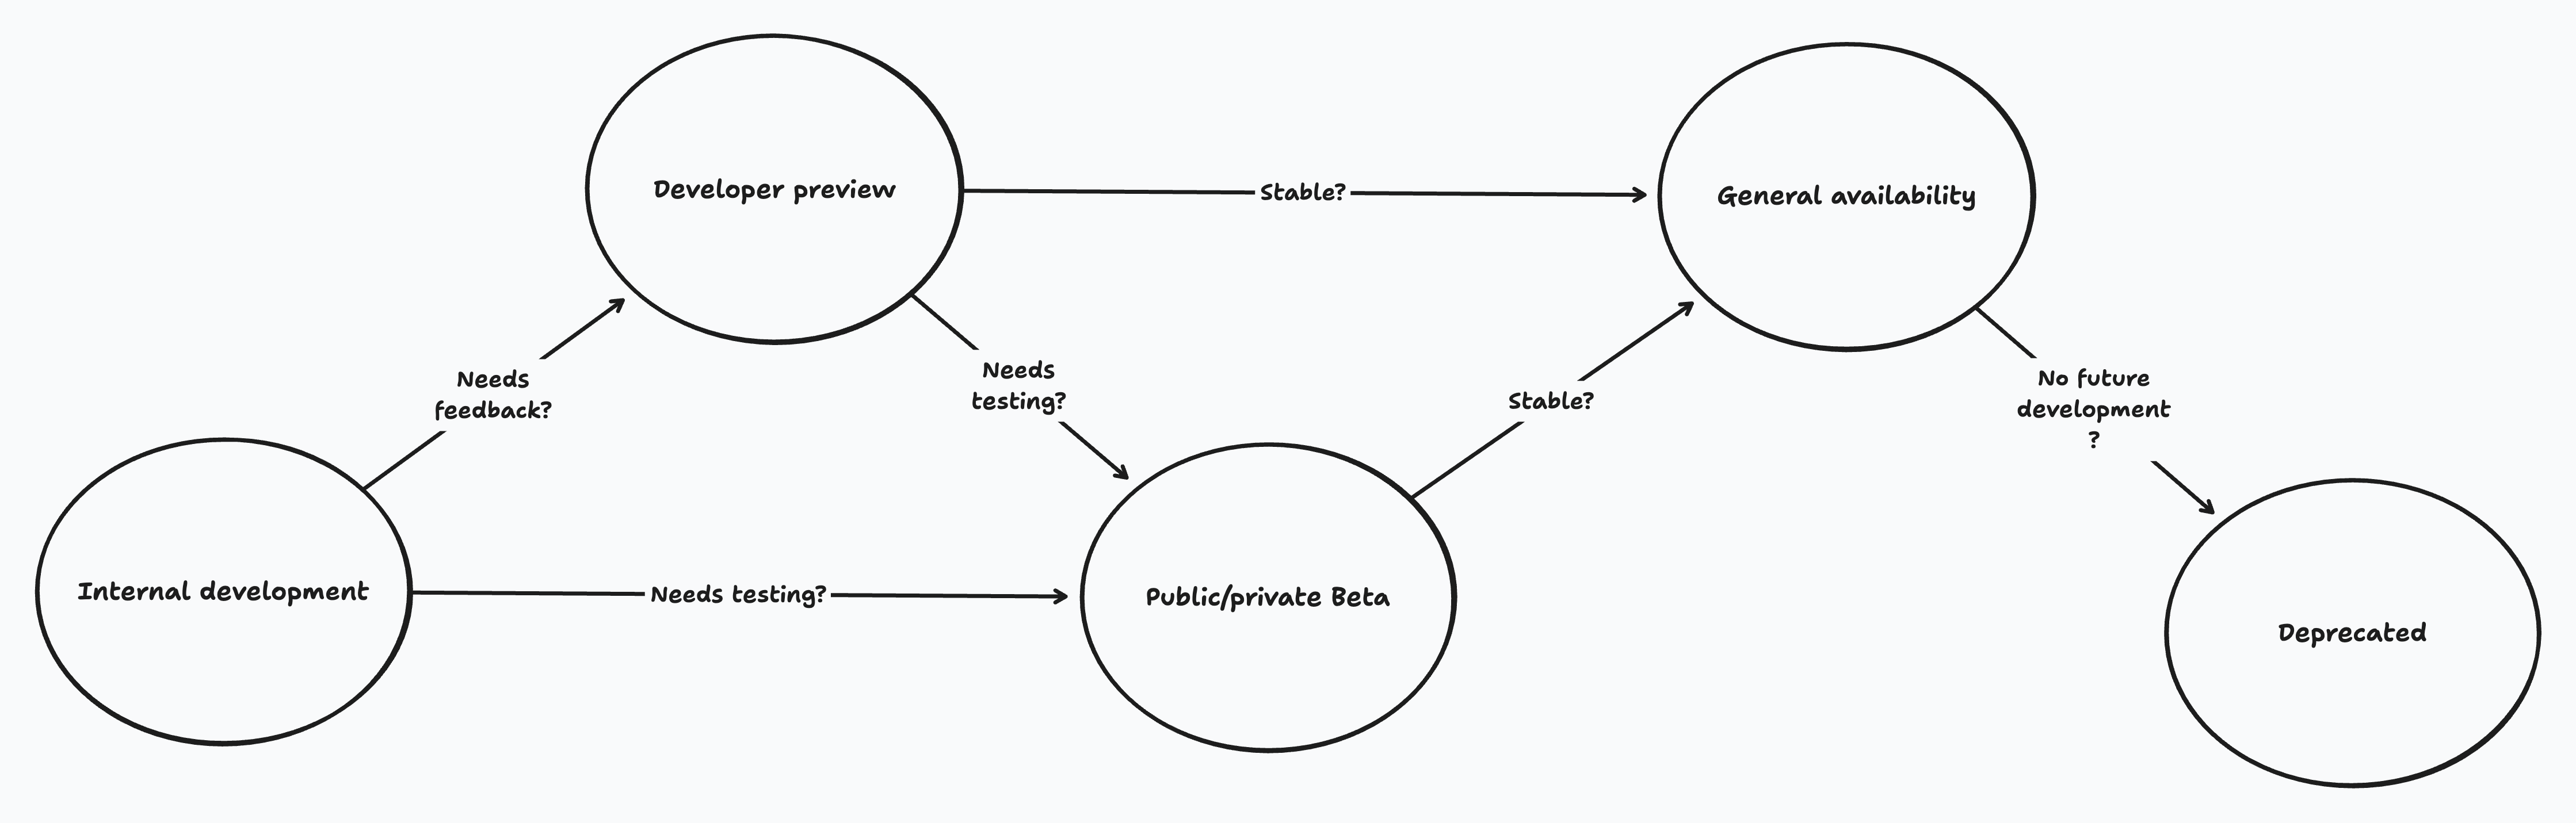
Releases can follow a non-linear flow to GA, the above graphic is not strict, but an idea of how features may flow from internal development to GA.
Additionally (_not pictured_), small features might go from internal development directly to GA for a launch.
You will find below the details of each release phase.
## Release Phases
### Developer Preview
Products or features released as a Developer Preview are still under development, made available to early users for feedback.
This implies that the new APIs or methods made available via our APIs or SDKs are flagged as experimental and might change without strict version control or notice.
Developer preview features or products cheat sheet:
| Aspect | Details |
|--------|---------|
| APIs | **Exposes non-final APIs that might change without strict version control or notice** |
| Documentation | Provides limited documentation that will evolve with users' feedback |
| Production Use | **Not recommended for production use and not covered by the Service Level Agreement applicable to the Enterprise plan** |
| Limitations | May come with limitations specific to the feature, such as plan-based or usage-based restrictions |
| Pricing | Limited free availability during preview phase |
Features or products currently in developer preview:
- [Realtime](/docs/features/realtime)
- [Connect](/docs/setup/connect)
- [Singleton functions](/docs/guides/singleton)
- [AgentKit](https://agentkit.inngest.com/)
### Private/Public Beta
Product or features in private or public beta are no longer under active development, but still require some work to meet the quality standards for GA (ex, reliability improvements, scalability stress tests).
Beta features or products cheat sheet:
| Aspect | Details |
|--------|---------|
| APIs | Provide almost final APIs that may change following strict version control and communications |
| Documentation | Provide extended documentation covering a getting-started guide, references, and an edge cases FAQ |
| Production Use | **Not recommended for production use and are not covered by the Service Level Agreement applicable to the Enterprise plan** |
| Support | Grants access to a channel to share feedback (_in case of private beta_) |
| Limitations | May come with limitations specific to the feature, such as plan-based or usage-based restrictions |
| Pricing | Limited free availability during preview phase |
**Private beta vs. public beta**
Features or products that require scalability stress tests, security considerations, or early customer feedback are good candidates for a private beta, ensuring a positive experience for all participants.
Other features might be a good fit for public beta (ex, SDKs features, Inngest Dev Server improvements)
### General Availability
A product or feature in general availability is considered secure, scalable, and stable, and is ready for use by users and customers across all plans.
General availability features or products cheat sheet:
| Aspect | Details |
|--------|---------|
| APIs | **Exposes final APIs that may evolve following strict version control and an associated changelog** |
| Documentation | Provide complete documentation from quickstarts, examples, and demos |
| Production Use | **Ready to be used in production by users and customers across all plans and are covered by the Service Level Agreement applicable to the Enterprise plan** |
| Limitations | Limitations are properly documented (_if any_) |
| Pricing | Pricing is moved into an entitlement |
### Deprecated
The deprecation of features or products follows the following agenda over multiple months:
1. Addition of deprecated mentions in the relevant documentation pages
1. Publishing of migration guides (if applicable)
2. Communication with users and customers over emails, Discord, and private support Slack channels
3. Update of SDKs to highlight the deprecated APIs (if applicable)
4. Targeted email reminders weeks before the target sunset date
## FAQ
### How feedback are collected during the developer preview phase?
During the Developer Preview and Public beta phases, we collect feedback from users and customers over our Discord channel.
Feedback from GA and private beta phases are collected over our private support Slack channel, our Discord channel and our [support portal](https://app.inngest.com/support).
### How can I stay updated on the release of new features and products?
You can follow us on [Twitter](https://x.com/inngest) or [Discord](https://discord.gg/inngest) to get notified when new features and products are released.
You can also subscribe to our [newsletter](https://inngest.com/newsletter) to get notified when new features and products are released.
# Environment Variables
Source: https://www.inngest.com/docs/sdk/environment-variables
You can set environment variables to change various parts of Inngest's configuration.
We'll look at all available environment variables here, what to set them to, and what our recommendations are for their use.
- [INNGEST_BASE_URL](#inngest-base-url)
- [INNGEST_DEV](#inngest-dev)
- [INNGEST_ENV](#inngest-env)
- [INNGEST_EVENT_KEY](#inngest-event-key)
- [INNGEST_LOG_LEVEL](#inngest-log-level)
- [INNGEST_SERVE_HOST](#inngest-serve-host)
- [INNGEST_SERVE_PATH](#inngest-serve-path)
- [INNGEST_SIGNING_KEY](#inngest-signing-key)
- [INNGEST_STREAMING](#inngest-streaming)
Within some frameworks and platforms such as Cloudflare Workers, environment
variables are not available in the global scope and are instead passed as
runtime arguments to your handler. In this case, you can use
`inngest.setEnvVars()` to ensure your client has the correct configuration
before communicating with Inngest.
```ts
// For example, in Hono on Cloudflare Workers
app.on("POST", "/my-api/send-some-event", async (c) => {
inngest.setEnvVars(c.env);
await inngest.send({ name: "test/event" });
return c.json({ message: "Done!" });
});
// You can also chain the call to be succinct
await inngest.setEnvVars(c.env).send({ name: "test/event" });
```
---
## INNGEST_BASE_URL
Use this to tell an SDK the host to use to communicate with Inngest.
If set, it should be the host including the protocol and port, e.g. `http://localhost:8288` or `https://my.tunnel.com`. Can be overwritten by manually specifying `baseUrl` in `new Inngest()` or `serve()`.
In most cases we recommend keeping this unset. A common case, though, is wanting
to force a production build of your app to use the Inngest Dev Server instead of
Inngest Cloud for local integration testing or similar.
In this case, prefer using [INNGEST_DEV=1](#inngest-dev). For Docker, it may be
appropriate to also set `INNGEST_BASE_URL=http://host.docker.internal:8288`. Learn more in our [Docker guide](/docs/guides/development-with-docker).
---
## INNGEST_DEV
Use this to force an SDK to be in Dev Mode with `INNGEST_DEV=1`, or Cloud mode
with `INNGEST_DEV=0`. A URL for the dev server can be set at the same time with `INNGEST_DEV=http://localhost:8288`.
Can be overwritten by manually specifying `isDev` in `new Inngest()`.
Explicitly setting either mode will change the URLs used to communicate with
Inngest, as well as turning **off** signature verification in Dev mode, or **on** in
Cloud mode.
If neither the environment variable nor config option are specified, the SDK will
attempt to infer which mode it should be in based on environment variables such
as `NODE_ENV`.
---
## INNGEST_ENV
Use this to tell Inngest which [Inngest Environment](/docs/platform/environments?ref=environment-variables) you're wanting to send and receive events from.
Can be overwritten by manually specifying `env` in `new Inngest()`.
This is detected and set automatically for some platforms, but others will need manual action. See [Configuring branch environments](/docs/platform/environments#configuring-branch-environments?ref=environment-variables) to see if you need this.
---
## INNGEST_EVENT_KEY
The key to use to send events to Inngest. See [Creating an Event Key](/docs/events/creating-an-event-key?ref=environment-variables) for more information.
Can be overwritten by manually specifying `eventKey` in `new Inngest()`.
---
## INNGEST_LOG_LEVEL
The log level to use for the SDK. Can be one of `fatal`, `error`, `warn`, `info`, `debug`, or `silent`.
Defaults to `info`.
---
## INNGEST_SERVE_HOST
The host used to access this application from Inngest Cloud.
If set, it should be the host including the protocol and port, e.g. `http://localhost:8288` or `https://my.tunnel.com`. Can be overwritten by manually specifying `serveHost` in `serve()`.
By default, an SDK will try to infer this using request details such as the `Host` header, but sometimes this isn't possible (e.g. when running in a more controlled environment such as AWS Lambda or when dealing with proxies/redirects).
---
## INNGEST_SERVE_PATH
The path used to access this application from Inngest Cloud.
If set, it should be a valid URL path with a leading `/`, e.g. `/api/inngest`.
By default, an SDK will try to infer this using request details, but sometimes this isn't possible (e.g. when running in a more controlled environment such as AWS Lambda or when dealing with proxies/redirects).
---
## INNGEST_SIGNING_KEY
The key used to sign requests to and from Inngest to ensure secure communication. See [Serve - Signing Key](/docs/learn/serving-inngest-functions#signing-key?ref=environment-variables) for more information.
Can be overwritten by manually specifying `signingKey` in `serve()`.
---
## INNGEST_SIGNING_KEY_FALLBACK
Only used during signing key rotation. When it's specified, the SDK will automatically retry signing key auth failures with the fallback key.
Available in version `3.18.0` and above.
---
## INNGEST_STREAMING
Sets an SDK's streaming support, potentially circumventing restrictive request timeouts and other limitations. See [Streaming](/docs/streaming?ref=environment-variables) for more information.
Can be one of `allow`, `force`, or `false`.
By default, this is `false`, disabling streaming. It can also be overwritten by setting `streaming` in `serve()` with the same values.
# ESLint Plugin
Source: https://www.inngest.com/docs/sdk/eslint
An ESLint plugin is available at [@inngest/eslint-plugin](https://www.npmjs.com/package/@inngest/eslint-plugin), providing rules to enforce best practices when writing Inngest functions.
## Getting started
Install the package using whichever package manager you'd prefer as a [dev dependency](https://docs.npmjs.com/cli/v10/configuring-npm/package-json#devdependencies).
```sh
npm install -D @inngest/eslint-plugin
```
Add the plugin to your ESLint configuration file with the recommended config.
```json
{
"plugins": ["@inngest"],
"extends": ["plugin:@inngest/recommended"]
}
```
You can also manually configure each rule instead of using the `plugin:@inngest/recommend` config.
```json
{
"plugins": ["@inngest"],
"rules": {
"@inngest/await-inngest-send": "warn"
}
}
```
See below for a list of all rules available to configure.
## Rules
- [@inngest/await-inngest-send](#inngest-await-inngest-send)
- [@inngest/no-nested-steps](#inngest-no-nested-steps)
- [@inngest/no-variable-mutation-in-step](#inngest-no-variable-mutation-in-step)
### @inngest/await-inngest-send
You should use `await` or `return` before `inngest.send().
```json
"@inngest/await-inngest-send": "warn" // recommended
```
In serverless environments, it's common that runtimes are forcibly killed once a request handler has resolved, meaning any pending promises that are not performed before that handler ends may be cancelled.
```ts
// ❌ Bad
inngest.send({ name: "some.event" });
```
```ts
// ✅ Good
await inngest.send({ name: "some.event" });
```
#### When not to use it
There are cases where you have deeper control of the runtime or when you'll safely `await` the send at a later time, in which case it's okay to turn this rule off.
### @inngest/no-nested-steps
Use of `step.*` within a `step.run()` function is not allowed.
```json
"@inngest/no-nested-steps": "error" // recommended
```
Nesting `step.run()` calls is not supported and will result in an error at runtime. If your steps are nested, they're probably reliant on each other in some way. If this is the case, extract them into a separate function that runs them in sequence instead.
```ts
// ❌ Bad
await step.run("a", async () => {
"...";
await step.run("b", () => {
return use(someValue);
});
});
```
```ts
// ✅ Good
async () => {
await step.run("a", async () => {
return "...";
});
return step.run("b", async () => {
return use(someValue);
});
};
await aThenB();
```
### @inngest/no-variable-mutation-in-step
Do not mutate variables inside `step.run()`, return the result instead.
```json
"@inngest/no-variable-mutation-in-step": "error" // recommended
```
Inngest executes your function multiple times over the course of a single run, memoizing state as it goes. This means that code within calls to `step.run()` is not called on every execution.
This can be confusing if you're using steps to update variables within the function's closure, like so:
```ts
// ❌ Bad
// THIS IS WRONG! step.run only runs once and is skipped for future
// steps, so userID will not be defined.
let userId;
// Do NOT do this! Instead, return data from step.run.
await step.run("get-user", async () => {
userId = await getRandomUserId();
});
console.log(userId); // undefined
```
Instead, make sure that any variables needed for the overall function are _returned_ from calls to `step.run()`.
```ts
// ✅ Good
// This is the right way to set variables within step.run :)
await step.run("get-user", () => getRandomUserId());
console.log(userId); // 123
```
# Upgrading from Inngest SDK v2 to v3
Source: https://www.inngest.com/docs/sdk/migration
Description: How to migrate your code to the latest version of the Inngest TS SDK.
This guide walks through migrating your code from v2 to v3 of the Inngest TS SDK.
Upgrading from an earlier version? See further down the page:
- [Upgrading from v1 to v2](#breaking-changes-in-v2)
- [Upgrading from v0 to v1](#migrating-from-inngest-sdk-v0-to-v1)
## Breaking changes in v3
Listed below are all breaking changes made in v3, potentially requiring code changes for you to upgrade.
- [Clients and functions now require IDs](#clients-and-functions-require-ids)
- [Steps now require IDs](#all-steps-require-ids)
- [Refactored serve handlers](#serve-handlers-refactored)
- [Removed shorthand function creation](#shorthand-function-creation-removed)
- [Refactored environment variables and config](#environment-variables-and-configuration)
- [Advanced: Updating custom framework serve handlers](#advanced-updating-custom-framework-serve-handlers)
- [Removed `fns` option](#fns-removed)
## Removing the guard rails
Aside from some of the breaking changes above, this version also some new features.
- **Versioning and state recovery** - Functions can change over time and even mid-run; our new engine will recover and adapt, even for functions running across huge timespans.
- **Allow mixing step and async logic** - Top-level `await` alongside steps is now supported within Inngest functions, allowing easier reuse of logic and complex use cases like dynamic imports.
- **Sending events returns IDs** - Sending an event now returns the event ID that has created.
See [Introducing Inngest TypeScript SDK v3.0](/blog/releasing-ts-sdk-3?ref=migration) to see what these features unlock for the future of the TS SDK.
## A simple example
The surface-level changes for v3 and mostly small syntactical changes, which TypeScript should be able to guide you through.
Here's a quick view of transitioning a client, function, and serve handler to v3.
When migrating, you'll want your ID to stay the same to ensure that in-progress runs switch over smoothly. We export a `slugify()` function you can use to generate an ID from your existing name as we used to do internally.
```ts
inngest.createFunction(
{ id: slugify("Onboarding Example"), name: "Onboarding Example" },
{ event: "app/user.created" },
async ({ event, step }) => {
// ...
}
);
```
This is only needed to ensure function runs started on v2 will transition to v3; new functions can specify any ID.
⚠️ `slugify()` **should only be applied to function IDs, not application IDs**. Changing the application ID will result new app, archiving the existing one.
```ts
new Inngest({
id: "My App",
});
inngest.createFunction(
// NOTE: You can manually slug IDs or import slugify to convert names to IDs automatically.
// { id: "onboarding-example", name: "Onboarding example" },
{ id: slugify("Onboarding example"), name: "Onboarding example" },
{ event: "app/user.created" },
async ({ event, step }) => {
await step.run("send-welcome-email", () =>
sendEmail(event.user.email, "Welcome!")
);
await step.waitForEvent(
"wait-for-profile-completion",
{
event: "app/user.profile.completed",
timeout: "1d",
match: "data.userId",
}
);
await step.sleep("wait-a-moment", "5m");
if (!profileCompleted) {
await step.run("send-profile-reminder", () =>
sendEmail(event.user.email, "Complete your profile!")
);
}
}
);
export default serve({
client: inngest,
functions: [fn],
});
```
```ts
// Clients only previously required a `name`, but we want to be
// explicit that this is used to identify your application and manage
// concepts such as deployments.
new Inngest({ name: "My App" });
inngest.createFunction(
// Similarly, functions now require an `id` and `name` is optional.
{ name: "Onboarding Example" },
{ event: "app/user.created" },
async ({ event, step }) => {
// `step.run()` stays the same.
await step.run("send-welcome-email", () =>
sendEmail(event.user.email, "Welcome!")
);
// The shape of `waitForEvent` has changed; all steps now require
// an ID.
await step.waitForEvent(
"app/user.profile.completed",
{
timeout: "1d",
match: "data.userId",
}
);
// All steps, even sleeps, require IDs.
await step.sleep("5m");
if (!profileCompleted) {
await step.run("send-profile-reminder", () =>
sendEmail(event.user.email, "Complete your profile!")
);
}
}
);
// Serving now uses a single object parameter for better readability.
export default serve(inngest, [fn]);
```
If during migration your function ID is not the same, you'll see duplicated functions in your function list. In that case, the recommended approach is to archive the old function using the dashboard.
## Clients and functions require IDs
When instantiating a client using `new Inngest()` or creating a function via `inngest.createFunction()`, it's now required to pass an `id` instead of a `name`. We recommend changing the property name and wrapping the value in `slugify()` to ensure you don't redeploy any functions.
#### Creating a client
```ts
inngest = new Inngest({
id: "My App",
});
```
```ts
inngest = new Inngest({
name: "My App",
});
```
#### Creating a function
```ts
inngest.createFunction(
{ id: "send-welcome-email", name: "Send welcome email" },
{ event: "app/user.created" },
async ({ event }) => {
// ...
}
);
```
```ts
inngest.createFunction(
{ name: "Send welcome email" },
{ event: "app/user.created" },
async ({ event }) => {
// ...
}
);
```
Previously, only `name` was required, but this implied that the value was safe to change. Internally, we used this name to produce an ID which was used during deployments and executions.
## All steps require IDs
When using any `step.*` tool, an ID is now required to ensure that determinism across changes to a function is easier to reason about for the user and the underlying engine.
The addition of these IDs allows you to deploy hotfixes and logic changes to long-running functions without fear of errors, failures, or panics. Beforehand, any changes to a function resulted in an irrecoverable error if step definitions changed. With this, changes to a function are smartly applied by default.
Every step tool now takes a new option, `StepOptionsOrId`, as its first argument. Either a `string`, indicating the ID for that step, or an object that can also include a friendly `name`.
```ts
type StepOptionsOrId =
| string
| {
id: string;
name?: string;
};
```
#### `step.run()`
This tool shouldn't require any changes. We'd still recommend changing the ID to something that's more obviously an identifier, like `send-welcome-email`, but you should wait for all existing v2 runs to complete before doing so.
See [Handling in-progress runs triggered from v2](#handling-in-progress-runs-triggered-from-v2) for more information.
#### `step.sendEvent()`
```ts
step.sendEvent("broadcast-user-creation", {
name: "app/user.created",
data: {
/* ... */
},
});
```
```ts
step.sendEvent({
name: "app/user.created",
data: {
/* ... */
},
});
```
#### `step.sleep()`
```ts
step.sleep("wait-before-poll", "1m");
```
```ts
step.sleep("1m");
```
#### `step.sleepUntil()`
```ts
step.sleepUntil("wait-for-user-birthday", specialDate);
```
```ts
step.sleepUntil(specialDate);
```
#### `step.waitForEvent()`
```ts
step.waitForEvent("wait-for-user-login", {
event: " app/user.login",
timeout: "1h ",
});
```
```ts
step.waitForEvent("app/user.login", {
timeout: "1h ",
});
```
## Serve handlers refactored
Serving functions could become a bit unwieldy with the format we had, so we've slightly altered how you serve your functions to ensure proper discoverability of options and aid in readability when revisiting the code.
In v2, `serve()` would always return `any`, to ensure compatibility with any version of any framework. If you're experiencing issues, you can return to this - though we don't recommend it - by using a type assertion such as `serve() as any`.
Also see the [Environment variables and config](#environment-variables-and-configuration) section.
```ts
export default serve({
client: inngest,
functions,
// ...options
});
```
```ts
export default serve(inngest, functions, {
// ...options
});
```
## Shorthand function creation removed
`inngest.createFunction()` can no longer take a `string` as the first or second arguments; an object is now required to aid in the discoverability of options and configuration.
```ts
inngest.createFunction(
{ id: "send-welcome-email", name: "Send welcome email" },
{ event: "app/user.created" },
async () => {
// ...
}
);
```
```ts
inngest.createFunction(
"Send welcome email",
"app/user.created",
async () => {
// ...
}
);
```
## Environment variables and configuration
The arrangement of environment variables available has shifted a lot over the course of v2, so in v3 we've streamlined what's available and how they're used.
We've refactored some environment variables for setting URLs for communicating with Inngest.
- **✅ Added `INNGEST_BASE_URL`** - Sets the URL to communicate with Inngest in one place, e.g. `http://localhost:8288`.
- **🛑 Removed `INNGEST_API_BASE_URL`** - Set `INNGEST_BASE_URL` instead.
- **🛑 Removed `INNGEST_DEVSERVER_URL`** - Set `INNGEST_BASE_URL` instead.
If you were using `INNGEST_DEVSERVER_URL` to test a production build against a local dev server, set `INNGEST_BASE_URL` to your dev server's address instead.
We've also added some new environment variables based on config options available when serving Inngest functions.
- **✅ Added `INNGEST_SERVE_HOST`** - Sets the `serveHost` serve option, e.g. `https://www.example.com`.
- **✅ Added `INNGEST_SERVE_PATH`** - Sets the `servePath` serve option, e.g. `/api/inngest`.
- **✅ Added `INNGEST_LOG_LEVEL`** - One of `"fatal" | "error" | "warn" | "info" | "debug" | "silent"`. Setting to `"debug"` will also set `DEBUG=inngest:*`.
- **✅ Added `INNGEST_STREAMING`** - One of `"allow" | "force" | "false"`.
Check out the [Environment variables](/docs/sdk/environment-variables?ref=migration) page for information on all current environment variables.
In this same vein, we've also refactored some configuration options when creating an Inngest client and serving functions.
- `new Inngest()`
- **✅ Added `baseUrl`** - Sets the URL to communicate with Inngest in one place, e.g. `"http://localhost:8288"`. Synonymous with setting the `INNGEST_BASE_URL` environment variable above.
- **🛑 Removed `inngestBaseUrl`** - Set `baseUrl` instead.
- `serve()`
- **✅ Added `baseUrl`** - Sets the URL to communicate with Inngest in one place, e.g. `"http://localhost:8288"`. Synonymous with setting the `INNGEST_BASE_URL` environment variable above or using `baseUrl` when creating the client.
- **🛑 Removed `inngestBaseUrl`** - Set `baseUrl` instead.
- **🛑 Removed `landingPage`** - The landing page for the SDK was deprecated in v2. Use the Inngest Dev Server instead via `npx inngest-cli@latest dev`.
## Handling in-progress runs triggered from v2
When upgrading to v3, there may be function runs in progress that were started using v2. For this reason, v3's engine changes are backwards compatible with v2 runs.
`step.run()` should require no changes from v2 to v3. To ensure runs are backwards-compatible, make sure to keep the ID the same while in-progress v2 runs complete.
## Advanced: Updating custom framework serve handlers
We found that writing custom serve handlers could be a confusing experience, focusing heavily on Inngest concepts. With v3, we've changed these handlers to now focus almost exclusively on shared concepts around how to parse requests and send responses.
A handler is now defined by telling Inngest how to access certain pieces of the request and how to send a response. Handlers are also now correctly typed, meaning the output of `serve()` will be a function signature compatible with your framework.
See the simple handler below that uses the native `Request` and `Response` objects to see the comparison between v2 and v3.
As with custom handlers previously, check out our [custom framework handlers](/docs/learn/serving-inngest-functions#custom-frameworks?ref=migration) section to see how to define your own.
```ts
serve = (options: ServeHandlerOptions) => {
new InngestCommHandler({
frameworkName,
...options,
handler: (req: Request) => {
return {
body: () => req.json(),
headers: (key) => req.headers.get(key),
method: () => req.method,
url: () => new URL(req.url, `https://${req.headers.get("host") || ""}`),
transformResponse: ({ body, status, headers }) => {
return new Response(body, { status, headers });
},
};
},
});
return handler.createHandler();
};
```
```ts
serve: ServeHandler = (inngest, fns, opts) => {
new InngestCommHandler(
name,
inngest,
fns,
{
fetch: fetch.bind(globalThis),
...opts,
},
(req: Request) => {
new URL(req.url, `https://${req.headers.get("host") || ""}`);
return {
url,
register: () => {
if (req.method === "PUT") {
return {
deployId: url.searchParams.get(queryKeys.DeployId) as string,
};
}
},
run: async () => {
if (req.method === "POST") {
return {
data: (await req.json()) as Record,
fnId: url.searchParams.get(queryKeys.FnId) as string,
stepId: url.searchParams.get(queryKeys.StepId) as string,
signature: req.headers.get(headerKeys.Signature) as string,
};
}
},
view: () => {
if (req.method === "GET") {
return {
isIntrospection: url.searchParams.has(queryKeys.Introspect),
};
}
},
};
},
({ body, status, headers }): Response => {
return new Response(body, { status, headers });
}
);
return handler.createHandler();
};
```
## Function `fns` option removed
In v2, providing a `fns` option when creating a function -- an object of functions -- would wrap those passed functions in `step.run()`, meaning you can run code inside your function without the `step.run()` boilerplate.
This wasn't a very well advertised feature and had some drawbacks, so we're instead replacing it with some optional middleware.
Check out the [Common Actions Middleware Example](/docs/reference/middleware/examples#common-actions-for-every-function?ref=migration) for the code.
```ts
new Inngest({
id: "my-app",
name: "My App",
middleware: [createActionsMiddleware(actions)],
});
inngest.createFunction(
{ name: "Send welcome email" },
{ event: "app/user.created" },
async ({ event, action }) => {
await action.getUserFromDb(event.data.userId);
await action.sendWelcomeEmail(user.email);
}
);
```
```ts
new Inngest({ name: "My App" });
inngest.createFunction(
{
name: "Send welcome email",
fns: actions,
},
{ event: "app/user.created" },
async ({ event, fns }) => {
await fns.getUserFromDb(event.data.userId);
await fns.sendWelcomeEmail(user.email);
}
);
```
---
# Upgrading from Inngest SDK v1 to v2
This guide walks through migrating your code from v1 to v2 of the Inngest TS SDK.
## Breaking changes in v2
Listed below are all breaking changes made in v2, potentially requiring code changes for you to upgrade.
- [Better event schemas](#better-event-schemas) - create and maintain your event types with a variety of native tools and third-party libraries
- [Clearer event sending](#clearer-event-sending) - we removed some alternate methods of sending events to settle on a common standard
- [Removed `tools` parameter](#removed-tools-parameter) - use `step` instead of `tools` for step functions
- [Removed ability to `serve()` without a client](#removed-ability-to-serve-without-a-client) - everything is specified with a client, so it makes sense for this to be the same
- [Renamed `throttle` to `rateLimit`](#renamed-throttle-to-ratelimit) - the concept didn't quite match the naming
## New features in v2
Aside from some of the breaking features above, this version also adds some new features that aren't breaking changes.
- [Middleware](/docs/reference/middleware/overview?ref=migration) - specify functions to run at various points in an Inngest client's lifecycle
- **Logging** - use a default console logger or specify your own to log during your workflows
## Better event schemas
Typing events is now done using a new `EventSchemas` class to create a guided, consistent, and extensible experience for declaring an event's data. This helps us achieve a few goals:
- Reduced duplication (no more `name`!)
- Allow many different methods of defining payloads to suit your codebase
- Easy to add support for third-party libraries like Zod and TypeBox
- Much clearer messaging when an event type doesn't satisfy what's required
- Allows the library to infer more data itself, which allows us to add even more powerful type inference
```ts
// ❌ Invalid in v2
type Events = {
"app/user.created": {
name: "app/user.created";
data: { id: string };
};
"app/user.deleted": {
name: "app/user.deleted";
data: { id: string };
};
};
new Inngest();
```
Instead, in v2, we use a new `EventSchemas` class and its methods to show current event typing support clearly. All we have to do is create a `new EventSchemas()` instance and pass it into our `new Inngest()` instance.
```ts
// ⬆️ New "EventSchemas" class
// ✅ Valid in v2 - `fromRecord()`
type Events = {
"app/user.created": {
data: { id: string };
};
"app/user.deleted": {
data: { id: string };
};
};
new Inngest({
schemas: new EventSchemas().fromRecord(),
});
```
Notice we've reduced the duplication of `name` slightly too; a common annoyance we've been seeing for a while!
We use `fromRecord()` above to match the current event typing quite closely, but we now have some more options to define events without having to shim, like `fromUnion()`:
```ts
// ✅ Valid in v2 - `fromUnion()`
type AppUserCreated = {
name: "app/user.created";
data: { id: string };
};
type AppUserDeleted = {
name: "app/user.deleted";
data: { id: string };
};
new EventSchemas().fromUnion();
```
This approach also gives us scope to add explicit support for third-party libraries, like Zod:
```ts
// ✅ Valid in v2 - `fromZod()`
z.object({
id: z.string(),
});
new EventSchemas().fromZod({
"app/user.created": { data: userDataSchema },
"app/user.deleted": { data: userDataSchema },
});
```
Stacking multiple event sources was technically supported in v1, but was a bit shaky. In v2, providing multiple event sources and optionally overriding previous ones is built in:
```ts
// ✅ Valid in v2 - stacking
new EventSchemas()
.fromRecord()
.fromUnion()
.fromZod(zodEventSchemas);
```
Finally, we've added the ability to pull these built types out of Inngest for creating reusable logic without having to create an Inngest function. Inngest will append relevant fields and context to the events you input, so this is a great type to use for quickly understanding the resulting shape of data.
```ts
new Inngest({ name: "My App" });
type Events = GetEvents;
```
For more information, see [Defining Event Payload Types](/docs/reference/client/create#defining-event-payload-types?ref=migration).
## Clearer event sending
v1 had two different methods of sending events that shared the same function. This "overload" resulted in autocomplete typing for TypeScript users appear more complex than it needed to be.
In addition, using a particular signature meant that you're locked in to sending a particular named event, meaning sending two different events in a batch required refactoring your call.
For these reasons, we've removed a couple of the event-sending signatures and settled on a single standard.
```ts
// ❌ Invalid in v2
inngest.send("app/user.created", { data: { userId: "123" } });
inngest.send("app/user.created", [
{ data: { userId: "123" } },
{ data: { userId: "456" } },
]);
// ✅ Valid in v1 and v2
inngest.send({ name: "app/user.created", data: { userId: "123" } });
inngest.send([
{ name: "app/user.created", data: { userId: "123" } },
{ name: "app/user.created", data: { userId: "456" } },
]);
```
## Removed `tools` parameter
The `tools` parameter in a function was marked as deprecated in v1 and is now being fully removed in v2.
You can swap out `tools` with `step` in every case.
```ts
inngest.createFunction(
{ name: "Example" },
{ event: "app/user.created" },
async ({ tools, step }) => {
// ❌ Invalid in v2
await tools.run("Foo", () => {});
// ✅ Valid in v1 and v2
await step.run("Foo", () => {});
}
);
```
## Removed ability to `serve()` without a client
In v1, serving Inngest functions could be done without a client via `serve("My App Name", ...)`. This limits our ability to do some clever TypeScript inference in places as we don't have access to the client that the functions have been created with.
We're shifting to ensure the client is the place where everything is defined and created, so we're removing the ability to `serve()` with a string name.
```ts
// ❌ Invalid in v2
serve("My App", [...fns]);
// ✅ Valid in v1 and v2
serve(inngest, [...fns]);
```
As is the case already in v1, the app's name will be the name of the client passed to serve. To preserve the ability to explicitly name a serve handler, you can now pass a `name` option when serving to use the passed string instead of the client's name.
```ts
serve(inngest, [...fns], {
name: "My Custom App Name",
});
```
## Renamed `throttle` to `rateLimit`
Specifying a rate limit for a function in v1 meant specifying a `throttle` option when creating the function. The term "throttle" was confusing here, as the definition of throttling can change depending on the context, but usually implies that "throttled" events are still eventually used to trigger an event, which was not the case.
To be clearer about the functionality of this option, we're renaming it to `rateLimit` instead.
```ts
inngest.createFunction(
{
name: "Example",
throttle: { count: 5 }, // ❌ Invalid in v2
rateLimit: { limit: 5 }, // ✅ Valid in v2
},
{ event: "app/user.created" },
async ({ tools, step }) => {
// ...
}
);
```
---
## Migrating from Inngest SDK v0 to v1
This guide walks through migrating to the Inngest TS SDK v1 from previous versions.
## What's new in v1
- **Step functions and tools are now async** - create your flow however you'd express yourself with JavaScript Promises.
- **`inngest.createFunction` for everything** - all functions are now step functions; just use step tools within any function.
- **Unified client instantiation and handling of schemas via `new Inngest()`** - removed legacy helpers that required manual types.
- **A foundation for continuous improvement:**
- Better type inference and schemas
- Better error handling
- Clearer patterns and tooling
- Advanced function configuration
## Replacing function creation helpers
Creating any Inngest function now uses `inngest.createFunction()` to create a consistent experience.
- All helpers have been removed
- `inngest.createScheduledFunction()` has been removed
- `inngest.createStepFunction()` has been removed
```ts
// ❌ Removed in v1
import {
createFunction,
createScheduledFunction,
createStepFunction,
} from "inngest";
// ❌ Removed in v1
inngest.createScheduledFunction(...);
inngest.createStepFunction(...);
```
The following is how we would always create functions without the v0 helpers.
```ts
// ✅ Valid in v1
// We recommend exporting this from ./src/inngest/client.ts, giving you a
// singleton across your entire app.
inngest = new Inngest({ name: "My App" });
inngest.createFunction(
{ name: "Single step" },
{ event: "example/single.step" },
async ({ event, step }) => "..."
);
inngest.createFunction(
{ name: "Scheduled" },
{ cron: "0 9 * * MON" },
async ({ event, step }) => "..."
);
inngest.createFunction(
{ name: "Step function" },
{ event: "example/step.function" },
async ({ event, step }) => "..."
);
```
This helps ensure that important pieces such as type inference of events has a central place to reside.
As such, each of the following examples requries an Inngest Client (`new Inngest()`) is used to create the function.
```ts
// We recommend exporting your client from a separate file so that it can be
// reused across the codebase.
inngest = new Inngest({ name: "My App" });
```
See the specific examples below of how to transition from a helper to the new signatures.
`createFunction()`
```ts
// ❌ Removed in v1
createFunction(
"Single step",
"example/single.step",
async ({ event }) => "..."
);
```
```ts
// ✅ Valid in v1
new Inngest({ name: "My App" });
inngest.createFunction(
{ name: "Single step" },
{ event: "example/single.step" },
async ({ event, step }) => "..."
);
```
`createScheduledFunction()` or `inngest.createScheduledFunction()`
```ts
// ❌ Removed in v1
createScheduledFunction( // or inngest.createScheduledFunction
"Scheduled",
"0 9 * * MON",
async ({ event }) => "..."
);
```
```ts
// ✅ Valid in v1
new Inngest({ name: "My App" });
inngest.createFunction(
{ name: "Scheduled" },
{ cron: "0 9 * * MON" },
async ({ event, step }) => "..."
);
```
`createStepFunction` or `inngest.createStepFunction`
```ts
// ❌ Removed in v1
createStepFunction(
"Step function",
"example/step.function",
({ event, tools }) => "..."
);
```
```ts
// ✅ Valid in v1
new Inngest({ name: "My App" });
inngest.createFunction(
{ name: "Step function" },
{ event: "example/step.function" },
async ({ event, step }) => "..."
);
```
## Updating to async step functions
The signature of a step function is changing.
- **`tools` is now `step`** - We renamed this to be easier to reason about billing and make the code more readable.
- **Always `async`** - Every Inngest function is now an async function with access to async `step` tooling.
- **Steps now return promises** - To align with the async patterns that developers are used to and to enable more flexibility, make sure to `await` steps.
Step functions in v0 were synchronous, meaning steps had to run sequentially, one after the other.
v1 brings the full power of asynchronous JavaScript to those functions, meaning you can use any and all async tooling at your disposal; `Promise.all()`, `Promise.race()`, loops, etc.
```ts
await Promise.all([
step.run("Send email", () => sendEmail(user.email, "Welcome!")),
step.run("Send alert to staff", () => sendAlert("New user created!")),
]);
```
Here we look at an example of a step function in v0 and compare it with the new v1.
```ts
// ⚠️ v0 step function
export default createStepFunction(
"Example",
"app/user.created",
({ event, tools }) => {
tools.run("Get user email", () => getUser(event.userId));
tools.run("Send email", () => sendEmail(user.email, "Welcome!"));
tools.run("Send alert to staff", () => sendAlert("New user created!"));
}
);
```
```ts
// ✅ v1 step function
export default inngest.createFunction(
{ name: "Example" },
{ event: "app/user.created" },
async ({ event, step }) => {
// The step must now be awaited!
await step.run("Get user email", () => getUser(event.userId));
await step.run("Send email", () => sendEmail(user.email, "Welcome!"));
await step.run("Send alert to staff", () => sendAlert("New user created!"));
}
);
```
These two examples have the exact same functionality. As above, there are a few key changes that were required.
- Using `createFunction()` on the client to create the step function
- Awaiting step tooling to ensure they run in order
- Using `step` instead of `tools`
When translating code to v1, be aware that not awaiting a step tool will mean it happens in the background, in parallel to the tools that follow. Just like a regular JavaScript async function, `await` halts progress, which is sometimes just what you want!
Async step functions with v1 of the Inngest TS SDK unlocks a huge `Array`. To explore these further, check out the [multi-step functions](/docs/guides/multi-step-functions?ref=migration) docs.
## Advanced: Updating custom framework serve handlers
If you're using a custom serve handler and are creating your own `InngestCommHandler` instance, a `stepId` must be provided when returning arguments for the `run` command.
This can be accessed via the query string using the exported `queryKeys.StepId` enum.
```ts
run: async () => {
if (req.method === "POST") {
return {
fnId: url.searchParams.get(queryKeys.FnId) as string,
// 🆕 stepId is now required
stepId: url.searchParams.get(queryKeys.StepId) as string,
```
# Installing the SDK
Source: https://www.inngest.com/docs/sdk/overview
The Inngest SDK allows you to write reliable, durable functions in your existing projects incrementally. Functions can be automatically triggered by events or run on a schedule without infrastructure, and can be fully serverless or added to your existing HTTP server.
- It works with any framework and platform by using HTTP to call your functions
- It supports serverless providers, without any additional infrastructure
- It fully supports TypeScript out of the box
- You can locally test your code without any extra setup
## Getting started
### Installation
To get started, install the SDK via your favorite package manager:
```shell {{ title: "npm" }}
npm install inngest
```
```shell {{ title: "yarn" }}
yarn add inngest
```
```shell {{ title: "pnpm" }}
pnpm add inngest
```
```shell {{ title: "bun" }}
bun add inngest
```
### Setup
Once Inngest is installed, create an Inngest client, later used to define your functions and trigger events:
```typescript
inngest = new Inngest({
id: "my-app",
});
```
To get started, install the SDK via `go get`:
```shell
go get github.com/inngest/inngestgo
```
### Installation
To get started, install the SDK via `pip`:
```shell
pip install inngest
```
### Setup
Once Inngest is installed, create an Inngest client, later used to define your functions and trigger events:
```python
import inngest
import logging
# Create an Inngest client
inngest_client = inngest.Inngest(
app_id="app_example",
logger=logging.getLogger("uvicorn"),
)
```
Your project is now ready to start writing Inngest functions:
1. [Define and write your functions](/docs/functions)
2. [Trigger functions with events](/docs/events)
3. [Set up and serve the Inngest API for your framework](/docs/learn/serving-inngest-functions)
# Self-hosting
Source: https://www.inngest.com/docs/self-hosting
Description: Learn how to self-host Inngest. Includes configuration options and instructions for using external services.'
# Self-hosting
Self-hosting support for Inngest is supported as of the 1.0 release.
* [Why self-host Inngest?](#why-self-host-inngest)
* [Inngest system architecture](#inngest-system-architecture)
* [How to self-host Inngest](#how-to-self-host-inngest)
## Why self-host Inngest?
While the easiest way to get started with Inngest is using our hosted platform, including our generous [free tier](/pricing?ref=docs-self-hosting), we understand that developers may want to self-host for a variety of reasons. If security or data privacy are concerns, review our [security documentation](/docs/learn/security?ref=docs-self-hosting) for more information including details about [end-to-end encryption](/docs/features/middleware/encryption-middleware?ref=docs-self-hosting).
## Inngest system architecture
To best understand how to self-host Inngest, it's important to understand the system architecture and components.
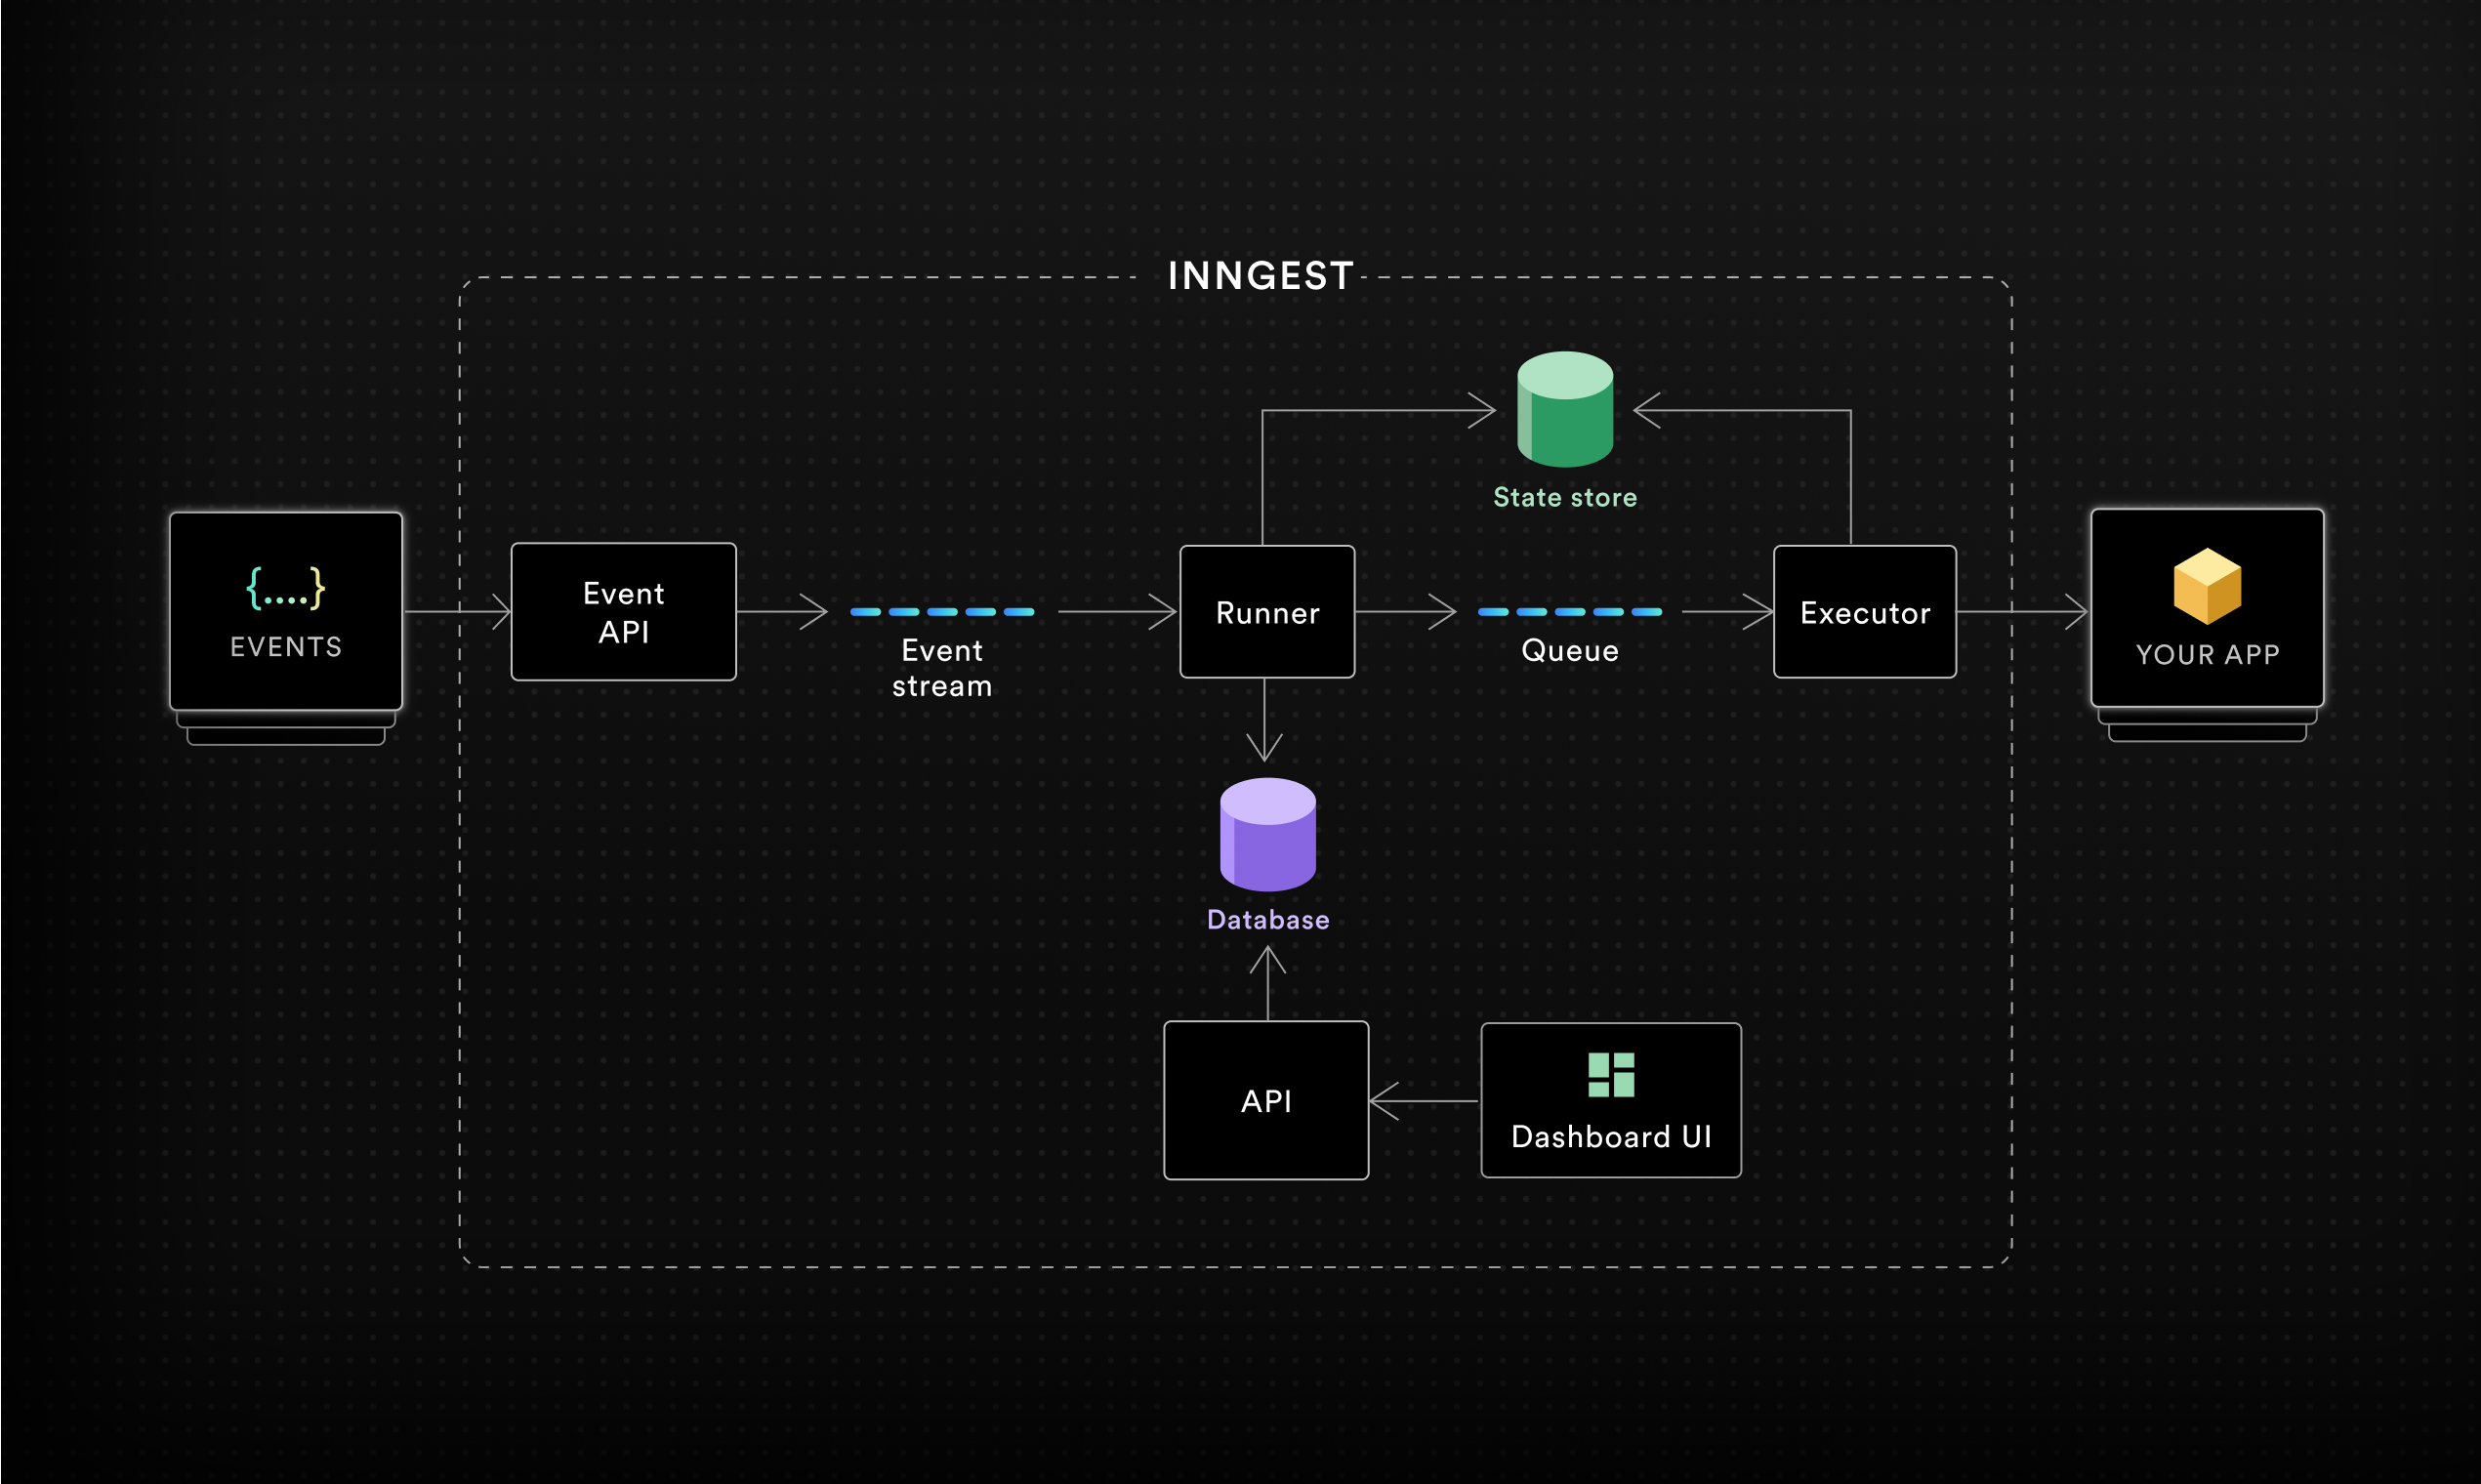
The system is composed of the following services:
* **Event API** - Receives events from SDKs via HTTP requests. Authenticates client requests via [Event Keys](/docs/events/creating-an-event-key?ref=docs-self-hosting). The Event API publishes event payloads to an internal event stream.
* **Event stream** - Acts as buffer between the _Event API_ and the _Runner_.
* **Runner** - Consumes incoming events and performs several actions:
* Scheduling of new “function runs” (aka jobs) given the event type, creating initial run state in the _State store_ database. Runs are added to queues given the function's flow control configuration.
* Resume functions paused via [`waitForEvent`](/docs/features/inngest-functions/steps-workflows/wait-for-event?ref=docs-self-hosting) with matching expressions.
* Cancels running functions with matching [`cancelOn`](/docs/features/inngest-functions/cancellation/cancel-on-events?ref=docs-self-hosting) expressions
* Writes ingested events to a database for historical record and future replay.
* **Queue** - A multi-tenant aware, multi-tier queue designed for fairness and various [flow control](/docs/guides/flow-control?ref=docs-self-hosting) methods (concurrency, throttling, prioritization, debouncing, rate limiting) and [batching](/docs/guides/batching?ref=docs-self-hosting).
* **Executor** - Responsible for executing functions, from initial execution, step execution, writing incremental function run state to the _State store_, and retries after failures.
* **State store (database)** - Persists data for pending and ongoing function runs. Data includes initial triggering event(s), step output and step errors.
* **Database** - Persists system data and history including Apps, Functions, Events, Function run results.
* **API** - GraphQL and REST APIs for programmatic access and management of system resources.
* **Dashboard UI** - The UI to manage apps, functions and view function run history.
The source code for Inngest and all services is [available on GitHub](https://github.com/inngest/inngest).
## How to self-host Inngest
To begin self-hosting Inngest, you only need to install the Inngest CLI. The Inngest CLI is a single binary which includes all Inngest services and can be run in any environment. Alternatively, you download the binary directly from [GitHub releases](https://github.com/inngest/inngest/releases).
```plaintext {{ title:
npm" }}
npm install -g inngest-cli
```
```plaintext {{ title: "Docker" }}
docker pull inngest/inngest
```
```plaintext {{ title: "curl" }}
curl -sfL https://cli.inngest.com/install.sh
```
Now that you have the CLI installed, you can start the Inngest server using the `inngest start` command.
```plaintext {{ title: "shell" }}
inngest start
```
```plaintext {{ title: "Docker" }}
docker run -p 8288:8288 inngest/inngest inngest start
```
This will start the Inngest server on the default port `8288` and use the default configuration, including SQLite for persistence.
##
Configuring the server can be done via command line flags, environment variables, or a configuration file.
By default, the server will:
* Run on `localhost:8288`, including the Event API, API, and Dashboard UI.
* Use an in-memory Redis server for the queue and state store. (See [Using external services](#using-external-services) for more information)
* Use SQLite for persistence. The default database is located at `./.inngest/main.db`. Queue and state store snapshots are periodically saved to the SQLite database, including prior to shutdown.
* Disable app sync polling to check for new functions or updated configurations (see `--poll-interval` flag).
To securely configure your server, create your event and signing keys using whatever format that you choose and start the Inngest server using them. You can also pass them via environment variable (see below):
```plaintext
inngest start --event-key --signing-key
```
Then you can use these same keys as environment variables when starting your application (`INNGEST_EVENT_KEY` and `INNGEST_SIGNING_KEY`). [See below](#configuring-inngest-sdks-to-use-self-hosted-server) for an example Node.js startup command.
To see all the available options, run `inngest start --help`:
```plaintext
$ inngest start --help
[Beta] Run Inngest as a single-node service.
Usage:
inngest start [flags]
Examples:
inngest start
Flags:
--config string Path to an Inngest configuration file
--event-key strings Event key(s) that will be used by apps to send events to the server.
-h, --help Output this help information
--host string Inngest server hostname
-p, --port string Inngest server port (default "8288")
-u, --sdk-url strings App serve URLs to sync (ex. http://localhost:3000/api/inngest)
--signing-key string Signing key used to sign and validate data between the server and apps.
Persistence Flags:
--postgres-uri string [Experimental] PostgreSQL database URI for configuration and history persistence. Defaults to SQLite database.
--redis-uri string Redis server URI for external queue and run state. Defaults to self-contained, in-memory Redis server with periodic snapshot backups.
--sqlite-dir string Directory for where to write SQLite database.
Advanced Flags:
--poll-interval int Interval in seconds between polling for updates to apps
--queue-workers int Number of executor workers to execute steps from the queue (default 100)
--retry-interval int Retry interval in seconds for linear backoff when retrying functions - must be 1 or above
--tick int The interval (in milliseconds) at which the executor polls the queue (default 150)
Global Flags:
--json Output logs as JSON. Set to true if stdout is not a TTY.
-l, --log-level string Set the log level. One of: trace, debug, info, warn, error. (default "info")
-v, --verbose Enable verbose logging.
```
**Environment variables**
Any CLI option can be set via environment variable by converting the flag to uppercase, replacing hyphens with underscores, and prefixing it with `INNGEST_`. For example, `--port 8288` can be set with the `INNGEST_PORT` environment variable.
**Configuration file** (`inngest.yaml`, `inngest.json`, etc.)
A configuration file can be specified with the `--config` flag. The file can be in YAML, JSON, TOML, or any other format supported by [Viper](https://github.com/spf13/viper). `urls` is used instead of `sdk-url` to specify your application's Inngest serve endpoints. An example configuration file is shown below:
```yaml {{ title: "inngest.yaml" }}
urls:
- http://localhost:3000/api/inngest
poll-interval: 60
redis-uri: redis://localhost:6379
sqlite-dir: /app/data
```
```json {{ title: "inngest.json" }}
{
"urls": [
"http://localhost:3000/api/inngest"
],
"poll-interval": 60,
"redis-uri": "redis://localhost:6379",
"sqlite-dir": "/app/data"
}
```
### Configuring Inngest SDKs to use self-hosted server
By default, the Inngest SDK will use URLs of the managed Inngest platform. To connect to a self-hosted server, set the [`INNGEST_DEV`](/docs/sdk/environment-variables#inngest-dev) and [`INNGEST_BASE_URL`](/docs/sdk/environment-variables#inngest-base-url) environment variables. As mentioned above, you'll also need to set the `INNGEST_EVENT_KEY` and `INNGEST_SIGNING_KEY` environment variables for securely connecting your application to the Inngest server.
For example, to connect to a self-hosted server running on `localhost:8288` for a Node.js app, set the following environment variables:
```plaintext
INNGEST_EVENT_KEY= \
INNGEST_SIGNING_KEY= \
INNGEST_DEV=0 \
INNGEST_BASE_URL=http://localhost:8288 \
node ./server.js
```
### Using external services
Inngest can be configured to use external services for the queue and state store, and soon, the database
**External Redis server**
With goal of simplifying the initial setup, the Inngest server will run an in-memory Redis server for the queue and state store. As this is running within the same process as the Inngest server, running your own Redis server can improve performance and reliability of the system. You may choose to run your own Redis server or use a cloud-based Redis service like AWS ElastiCache, Redis Cloud, etc.
To use an external Redis server, set the `redis-uri` flag to the Redis server URI.
**External Postgres database (experimental)**
By default, the Inngest server uses SQLite for persistence. This is convenient for zero-dependency deployments, but does not support scaling beyond a single node. You may choose to run your own Postgres database or use a cloud-based Postgres service like AWS RDS, Neon, Supabase, etc.
Postgres support is experimental and should be used with caution.
To use an external Postgres database, set the `postgres-uri` flag to your Postgres connection string URI.
## Docker compose example
_Coming soon_
## Roadmap & feature requests
Planned features for self-hosting include:
* Postgres external database support.
* Event key and signing key management via API and UI.
* Multi-node Inngest server support. Run standalone services (API, Executor, etc.) instead of all services in a single process.
To suggest additional features, please submit feedback on our [public roadmap](https://roadmap.inngest.com/roadmap).
Check out [the source code on GitHub](https://github.com/inngest/inngest) to file issues or submit pull requests.
# Connect
Source: https://www.inngest.com/docs/setup/connect
These docs are part of a developer preview for Inngest's `connect` API. Learn more about the [developer preview here](#developer-preview).
The `connect` API allows your app to create an outbound persistent connection to Inngest. Each app can establish multiple connections to Inngest, which enable you to scale horizontally across multiple workers. The key benefits of using `connect` compared to [`serve`](/docs/learn/serving-inngest-functions) are:
- **Lowest latency** - Persistent connections enable the lowest latency between your app and Inngest.
- **Elastic horizontal scaling** - Easily add more capacity by running additional workers.
- **Ideal for container runtimes** - Deploy on Kubernetes or ECS without the need of a load balancer for inbound traffic
- **Simpler long running steps** - Step execution is not bound by platform http timeouts.
## Minimum requirements
### Language
- **TypeScript**: SDK `3.34.1` or higher.
- **Go**: SDK `0.11.2` or higher.
- **Python**: SDK `0.5.0` or higher.
- Install the SDK with `pip install inngest[connect]` since there are additional dependencies required.
- We also recommend the following constraints:
- `protobuf>=5.29.4,<6.0.0`
- `psutil>=6.0.0,<7.0.0`
- `websockets>=15.0.0,<16.0.0`
### Runtime
You must use a long running server (Render, Fly.io, Kubernetes, etc.). Serverless runtimes (AWS Lambda, Vercel, etc.) are not supported.
If using TypeScript, your runtime must support built-in WebSocket support (Node `22.4.0` or higher, Deno `1.4` or higher, Bun `1.1` or higher).
## Getting started
Using `connect` with your app is simple. Using each SDK's "connect" method only requires a list of functions that are available to be executed. (Note: Python support is in beta; [upvote on our roadmap](https://roadmap.inngest.com/roadmap?id=2bac8d74-288f-47c7-8afc-3fd1a0e94654))
Here is a one-file example of a fully-functioning app that connects to Inngest.
```ts
new Inngest({
id: 'my-app'
});
inngest.createFunction(
{ id: 'handle-signup' },
{ event: 'user.created'}
async ({ event, step }) => {
console.log('Function called', event);
}
);
(async () => {
await connect({
apps: [{ client: inngest, functions: [handleSignupFunction] }]
});
console.log('Worker: connected', connection);
})();
```
```go
type UserCreatedEvent struct {
Name string
Data struct {
UserID string `json:"user_id"`
}
}
func main() {
ctx := context.Background()
app, err := inngestgo.NewClient(inngestgo.ClientOpts{
AppID: "my-app",
Logger: logger.StdlibLogger(ctx),
AppVersion: nil, // Optional, defaults to the git commit SHA
})
if err != nil {
panic(err)
}
f := inngestgo.CreateFunction(
app,
inngestgo.FunctionOpts{ID: "handle-signup", Name: "Handle signup"},
inngestgo.EventTrigger("user.created", nil),
func(ctx context.Context, input inngestgo.Input[UserCreatedEvent]) (any, error) {
fmt.Println("Function called")
return map[string]any{"success": true}, nil
},
)
fmt.Println("Worker: connecting")
ws, err := inngestgo.Connect(ctx, inngestgo.ConnectOpts{
InstanceID: inngestgo.Ptr("example-worker"),
Apps: []inngestgo.Handler{
app,
},
})
if err != nil {
fmt.Printf("ERROR: %#v\n", err)
os.Exit(1)
}
defer func(ws connect.WorkerConnection) {
<-ctx.Done()
err := ws.Close()
if err != nil {
fmt.Printf("could not close connection: %s\n", err)
}
}(ws)
}
```
```python
import asyncio
import inngest
from inngest.connect import connect
client = inngest.Inngest(app_id="my-app")
@client.create_function(
fn_id="handle-signup",
trigger=inngest.TriggerEvent(event="user.created"),
)
async def fn_1(ctx: inngest.Context) -> None:
print("Function called")
functions = [fn_1]
asyncio.run(
connect(
apps=[(client, functions)],
).start()
)
```
## How does it work?
The `connect` API establishes a persistent WebSocket connection to Inngest. Each connection can handle executing multiple functions and steps concurrently. Each app can create multiple connections to Inngest enabling horizontal scaling. Additionally, connect has the following features:
- **Automatic re-connections** - The connection will automatically reconnect if it is closed.
- **Graceful shutdown** - The connection will gracefully shutdown when the app receives a signal to terminate (`SIGTERM`). New steps will not be accepted after the connection is closed, and existing steps will be allowed to complete.
- **Worker-level maximum concurrency (Coming soon)** - Each worker can configure the maximum number of concurrent steps it can handle. This allows Inngest to distribute load across multiple workers and not overload a single worker.
## Local development
During local development, set the `INNGEST_DEV=1` environment variable to enable local development mode. This will cause the SDK to connect to [the Inngest dev server](/docs/dev-server). When your worker process is running it will automatically connect to the dev server and sync your functions' configurations.
No signing or event keys are required in local development mode.
## Deploying to production
The `connect` API is currently in developer preview and is not yet recommended for critical production workloads. We recommend deploying to a staging environment first prior to deploying to production.
To enable your application to securely connect to Inngest, you must set the `INNGEST_SIGNING_KEY` and `INNGEST_EVENT_KEY` environment variables.
These keys can be found in the Inngest Dashboard. Learn more about [Event keys](/docs/events/creating-an-event-key) and [Signing Keys](/docs/platform/signing-keys).
The `appVersion` is used to identify the version of your app that is connected to Inngest. This allows Inngest to support rolling deploys where multiple versions of your app may be connected to Inngest.
When a new version of your app is connected to Inngest, the functions' configurations are synced to Inngest. When a new version is connected, Inngest update the function configuration in your environment and starts routing new function runs to the latest version.
You can set the `appVersion` to whatever you want, but we recommend using something that automatically changes with each deploy, like a git commit sha or Docker image tag.
```ts {{ title: "Any platform" }}
// You can set the app version to any environment variable, you might use
// a build number ('v2025.02.12.01'), git commit sha ('f5a40ff'), or
// a custom value ('my-app-v1').
new Inngest({
id: 'my-app',
appVersion: process.env.MY_APP_VERSION, // Use any environment variable you choose
})
```
```ts {{ title: "GitHub Actions" }}
// If you're using Github Actions to build your app, you can set the
// app version to the GITHUB_SHA environment variable during build time
// or inject into the build of a Docker image.
new Inngest({
id: 'my-app',
appVersion: process.env.GITHUB_SHA,
})
```
```ts {{ title: "Render" }}
// Render includes the RENDER_GIT_COMMIT env var at build and runtime.
// https://render.com/docs/environment-variables
new Inngest({
id: 'my-app',
appVersion: process.env.RENDER_GIT_COMMIT,
})
```
```ts { {title: "Fly.io" }}
// Fly includes a machine version env var at runtime.
// https://fly.io/docs/machines/runtime-environment/
new Inngest({
id: 'my-app',
appVersion: process.env.FLY_MACHINE_VERSION,
})
```
The `instanceId` is used to identify the worker instance of your app that is connected to Inngest. This allows Inngest to support multiple instances (workers) of your app connected to Inngest.
By default, Inngest will attempt to use the hostname of the worker as the instance id. If you're running your app in a containerized environment, you can set the `instanceId` to the container id.
```ts {{ title: "Any platform" }}
// Set the instance ID to any environment variable that is unique to the worker
await connect({
apps: [...],
instanceId: process.env.MY_CONTAINER_ID,
})
```
```ts {{ title: "Kubernetes + Docker" }}
// instanceId defaults to the HOSTNAME environment variable.
// By default, Kubernetes and Docker set the HOSTNAME environment variable to the pod name
// so it is automatically set for you.
await connect({
apps: [...],
// This is what happens under the hood if you don't set instanceId
// instanceId: process.env.HOSTNAME,
})
```
```ts {{ title: "Render" }}
// Render includes the RENDER_INSTANCE_ID env var at runtime.
// https://render.com/docs/environment-variables
await connect({
apps: [...],
instanceId: process.env.RENDER_INSTANCE_ID,
})
```
```ts {{ title: "Fly.io" }}
// Fly includes the FLY_MACHINE_ID env var at runtime.
// https://fly.io/docs/machines/runtime-environment/
await connect({
apps: [...],
instanceId: process.env.FLY_MACHINE_ID,
})
```
The `maxConcurrency` option is used to limit the number of concurrent steps that can be executed by the worker instance. This allows Inngest to distribute load across multiple workers and not overload a single worker.
The `maxConcurrency` option is not yet supported. It will be supported in a future release before general availability.
```ts
await connect({
apps: [...],
maxConcurrency: 100,
})
```
## Lifecycle
As a connect worker is a long-running process, it's important to understand the lifecycle of the worker and how it relates to the deployment of a new version of your app. Here is an overview of the lifecycle of a connect worker and where you can hook into it to handle graceful shutdowns and other lifecycle events.
`CONNECTING` - The worker is establishing a connection to Inngest. This starts when `connect()` is called.
First, the worker sends a request to the Inngest API via HTTP to get connection information. The response includes the WebSocket gateway URL. The worker then connects to the WebSocket gateway.
`ACTIVE` - The worker is connected to Inngest and ready to execute functions.
* The new `appVersion` is synced including the latest function configurations.
* The worker begins sending and receiving "heartbeat" messages to Inngest to ensure the connection is still active.
* The worker will automatically reconnect if the connection is lost.
```ts {{ title: "TypeScript" }}
// The connect promise will resolve when the connection is ACTIVE
await connect({
apps: [...],
})
console.log(`The worker connection is: ${connection.state}`)
// The worker connection is: ACTIVE
```
`RECONNECTING` - The worker is reconnecting to Inngest after a connection was lost.
The worker will automatically flush any in-flight steps via the HTTP API when the WebSocket connection is lost.
By default, the worker will attempt to reconnect to Inngest an infinite number of times. See the [developer preview limitations](#limitations) for more details.
`CLOSING` - The worker is beginning the shutdown process.
* New steps will not be accepted after this state is entered.
* Existing steps will be allowed to complete. The worker will flush any in-flight steps via the HTTP API after the WebSocket connection is closed.
By default, the SDK listens for `SIGTERM` and `SIGINT` signals and begins the shutdown process. You can customize this behavior by in each SDK:
```ts
// You can explicitly configure which signals the SDK should
// listen for by an array of signals to `handleShutdownSignals`:
await connect({
apps: [...],
// ex. Only listen for SIGTERM, or pass an empty array to listen to no signals
handleShutdownSignals: ['SIGTERM'],
})
```
```go
// The Go SDK must receive a Context object that will be notified
// when the correct signals are received. Use signal.NotifyContext:
ctx, cancel := signal.NotifyContext(context.Background(), syscall.SIGINT, syscall.SIGTERM)
defer cancel()
// Later in your function - pass the context to the connect function:
ws, err := inngestgo.Connect(ctx, inngestgo.ConnectOpts{
InstanceID: inngestgo.Ptr("example-worker"),
Apps: []inngestgo.Client{client},
})
```
You can manually close the connection with the `close` method on the connection object:
```ts
await connection.close()
// Connection is now closed
```
`CLOSED` - The worker's WebSocket connection has closed.
By this stage, all in-flight steps will be flushed via the HTTP API as the WebSocket connection is closed, ensuring that no in-progress steps are lost.
```ts {{ title: "TypeScript" }}
// The `closed` promise will resolve when the connection is "CLOSED"
await connection.closed
// Connection is now closed
```
**WebSocket connection and HTTP fallback** - While a WebSocket connection is open, the worker will receive and send all step results via the WebSocket connection. When the connection closes, the worker will fallback to the HTTP API to send any remaining step results.
## Worker observability
In the Inngest Cloud dashboard, you can view the connection status of each of your workers. At a glance, you can see each worker's instance id, connection status, connected at timestamp, last heartbeat, the app version, and app version.
This view is helpful for debugging connection issues or verifying rolling deploys of new app versions.
## Syncing and Rollbacks
[//]: <> (TODO: Create diagram to explain syncing)
Inngest keeps track of the version your workers are running on. This internal representation changes when you update your function configuration, provide a new app version identifier to the client configuration, or change the SDK version or language.
When you deploy a new version of your application, the first worker to connect to Inngest will automatically sync your app. This will update function configurations to the desired state configured in your code.
`connect` supports rolling releases: During a deployment of your app, Inngest will run functions on all connected workers, regardless of the version, as long as they are able to process a request for a given function. This prevents traffic from concentrating on a single instance during rollouts and causing a thundering herd issue.
Once all old workers have terminated after a deployment, you can roll back to an old version by bringing back an old worker. Similar to the deployment process, this will update the function configuration to the previous state and gradually allow you to shift traffic to the old version by bringing up more old workers while terminating workers running the newer version.
## Health checks
If you are running your app in a containerized environment, we recommend using a health check to ensure that your app is running and ready to accept connections. This is key for graceful rollouts of new app versions. If you are using Kubernetes, we recommend using the `readinessProbe` to check that the app is ready to accept connections.
The simplest way to implement a health check is to create an http endpoint that listens for health check requests. As connect is an outbound WebSocket connection, you'll need to create a small http server that listens for health check requests and returns a 200 status code when the connection to Inngest is active.
Here is an example of using `connect` with a basic Node.js http server to listen for health check requests and return a 200 status code when the connection to Inngest is active.
```ts {{ title: "Node.js" }}
(async () => {
await connect({
apps: [{ client: inngest, functions }]
});
console.log('Worker: connected', connection);
// This is a basic web server that only listens for the /ready endpoint
// and returns a 200 status code when the connection to Inngest is active.
createServer((req, res) => {
if (req.url === '/ready') {
if (connection.state === ConnectionState.ACTIVE) {
res.writeHead(200, { 'Content-Type': 'text/plain' });
res.end('OK');
} else {
res.writeHead(500, { 'Content-Type': 'text/plain' });
res.end('NOT OK');
}
return;
}
res.writeHead(404, { 'Content-Type': 'text/plain' });
res.end('NOT FOUND');
});
// Start the server on a port of your choice
httpServer.listen(8080, () => {
console.log('Worker: HTTP server listening on port 8080');
});
// When the Inngest connection has gracefully closed,
// this will resolve and the app will exit.
await connection.closed;
console.log('Worker: Shut down');
// Stop the HTTP server
httpServer.close();
})();
```
```ts {{ title: "Bun (JavaScript)" }}
await connect({
apps: [{ client: inngest, functions: [helloWorld] }],
});
console.log('Worker: connected', connection);
// Start a basic web server that only listens for the /ready endpoint
// and returns a 200 status code when the connection to Inngest is active.
Bun.serve({
port: 8080,
routes: {
'/ready': async () => {
return connection.state === ConnectionState.ACTIVE
? new Response('OK')
: new Response('Not Ready', { status: 500 });
},
},
fetch(req) {
return new Response('Not Found', { status: 404 });
},
});
console.log('Worker: HTTP server listening on port 8080');
// When the Inngest connection has gracefully closed,
// this will resolve and the app will exit.
await connection.closed;
console.log('Worker: Shut down');
// Stop the HTTP server
await server.stop();
```
### Kubernetes readiness probe
If you are running your app in Kubernetes, you can use the `readinessProbe` to check that the app is ready to accept connections. For the above example running on port 8080, the readiness probe would look like this:
```yaml
readinessProbe:
httpGet:
path: /ready
initialDelaySeconds: 3
periodSeconds: 10
successThreshold: 3
failureThreshold: 3
```
## Self hosted Inngest
Self-hosting support for `connect` is in development. Please [contact us](https://app.inngest.com/support) for more info.
If you are [self-hosting](/docs/self-hosting?ref=docs-connect) Inngest, you need to ensure that the Inngest WebSocket gateway is accessible within your network. The Inngest WebSocket gateway is available at port `8289`.
Depending on your network configuration, you may need to dynamically re-write the gateway URL that the SDK uses to connect.
```ts
await connect({
apps: [...],
rewriteGatewayEndpoint: (url) => { // ex. "wss://gw2.connect.inngest.com/v0/connect"
// If not running in dev mode, return
if (!process.env.INNGEST_DEV) {
new URL(url);
clusterUrl.host = 'my-cluster-host:8289';
return clusterUrl.toString();
}
return url;
},
})
```
{/* TODO: multiple apps in a single worker */}
## Migrating from serve
We are working on enabling more fine-grained function and app migrations from existing `serve` apps to `connect`.
During the Inngest developer preview, we recommend setting up a new app for trying out `connect`. We will support gradually migrating your existing `serve` apps in a future release.
## Developer preview
The `connect` API is currently in developer preview. This means that the API is not yet recommended for critical production workloads and is subject to breaking changes.
During the developer preview, the `connect` API is available to all Inngest accounts with the following plan-limits:
* Free plan: 2 concurrent worker connections
* All paid plans: 10 concurrent worker connections
* Max apps per connection: 10
Final plan limitations will be announced prior to general availability. Please [contact us](https://app.inngest.com/support) if you need to increase these limits.
Read the [release phases](/docs/release-phases) for more details.
### Limitations
During the developer preview, there are some limitations to using `connect` to be aware of. Please [contact us](https://app.inngest.com/support) if you'd like clarity on any of the following:
* **Worker-level maximum concurrency** - This is not yet supported. When completed, each worker can configure the maximum number of concurrent steps it can handle. This allows Inngest to distribute load across multiple workers and not overload a single worker.
* **Reconnection policy is not configurable** - The SDK will attempt to reconnect to Inngest an infinite number of times. We will expose a configurable reconnection policy in the future.
# Streaming
Source: https://www.inngest.com/docs/streaming
In select environments, the SDK allows streaming responses back to Inngest, hugely increasing maximum timeouts on many serverless platforms up to 15 minutes.
While we add wider support for streaming to other platforms, we currently support the following:
- [Cloudflare Workers](/docs/learn/serving-inngest-functions#framework-cloudflare-workers)
- [Express](/docs/learn/serving-inngest-functions#framework-express)
- [Next.js on Vercel Edge Functions](/docs/learn/serving-inngest-functions#framework-next-js)
- [Remix on Vercel Edge Functions](/docs/learn/serving-inngest-functions#framework-remix)
## Enabling streaming
Select your platform above and follow the relevant "Streaming" section to enable streaming for your application.
Every Inngest serve handler provides a `streaming` option, for example:
```ts
serve({
client: inngest,
functions: [...fns],
streaming: "allow",
});
```
This can be one of the following values:
- `false` - Streaming will never be used. This is the default.
- `"allow"` - Streaming will be used if we can confidently detect support for it by verifying that the platform, environment, and serve handler support streaming.
⚠️ We also allow `"force"`, where streaming will be used if the serve handler supports it, but completely overrides the SDK's attempts to verify if the platform supports streaming.
This is not recommended, but is an escape hatch if you know that streaming is supported and you're in a restricted environment that has little or no access to the environment.
# TypeScript
Source: https://www.inngest.com/docs/typescript
description =
`Learn the Inngest SDK's type safe features with TypeScript`
The Inngest SDK leverages the full power of TypeScript, providing you with some awesome benefits when handling events:
- 📑 **Autocomplete**
Tab ↹ your way to victory with inferred types for every event.
- **Instant feedback**
Understand exactly where your code might error before you even save the file.
All of this comes together to provide some awesome type inference based on your actual production data.
## Using types
Once your types are generated, there are a few ways we can use them to ensure our functions are protected.
### `new Inngest()` client
We can use these when creating a new Inngest client via `new Inngest()`.
This comes with powerful inference; we autocomplete your event names when selecting what to react to, without you having to dig for the name and data.
```ts {{ title: "v3" }}
type UserSignup = {
data: {
email: string;
name: string;
};
};
type Events = {
"user/new.signup": UserSignup;
};
inngest = new Inngest({
id: "my-app",
schemas: new EventSchemas().fromRecord(),
});
```
```ts {{ title: "v2" }}
type UserSignup = {
data: {
email: string;
name: string;
};
};
type Events = {
"user/new.signup": UserSignup;
};
inngest = new Inngest({
name: "My App",
schemas: new EventSchemas().fromRecord(),
});
```
```ts {{ filename: "inngest/sendWelcomeEmail.ts" }}
export default inngest.createFunction(
{ id: "send-welcome-email" },
{ event: "user/new.signup" },
async ({ event }) => {
// "event" is fully typed to provide typesafety within this function
return await email.send("welcome", event.data.email);
}
);
```
### Sending events
TypeScript will also enforce your custom events being the right shape - see [Event Format](/docs/reference/events/send) for more details.
We recommend putting your `new Inngest()` client and types in a single file, i.e. `/inngest/client.ts` so you can use it anywhere that you send an event.
Here's an example of sending an event within a Next.js API handler:
```ts {{ filename: "pages/api/signup.ts" }}
export default function handler(req: NextApiRequest, res: NextApiResponse) {
createNewUser(req.body.email, req.body.password, req.body.name);
// TypeScript will now warn you if types do not match for the event payload
// and the user object's properties:
await inngest.send({
name: "user/new.signup",
data: {
email: user.email,
name: user.name,
}
});
res.status(200).json({ success: true });
}
```
### Using with `waitForEvent`
When writing step functions, you can use `waitForEvent` to pause the current function until another event is received or the timeout expires - whichever happens first. When you declare your types using the `Inngest` constructor, `waitForEvent` leverages any types that you have:
```ts {{ title: "v3" }}
type UserSignup = {
data: {
email: string;
user_id: string;
name: string;
};
};
type UserAccountSetupCompleted = {
data: {
user_id: string;
};
};
type Events = {
"user/new.signup": UserSignup;
"user/account.setup.completed": UserAccountSetupCompleted;
};
inngest = new Inngest({
id: "my-app",
schemas: new EventSchemas().fromRecord(),
});
```
```ts {{ title: "v2" }}
type UserSignup = {
data: {
email: string;
user_id: string;
name: string;
};
};
type UserAccountSetupCompleted = {
data: {
user_id: string;
};
};
type Events = {
"user/new.signup": UserSignup;
"user/account.setup.completed": UserAccountSetupCompleted;
};
inngest = new Inngest({
name: "My App",
schemas: new EventSchemas().fromRecord(),
});
```
```ts {{ title: "v3" }}
export default inngest.createFunction(
{ id: "onboarding-drip-campaign" },
{ event: "user/new.signup" },
async ({ event, step }) => {
await step.run("send-welcome-email", async () => {
// "event" will be fully typed provide typesafety within this function
return await email.send("welcome", event.data.email);
});
// We wait up to 2 days for the user to set up their account
await step.waitForEvent(
"wait-for-setup-complete",
{
event: "user/account.setup.completed",
timeout: "2d",
// ⬇️ This matches both events using the same property
// Since both events types are registered above, this is match is typesafe
match: "data.user_id",
}
);
if (!accountSetupCompleted) {
await step.run("send-setup-account-guide", async () => {
return await email.send("account_setup_guide", event.data.email);
});
}
}
);
```
```ts {{ title: "v2" }}
export default inngest.createFunction(
{ id: "Onboarding drip campaign" },
{ event: "user/new.signup" },
async ({ event, step }) => {
await step.run("Send welcome email", async () => {
// "event" will be fully typed provide typesafety within this function
return await email.send("welcome", event.data.email);
});
// We wait up to 2 days for the user to set up their account
await step.waitForEvent(
"user/account.setup.completed",
{
timeout: "2d",
// ⬇️ This matches both events using the same property
// Since both events types are registered above, this is match is typesafe
match: "data.user_id",
}
);
if (!accountSetupCompleted) {
await step.run("Send setup account guide", async () => {
return await email.send("account_setup_guide", event.data.email);
});
}
}
);
```
## Helpers
The TS SDK exports some helper types to allow you to access the type of particular Inngest internals outside of an Inngest function.
### GetEvents
Get a record of all available events given an Inngest client.
It's recommended to use this instead of directly reusing your own event types, as Inngest will add extra properties and internal events such as `ts` and `inngest/function.failed`.
```ts
type Events = GetEvents;
```
By default, the returned events do not include internal events prefixed with
`inngest/`, such as `inngest/function.finished`.
To include these events in
, pass a second `true` generic:
```ts
type Events = GetEvents;
```
### GetFunctionInput
Get the argument passed to Inngest functions given an Inngest client and, optionally, an event trigger.
Useful for building function factories or other such abstractions.
```ts
type InputArg = GetFunctionInput;
type InputArgWithTrigger = GetFunctionInput;
```
### GetStepTools
Get the `step` object passed to an Inngest function given an Inngest client and, optionally, an event trigger.
Is a small shim over the top of `GetFunctionInput<...>["step"]`.
```ts
type StepTools = GetStepTools;
type StepToolsWithTrigger = GetStepTools;
```
### Inngest.Any / InngestFunction.Any
Some exported classes have an `Any` type within their namespace that represents any instance of that class without inference or generics.
This is useful for typing lists of functions or factories that create Inngest primitives.
```ts
[];
```
# Usage Limits
Source: https://www.inngest.com/docs/usage-limits/inngest
We have put some limits on the service to make sure we provide you a good default to start with, while also keeping it a good experience for all other users using Inngest.
Some of these limits are customizable, so if you need more than what the current limits provide, please [contact us][contact] and we can update the limits for you.
## Functions
The following applies to `step` usage.
### Sleep duration
Sleep (with `step.sleep()` and `step.sleepUntil()`) up to a year, and for free plan up to seven days. Check the [pricing page](/pricing) for more information.
### Timeout
Each step has a timeout depending on the hosting provider of your choice ([see more info][provider-docs]), but Inngest supports up to `2 hours` at the maximum.
### Concurrency Upgradable
Check your concurrency limits on the [billing page](https://app.inngest.com/billing). See the [pricing page](https://www.inngest.com/pricing) for more info about the concurrency limits in all plans.
### Payload Size
The limit for data returned by a step is `4MB`.
### Function run state size
Function run state cannot exceed `32MB`. Its state includes:
- Event data (multiple events if using batching)
- Step-returned data
- Function-returned data
- Internal metadata (_small - around a few bytes_)
### Number of Steps per Function
The maximum number of steps allowed per function is `1000`.
⚠️
This limit is easily reached if you're using `step` on each item in a loop.
Instead we recommend one or both of the following:
- Process the loop within a `step` and return that data
- Utilize the [fan out][fanout-guide] feature to process each item in a separate function
## Events
### Name length
The maximum length allowed for an event name is `256` characters.
### Request Body Size Upgradable
The maxmimum event payload size is dependent on your billing plan. The default on the Free Tier is `256KB` and is upgradable to `3MB`. See [the pricing page](/pricing?ref=docs-usage-limits) for additional detail.
### Number of events per request Customizable
Maximum number of events you can send in one request is `5000`.
If you're doing fan out, you'll need to be aware of this limitation when you run `step.sendEvent(events)`.
```ts {{ title: "TypeScript" }}
// this `events` list will need to be <= 5000
[{name: "", data: {}}, ...];
await step.sendEvent("send-example-events", events);
// or
await inngest.send(events);
```
```go {{ title: "Go" }}
// this `events` list will need to be <= 5000
events := []inngestgo.Event{{Name: "", Data: {}}}
ids, err := inngestgo.SendMany(ctx, events)
```
```python {{ title: "Python" }}
# this `events` list will need to be <= 5000
events = [{'name': '', 'data': {}}, ...]
await step.send_event('send-example-events', events)
# or
await inngest.send(events)
```
### Batch size
The hard limit of a batch size is 10 MiB regardless of the `timeout` or `maxSize` limit.
Meaning the batch will be started if that limit is crossed even if the batch is not full or has not reached the timeout duration configured.
[provider-docs]: /docs/usage-limits/providers
[fanout-guide]: /docs/guides/fan-out-jobs
[contact]: /contact
# Providers' Usage Limits
Source: https://www.inngest.com/docs/usage-limits/providers
As your functions' code runs on the hosting provider of your choice, you will be subject to provider or billing plan
limits separate from [Inngest's own limits](/docs/usage-limits/inngest).
Here are the known usage limits for each provider we support based on their documentation.
| | Payload size | Concurrency | Timeout |
|-----------------------------------------|:--------------|---------------------|----------------------------|
| [AWS Lambda][aws-quota] | 6MB - 20MB | 1000 | 15m |
| [Google Cloud Functions][gcp-quota] | 512KB - 32MB | 3000 (1st gen only) | 10m - 60m |
| [Cloudflare Workers][cf-workers-limits] | 100MB - 500MB | 100 - 500 | [N/A][cf-workers-duration] |
| [Vercel][vercel-limits] | 4MB - 4.5MB | 1000 | 10s - 900s, N/A (Edge Fn) |
| [Netlify][netlify-limits] | 256KB - 6MB | Undocumented | 10s - 15m |
| [DigitalOcean][digitalocean-limits] | 1MB | 120 | 15m |
| Fly.io | Undocumented | [User configured][flyio-limits] | Undocumented |
For more details tailored to your plan, please check each provider's website.
[aws-quota]: https://docs.aws.amazon.com/lambda/latest/dg/gettingstarted-limits.html
[gcp-quota]: https://cloud.google.com/functions/quotas
[cf-workers-limits]: https://developers.cloudflare.com/workers/platform/limits/
[cf-workers-duration]: https://developers.cloudflare.com/workers/platform/limits/#worker-limits
[vercel-limits]: https://vercel.com/docs/concepts/limits/overview
[netlify-limits]: https://docs.netlify.com/functions/overview/#default-deployment-options
[digitalocean-limits]: https://docs.digitalocean.com/products/functions/details/limits/
[flyio-limits]: https://fly.io/docs/reference/configuration/#http_service-concurrency